You can use command aliases and shortcut keys to start a command without moving the mouse cursor between the drawing area and the AutoCAD user interface (UI). Command aliases and shortcut keys can be easier to remember than the full command name. Creating your own command aliases and shortcut keys can also help you be more efficient.
- Command alias. A shortened name for a command entered at the Command prompt. For example, CP is an alias for COPY, and Z is an alias for ZOOM. You define aliases in a product-specific .pgp file, such as acad.pgp or acadlt.pgp.
- Shortcut key. A key combination that starts a command. For example, Ctrl+S saves a file and Ctrl+1 opens the Properties palette. The function keys (F1, F2, and so on) are also shortcut keys. Shortcut keys are defined in a customization (CUIx) file.
Use Command Aliases and Shortcut Keys
There are some command aliases that are predefined in the product. You may have been using them without even knowing it. Let's try a few.
- Open any drawing with some objects in it.
- At the Command prompt, enter
C.
The CIRCLE command starts.
- At the Command prompt, enter
E.
The ERASE command starts.
- At the Command prompt, enter
LA.
The LAYER command starts, opening the Layer Properties Manager palette.
There are also predefined shortcut keys that you can try.
- At the Command prompt, press
Ctrl+G.
The grid toggles on and off each time you press this shortcut key.
- At the Command prompt, press
Ctrl+8.
The Quick Calc palette turns on and off each time you press this shortcut key.
- At the Command prompt, press
Ctrl+0.
Clean Screen turns on and off each time you press this shortcut key. Clean Screen does not hide the Quick Access toolbar, the command window, or the status bar.
Customize Command Aliases
You can redefine or add command aliases by editing the acad.pgp file, or for AutoCAD LT, the acadlt.pgp file. In this example, you'll override an existing alias with your own and add a new one.
- Click
.
Find
A little about the format of the PGP file:
<Alias>,*<Full command name
A, *ARC
This line in the file defines A as the command alias for the ARC command.
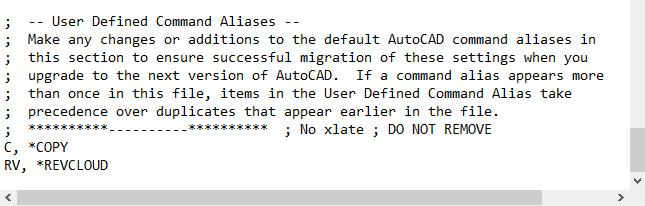
Note: A semicolon (;) at the beginning of a line indicates a comment.Always add your alias definitions to the User Defined Command Aliases section at the end of the file even if you are redefining an existing command alias. The last definition in the PGP file is the one the product loads.
- Scroll down to the end of the file looking for the section labeled User Defined Command Aliases.
- Enter C, *COPY.
- Enter
RV, *REVCLOUD.
It should look like the following once you finish.
- Save the file.
- At the Command prompt, enter
REINIT.
This command loads the latest changes into your current AutoCAD session.
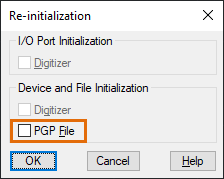
- Select PGP file on the Re-initialization dialog box.
- Click OK.
- Try your new command aliases.
Alias Editor (AutoCAD Only)
An Alias Editor is available in AutoCAD as an Express Tool. This editor provides a user interface to edit command aliases.
To open the Alias Editor, do one of the following:
- Click . Find
- At the Command prompt, enter ALIASEDIT.
The AutoCAD Alias Editor dialog box opens, where you can add, edit, or remove command aliases.
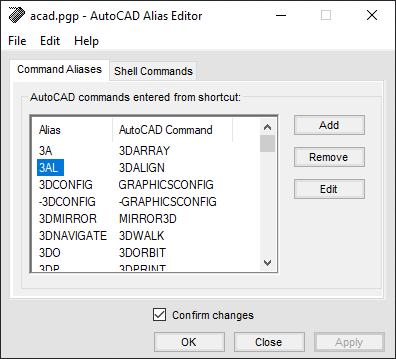
- New and edited command aliases are added at the end of the PGP file in the User Defined Command Aliases section.
- Removed command aliases are commented out by adding a semicolon in front.
- The REINIT command runs after clicking OK, applying any changes to the current AutoCAD session.
AutoLISP Commands Like Aliases
Command aliases can only be used to start an AutoCAD command. They can't pass any command options or values. A simple AutoLISP program is perfect for when you want to pass an option or a value to a command. In this example, you'll define three commands with abbreviated names using AutoLISP.
There are three basic steps to using AutoLISP programming: create, load, and test.
Create
- Open Notepad outside AutoCAD.
Note: Make sure you use a text editor such as Notepad and not a word processor such as Word.
- To define an alias for Zoom Previous, enter the following:
(defun c:ZP ()(command "._zoom" "_p"))
- To define an alias for Zoom Extents, on the next line of the file enter the following:
(defun c:ZE ()(command "._zoom" "_e"))
- On the next line, enter the following:
(defun c:C2 ()(command "._-layer" "_m"
"Obj" "" "._circle" "_2p"))
This defines an alias that creates a layer named Obj, makes the new layer current, and starts the CIRCLE command using the two points option.Note: You can enter multiple command definitions in one LSP file. For more information about using AutoLISP, see Tutorial: Getting Started (AutoLISP). - Save the file as myaliases.lsp.
Load
AutoLISP files must load before they can be used. You can load a file manually for the current AutoCAD session and you can set up your LSP files to automatically load every time AutoCAD starts.
- Click
.
Find
You can also enter APPLOAD at the Command prompt.
- In the Load/Unload Applications dialog box, browse to the folder in which you stored the LSP file.
- Select the myaliases.lsp file.
- Click Load.
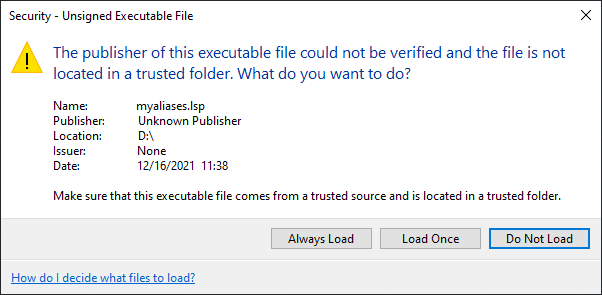
- If the File Loading - Security Concern dialog box is displayed, click Load again.
- Click Close to return to the application window.
You should see a message in the Command History window indicating the file loaded.
Note: If you see an error, check that your text matches what is shown, especially the quote marks and parentheses.
To load your LSP file automatically each time AutoCAD opens, follow these steps.
- Click
.
Find
You can also enter APPLOAD at the Command prompt.
- Click Contents in the Startup Suite section.
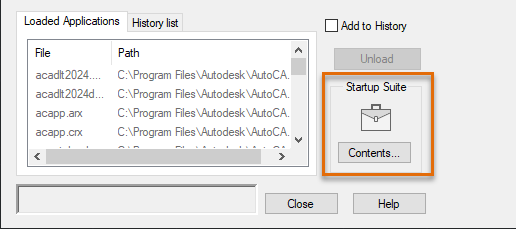
- Click Add on the Startup Suite dialog box.
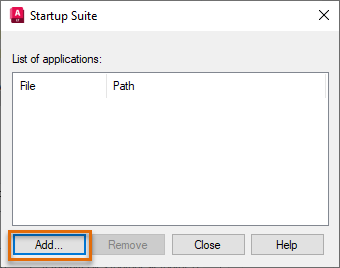
- Browse to and select the
myaliases.lsp file you created. Click Open.
The file is added to the Startup Suite.

- Click Close on each dialog.
Next time you restart AutoCAD or open a drawing, the LSP file loads automatically and your commands defined in the LSP file are available to use.
Test
- Zoom in to an area of your open drawing.
- At the Command prompt, enter
ZP.
The ZOOM command with the Previous option starts.
- At the Command prompt, enter
ZE.
The Zoom command with the Extents option runs.
- At the Command prompt, enter
C2.
The Obj layer is created, made current, and the CIRCLE command with the 2P option starts.
Customize Shortcut Keys
Shortcut keys are defined in a customization (CUIx) file. In this example, you'll define a shortcut key to run the REVCLOUD command with the Rectangular option.
- At the Command prompt, enter CUI.
- Expand the Keyboard Shortcuts node and the Shortcut Keys node under that.
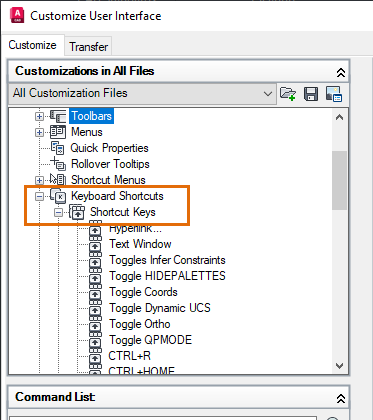
- Select Shortcut Keys.
This displays a complete list of defined shortcut keys on the right side of the editor.
 Note: A list of common command aliases and shortcut keys can also be found at https://www.autodesk.com/shortcuts/autocad.
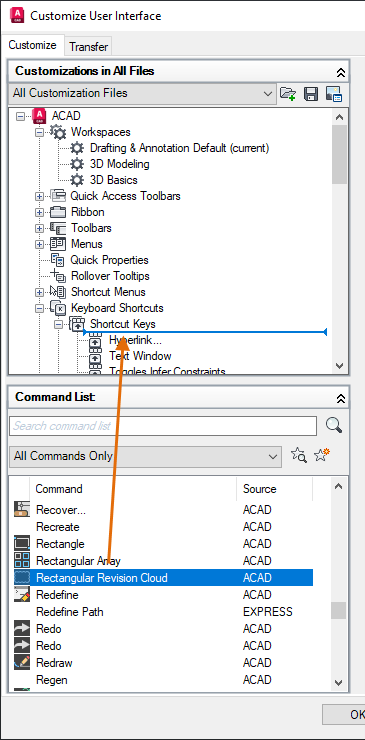
To define a new shortcut key, we'll drag a command from the Command List to the Shortcut Keys node and then assign a key combination to it.
- In the Command List pane, scroll down to Rectangular Revision Cloud.
- Drag it to the Shortcut Keys node.
 Tip: While dragging, going outside of the dialog box and then back in to the area you want to place the command eliminates the automatic scrolling. This makes it easier to place the command exactly where you want it.
 - Select the Rectangular Revision Cloud you just added to Shortcut Keys.
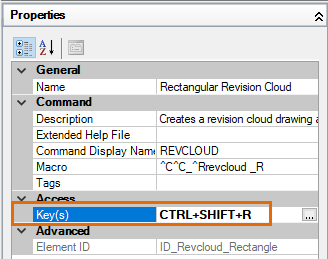
The Properties section is prefilled except for the shortcut keys. We'll assign Ctrl+Shift+R.
- In the Properties section, Keys field, do one of the following:
- Type Ctrl+SHIFT+R.
- Click ... and press Ctrl+Shift+R on the Shortcut Keys dialog box, and then click OK.
The result should appear like the following image.
- Click OK to exit the Customize User Interface (CUI) editor.
- At the Command prompt, press Ctrl+Shift+R.
The REVCLOUD command runs with the rectangular option.
Restore the CUIx File
If you aren't happy with the changes you made, you can restore the CUIx file to either its previous saved state or to the program defaults.
- Enter CUI at the Command prompt.
- Right-click on the ACAD node in the Customizations in All Files pane (ACADLT node for AutoCAD LT).
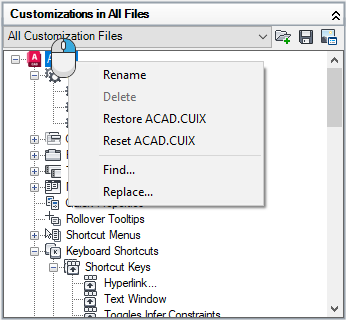
- Select one of the following:
- Restore ACAD.CUIX (ACADLT.CUIX for AutoCAD LT) - restores the CUIx to its previous saved state.
- Reset ACAD.CUIX (ACADLT.CUIX for AutoCAD LT) - resets the CUIx to its original installed state.
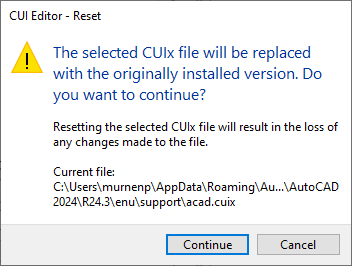
- Click Continue on the alert.
- Click OK to exit the Customize User Interface (CUI) editor.
AutoCorrect
If you frequently misspell certain commands you might want to try AutoCorrect. With the AutoCorrect feature enabled, the command line suggestion list provides suggestions based on misspellings you have made in the past. You can also manually add commands and system variables to the AutoCorrect list that you commonly misspell.
- At the Command prompt, enter
INPUTSEARCHOPTIONS.
The dialog box contains a section for AutoCorrect settings.
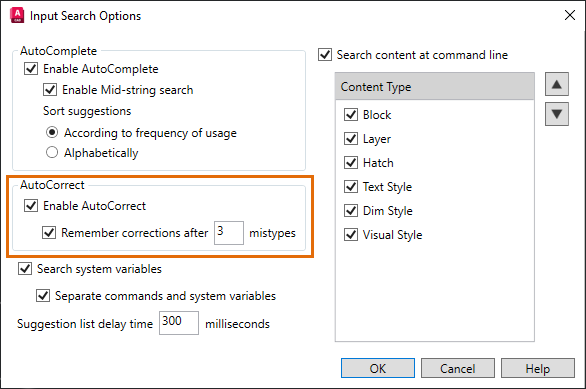
- Select Enable AutoCorrect if it isn't already selected.
- Set AutoCorrect to Remember Corrections After
1 Mistypes.
This is so we can associate a misspelled word with a command in one try in this exercise.
- Click OK.
- At the Command prompt, enter
WPIOUT.
You'll see Unknown Command in the command window.
- At the Command prompt, type WPIOUT but don't press Enter.
- From the list of possible commands, select WIPEOUT.
This associates the misspelled WPIOUT to the actual command, WIPEOUT.
- Press ESC to clear the Command prompt.
- At the Command prompt, type
WPIOUT.

The misspelled command is now recognized as the WIPEOUT command.
Let's set the options back to the defaults.
- At the Command prompt, enter INPUTSEARCHOPTIONS.
- Change Remember Corrections After back to 3 Mistypes.
- Click OK.
You can also manually enter commands in the AutoCorrect file.
- Click
.
Find
Notepad opens the AutoCorrectUserDB.pgp file. The format of this file is INCORRECT, *CORRECT.
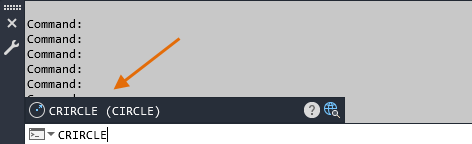
- Enter CRIRCLE, *CIRCLE on the first empty line.
- Click and close NotePad.
- At the Command prompt, enter REINIT.
- Select PGP file and click OK.
- At the Command prompt, start typing
CRIRCLE.
You can see that it is now corrected and will start the CIRCLE command.
Summary
Customizing these command line features can take your efficiency to the next level. Defining your own command aliases and shortcut keys can save you time over the long run.
Related Commands and System Variables
Here are some frequently used commands and system variables related to command aliases, shortcut keys, and AutoCorrect.
| Command | Description |
|---|---|
| ALIASEDIT | Creates, modifies, and deletes AutoCAD command aliases. |
| APPLOAD | Loads and unloads applications and defines which applications to load at startup. |
| CUI | Manages the customized user interface elements in the product. |
| REINIT | Reinitializes the digitizer, digitizer input/output port, and program parameters file. |
| System Variable | Description | Default Value | Saved in |
|---|---|---|---|
| RE-INIT | Reinitializes the digitizer, digitizer port, and acad.pgp file. (Bitcode) | 0 | Not saved |