Note: Vault requires a 64-bit system. Vault Basic is shown here.
Getting Started
- Start AutoCAD Electrical toolset.
- Click

 .
Find
- In a single user environment, if you did not set a working folder yet, start Autodesk Vault Explorer and set a working folder on your local computer and then switch back to AutoCAD Electrical toolset.
In a multiple-user design environment, set the working folder on a shared network resource for the entire project team. This allows simultaneous access for all users on the same dataset and maintains the data consistency.
Add a Project to Vault
- Start AutoCAD Electrical toolset.
- Click

 .
Find
- In Project Manager, open a project you want to add to the vault.
- Right-click the project name and select Vault
 Check In.
- Follow the prompts.
Open a Project from Vault
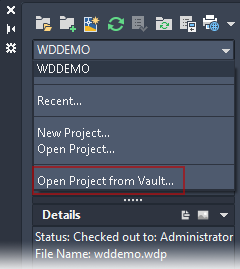
- In the Project Manager, select Open Project from Vault from the project selection menu.

- Navigate to the project definition file, and select it. To maintain the relationship between the drawing files in the project, check out all files in the project.
- Click Open (Check Out All).
Check Out a Project
- In Project Manager, right-click the project name and select Vault
 Check Out All.
Check In a Project
- In Project Manager, right-click the project name and select Vault
 Check In All.
Refresh
Refresh retrieves a read-only copy of the most recent design data that is checked in.
- To refresh the project, in Project Manager right-click the project name and select:
- Vault
 Refresh File to get the most recent version of the project file.
- Vault
 Refresh All Files to get the most recent version of the selected project file and all of the related files.
- Vault
- To refresh an individual drawing, in Project Manager right-click and select Refresh File.
Get Specific Version
You can retrieve a past version of a file or a project which places a read-only copy in your working folder. Historical versions can never be modified. You can only create a new version of a file.
- Click

 .
Find
- Enter the user name and password.
- Navigate to the file.
- Click Check Out.

The Get/Check Out dialog box displays.
- Click Expand
 if the dialog box is collapsed.
- Select the version from the Version drop-down list.
- Click OK.
Create a Project Version
- Check out the project .wdp file.
- Check in the project .wdp file.
Even if the .wdp is not modified, if any drawings have newer versions, a newer version of the .wdp is created, associating all newer drawing versions.
Tip: Use Vault Explorer to examine the relationship between versions of the project file and corresponding drawings.