One of the most attractive AutoCAD features is the amount of control available to you over the user interface (UI). This flexibility has been a major factor in the popularity of AutoCAD, which recognizes the diversity of disciplines, workflows, requirements, and preferences within our customer community.
For example, here's how someone might decide to customize the AutoCAD UI for 2D drafting to maximize their usable drawing area.
You can maximize your working space and reduce the UI complexity by hiding or removing rarely used controls. Here are some options you can consider if you're working on 2D drawings.
If you've never done so before, try this experiment:
- Press Ctrl+0 (zero) to maximize the drawing area. This is mildly shocking the first time you do it, but it demonstrates why the operation is named "Clean screen."
- Press Ctrl+0 again to restore the previous state.
There are some other techniques to try without resorting to this quick, but extreme measure.
Control the Ribbon Display
The ribbon takes up a significant area in the application window. Instead of turning it off completely, you can cycle through several display modes.
- Click the up arrow repeatedly to cycle through several ribbon display modes.

- Then, click the down arrow just to the right and choose Minimize to Tabs.

- Click one of the ribbon tabs. Notice that the ribbon is temporarily restored until you start a command.
Note: To restore the full ribbon, click the up arrow again.
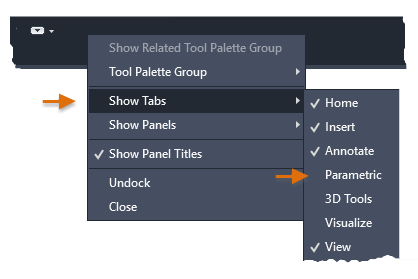
- Right-click any ribbon tab to choose which tabs you want to show or hide. In this case, clear Parametric to hide that tab.
 Note: If you want to hide certain panels in the current tab, you can choose the Show Panels option.
Control the Quick Access Toolbar
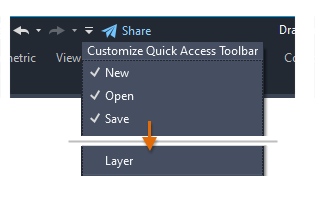
When the ribbon is minimized, access to the tools on the Layers panel is not as convenient. However, you can add the Layer drop-down list to the Quick Access toolbar instead.
- On the Quick Access toolbar, click the Customize down arrow and choose Layer.

Here's the result.

- Use the same method to add or remove other predefined commands from the Quick Access toolbar.
Control the Start Tab
Not everyone uses the Start tab, and you can turn it off if you prefer.

- To hide the Start tab, enter STARTMODE at the Command prompt and set its value to 0 (off).
Dock Commonly Used Palettes
Two of the most commonly used palettes are Properties and Layer Properties Manager. Docking these two palettes together with the Auto-hide option is a tradeoff between losing two slices of the drawing area in exchange for instant roll-over access.
- Display the Properties palette.
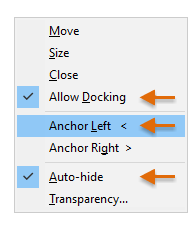
- On its title bar, click the Properties button as shown.

- Choose the options indicated:

Rolling over or off this palette provides fast, temporary access when needed.
- Repeat this process for the Layer Properties Manager palette, docking it to the right-side of the application window.
Notice that you can resize the width of a palette when it's displayed.
Hide the UCS Icon, the ViewCube, and the Navigation Bar
The user coordinate system is useful in some 2D drawings, and it's essential for 3D modeling. If you don't use the UCS frequently, you can easily hide it. The same is true for the ViewCube control and the Navigation bar.

- Click the View tab on the ribbon. Then click the UCS Icon, ViewCube, and Navigation Bar controls to toggle their visibility.

Hide the Viewport Controls
The viewport controls are used primarily for 3D modeling. If you're not using them, you can hide these controls to reduce the visual noise in 2D drawings.

- Enter VPCONTROL at the Command prompt and set it to Off.
Remove an Unneeded Layout Tab
Reducing the user interface to the minimum that you normally use also applies to layout tabs. The only reason that the second layout tab is displayed in the lower-left corner is to demonstrate that you can create more than one layout.
- If you're not using this additional layout, right-click the Layout2 tab and choose Delete.
Note: You can reduce the number of times that you need to delete unnecessary layouts by removing them from your drawing template files.
Control the Status Bar
The status bar includes common settings and controls. Turning off the controls you don't need is super easy.
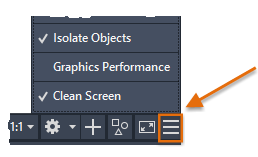
- Click the Customization icon on the right end of the status bar.

- Clear any items from the list that you rarely use.
Summary
Following these steps can provide a custom user interface that's clean, functional, and visually quiet. Naturally, you'll want to choose your own settings to suit your preferences and work style. Once set, your customized UI settings are stored in the Windows registry, or for drawing-specific settings, in individual drawing files (DWG) or drawing template files (DWT).
Hopefully, you'll be able to apply some of these ideas and suggestions to make your experience with AutoCAD satisfying and efficient.