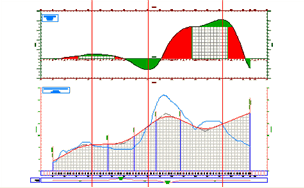
Using the Create Mass Haul Diagram wizard, you can create a mass haul diagram with a single click, accepting the default settings for name, style, display, and balancing options.
You must have a material list for the drawing before you can create a mass haul diagram. A mass haul diagram (top) can be mapped directly to a profile view (bottom) created from the same alignment.

- Create a material list.
-
Click

 Find.
Find.
The Create Mass Haul Diagram wizard is displayed.
- On the General page, do any of the following:
- Specify the alignment from which the mass haul diagram will be created.
- Specify the sample line group from which the mass haul diagram will be created.
- Specify a mass haul view style.
- To edit the mass haul view style, next to Mass Haul View Style, click
 .
.
- On the Mass Haul Display Option page, do any of the following:
- Select a material list.
- Select a material to display as mass haul line (Total Volume, Total Cut Volume, Total Fill Volume, Total Unusable Volume, and any other material associated with the material list).
- Specify a mass haul line style.
- To edit the mass haul line style, next to Mass Haul Line Style, click
 .
.
- On the Balancing Options page, specify a free haul distance, and the type, location, and capacity of borrow pits and dump sites.
- Click Create Diagram.
- In the drawing, find a suitable location for the mass haul diagram. For ease of viewing, place the diagram outside the surface boundary, and above or below any section or profile views. Click that location to set the origin of the balance line at the left side of the mass haul diagram.