- In Toolspace, on the Prospector tab, expand the surface Definition collection, right-click
 Breaklines, and click .
 - In the Add Breaklines dialog box, enter the breakline description in the Description field.
- From the Type list, select Wall.
- Optionally, if the object from which you are creating a breakline has curves, enter a value into the Mid-Ordinate Distance field or click
 to digitize a distance in the drawing area.
 The Add Breaklines dialog box is closed. A message prompts you to select a polyline.
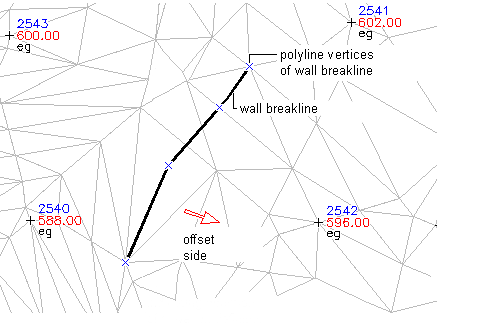
- In the drawing, select the object to define the breakline.

- Select the offset side for the wall breakline. This is the side for the new offset line that represents the elevation of material on the other side of the wall.
A message prompts you to specify the wall height with one value for all the points (Define By Object) or to specify values for individual points (Define By Vertex).
- Do one of the following:
- To define the wall breakline by object, specify All and enter the amount to add to elevation at each point.
- To define the wall breakline by object vertex, specify Individual at the prompt and enter the elevation or delta for each vertex.
The prompts provide two ways to define elevations for each offset point: as an elevation (Elevation) or as the elevation difference (Delta) between the control point and the offset point. Deltas may be either positive or negative values.
The breakline is created and added to the surface Breaklines collection in the Prospector tree.