You can move one or more section views into a specified section view group.
- The section views that you want to move and the destination section view group must share the same sample line group.
- Section views can be moved from the individual section views collection to a section view group, or from one section view group to another section view group.
Note: Section views cannot be moved into the individual section views collection.
When you move section views to a different section view group, the following occurs:
- The section views are inserted into the section view group in order of their stationing. They are inserted between existing section views in the group as needed so all the section views are in order.
- If the styles are different, the section views you are moving can keep their existing styles, or they can use the style of the destination section view group.
In the following example, an individual section SL-25 needs to be moved into the section view group. Its station is 1+75 so it will be inserted between the sections for station 1+50 and 2+00.
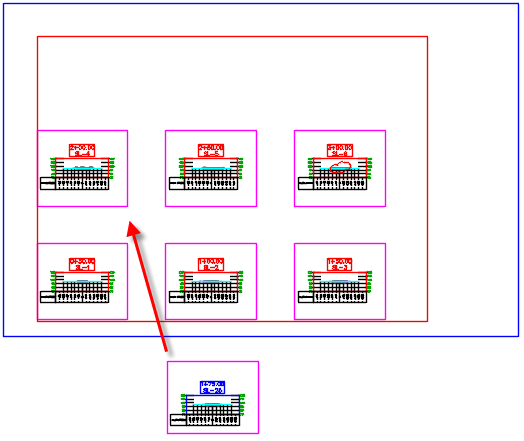
The following illustration shows the section view inserted into the section view group. You can choose to keep the existing stylization, as shown in this example, or you can choose to apply the stylization of the destination section view group to the moved sections. The section view for station 3+00 was moved to the next sheet.


|
 Watch video: Bind Drafting Elements to Section Views and Move Section Views to a Section View Group
Bind drafting elements to section views and move individual section views to a section view group. |
 00:02:54
 With Audio
-
In Prospector, select the section view group that contains the section views that you want to move to a different section view group.
Select Alignments
 Alignment types collection (for example, Centerline Alignments) <Alignment Name> Sample Line Groups <Sample Line Group Name> Section View Groups <Section View Groups Name>.
The section views are listed in the Prospector item view.
- In the Prospector item view, select the section views that you want to move.
- Right-click Move To Section View Group.
Note: This command is also available on the context menu after you select a section view in the drawing and on the Section View ribbon. To access the command on the ribbon, click Section View tab
Modify View panel
Move To Section View Group
Find.
- In the
Select a Section View Group dialog box, select the destination section view group and click OK.
Note: The sections that you want to move and the destination section view group must share the same sample line group. Only those section view groups that are created from the same sample line group are available for selection.
- If the styles of the section views are different than what is used in the destination section view group, a task dialog box is displayed. You can use the options in the task dialog box to change the style of the section views so they match the styles in the destination section view group, or you can preserve their existing styles.
Note: If you select the Always Use My Selection in the Future check box in the task dialog box, and you want to change the behavior in the future, you can edit the Hidden Messages Settings on the System tab of the AutoCAD Options dialog box.