Use the Import EDL menu to create, import, edit, auto-capture, assemble, and save EDLs.
EDL List
The EDL list is divided into 12 columns.
- Event #
- The event number, followed by a capture indicator.
- Tape
- The name of the tape containing the source clip.
- A. Patch
- The Audio Patch information.
- Tracks
- The track for the edit (shown as a combination of: V, 1, 2, 3, 4, 5, 6, 7, 8).
- Transition
- The type of transition between the clips: C for cuts, D <duration> for dissolves, and W <wipe code> <duration> for SMPTE wipes.
- Source In
- The starting timecode of the element in the source clip.
- Source Out
- The ending timecode of the element in the source clip. (Ctrl-click the heading to view Source duration.)
- Keycode In
- The starting keycode of the element in the source clip.
- Keycode Out
- The ending keycode of the element in the source clip.
- Speed
- The speed at which the source clip is timewarped in the edit. The value is preceded by a negative sign if the effect is a reverse. The column is blank if the speed value is 100% (no timewarp).
- Record In
- The starting timecode of the element in the result clip.
- Record Out
- The ending timecode of the element in the result clip. (Ctrl-click the heading to view Record duration.)
Operations Group
The Operations group contains the commands that allow you to import an EDL.
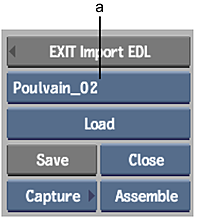
(a) File Name field
- File Name box
- Select a previously loaded EDL file to display in the EDL work area.
- Load button
- Opens the Load EDL menu where you set options for loading EDLs.
- Save button
- Opens the Save EDL menu where you set options for saving EDLs.
- Capture button
- Opens the Auto-Capture menu where you capture media from a VTR using an EDL.
- Close box
- Select Close to close the currently displayed EDL file, or Close All to close all EDL files.
- Assemble box
- Select Assemble to combine the captured or imported material into a clip. Select M-Assemble to combine multiple EDLs into a multitrack clip.
Assembly Options Menu
The Assembly Options menu contains options that you can set that affect EDL assembly.
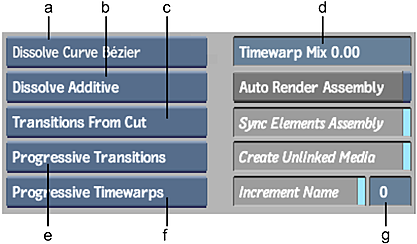
(a) Dissolve Curves box (b) Dissolve Type box (c) Transitions Alignment box (d) Timewarp Mix field (e) Transition Render Option box (f) Timewarp Render Option box (g) Increment field
- Dissolve Curves box
- Select the type of interpolation to use for all dissolves.
| Select: | To: |
|---|---|
| Dissolve Curves Linear | Create dissolves with linear interpolation curves. |
| Dissolve Curves Bézier | Create dissolves with Bézier interpolation curves. |
- Dissolve Type box
- Select a rendering option for dissolves during EDL assembly.
| Select: | To: |
|---|---|
| Dissolve Additive | Render dissolves as additive. |
| Dissolve Non Additive | Render dissolves as non additive. |
| Dissolve Inv Non Additive | Render dissolves as inverse non additive. |
- Transitions Alignment box
- Select an option for the placement of transitions in assembled EDLs.
| Select: | To: |
|---|---|
| Transitions From Cut | Align transitions after the cut. |
| Transitions Centred | Centre transitions on the cut. |
| Transitions Up To Cut | Align transitions before the cut. |
- Transition Render Option box
- Select the rendering mode for transitions in assembled EDLs.
| Select: | To: |
|---|---|
| Interlaced Transitions | Override the Preferences settings and render transitions in Interlaced mode. |
| Progressive Transitions | Override the Preferences settings and render transitions in Progressive mode. |
- Timewarp Render Option box
- Select an option for the rendering mode for timewarps in assembled EDL.
| Select: | To: |
|---|---|
| Progressive TW | Render timewarps in Progressive mode. |
| Interlaced TW | Render timewarps in Interlaced mode. |
- Timewarp Mix field
- Enter the mix value for assembled timewarps. You can enter any value from 0.00 to 1000.00.
- Auto Render Assembly button
- Enable to render transitions and timewarps when you assemble the final clip.
- Sync Elements Assembly button
- Enable to automatically create Edit Sync groups for video and audio tracks that share the same timecode.
- Create Unlinked Media button
- Enable to assemble an EDL, even if you do not have all the sources and, later, use the Recapture/Relink media feature to bring the missing media into your work-in-progress timeline clip.
When you disable this option, you get virtual sources with no indication of source timecode and tape name for the events when no recapture media exists for an event.
- Increment Name button
- Enable to increment the assembled clip name (when assembling the same clip multiple times).
- Increment field
- Enter a number by which the name is incremented. Active only when the Increment Name button is enabled.
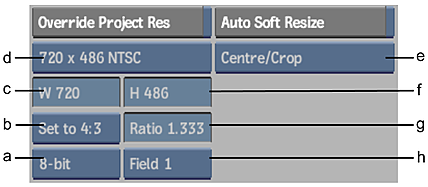
(a) Frame Depth box (b) Aspect Ratio Presets box (c) Frame Width field (d) Resolution Presets box (e) Fit Method box (f) Frame Height field (g) Aspect Ratio field (h) Scan Mode box
- Override Project Resolution button
- Enable to assemble pre-captured material of a different resolution than your project's default resolution. Additional controls become active that you use to specify the resolution options for assembly.
During assembly, the system searches the specified library for matching media. For media to match an event during EDL assembly, all the specified parameters must be the same (including frame rate, resolution, bit depth, and so on). When a match occurs for an event, the event is marked as captured.
By default, Override Project Resolution is disabled and the project's default resolution is used when matching EDL events to pre-captured media.
- Resolution Presets box
- Select one of many standard resolutions, as well as a Custom option that you can use to specify non-standard resolutions.
- Auto Soft Resize button
- Enable to apply a soft resize when assembling any clip that was captured at a resolution that differs from the native project resolution. Options become active that allow you to specify how the soft resize should be applied.
- Fit Method box
- Select a fit method option to be applied to the imported clip.
| Select: | To: |
|---|---|
| Centre/Crop | Fit the source image, centred, over the destination frame. If the source is larger than the destination, it is cropped. If the source is smaller than the destination, it is surrounded by a black border. |
| Crop Edges | Fit one edge of the source into the destination frame without stretching or squashing the frame. Excess parts of the source frame after resizing are cropped. If the source—after the one edge is resized—is wider than the destination, its overhanging left and right edges are cropped. If the source is taller than the destination, the upper and lower edges are cropped. |
| Fill | Fit the source, width and height, into the destination frame. If the source and destination frames do not have the same aspect ratio, the image can become distorted. |
| Letterbox | Fit the source to the destination frame without squashing or stretching it, and without cropping the source. If the source is wider than the destination, black bars fill the top and bottom of the destination frame. If the source is narrower than the destination, black bars fill the right and left sides of the frame. In all cases, the entire source frame is contained within the destination frame. |
- Frame Width field
- Displays the frame width of the selected resolution preset. If Resolution Presets is set to Custom then this field is active, allowing you to enter the frame width value that you want to use.
- Aspect Ratio Presets box
- Select a standard frame aspect ratio. Select the Set to w:h option to set the clip to use square pixels. Select Custom to define a custom frame aspect ratio in the Aspect Ratio field.
- Frame Depth box
- Select from one of five frame depth options: 8-bit, 10-bit, 12-bit, 12-bit u, or 16-bit fp.
- Frame Height field
- Displays the frame height of the selected resolution preset. If Resolution Presets is set to Custom then this field is active, allowing you to enter the frame height value that you want to use.
- Aspect Ratio field
- Displays the aspect ratio of the imported clip. When Aspect Ratio Presets is set to Custom, this field becomes active so that you can enter a custom frame aspect ratio.
- Scan Mode box
- Select an option to determine the order in which the fields of interlaced material are scanned.
| Select: | To: |
|---|---|
| Progressive | Scan a frame-based clip with no interlacing. |
| Field 1 | Scan Field 1 first, followed by Field 2. |
| Field 2 | Scan Field 2 first, followed by Field 1. |
Preferences Menu
Use the options in the Preferences menu to specify your EDL preferences.
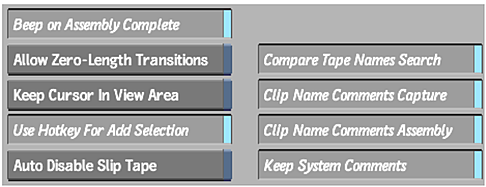
- Beep on Assembly Complete button
- Enable to hear an audible tone when the EDL is assembled.
- Allow Zero-Length Transitions button
- Enable to allow zero-length wipes and dissolves. If this option is disabled and you change a transition duration to zero, the transition automatically becomes a cut.
- Keep Cursor In View Area button
- Enable to keep the cursor from leaving the window when you scroll an EDL. When you scroll an EDL, the cursor will stop at the first or last event on the EDL page.
- Compare Tape Names Search button
- Disable to ignore tape names during assembly.
- Clip Name Comments Capture button
- If your events contain clip names in their comments, enable this option to use those names during capture. If this option is disabled, the event number is used as the captured shot's name.
- Use Hotkey For Add Selection button
- Use to change the functionality of selecting events. When this option is disabled, you add to your selection range by clicking the events. When this option is enabled, you must hold the Ctrl key or the pen button while clicking events to add them to your selection range.
- Auto Disable Slip Tape button
- By default, the Slip Tape option remains enabled after you slip sources. Enable this option to disable the Slip Tape option automatically after you slip sources.
- Clip Name Comments Assembly button
- If your events contain clip names in their comments, enable this option to use those names during assembly. If this option is disabled, the EDL title is used as the assembled clip's name.
- Keep System Comments button
- Use the Keep System Comments option to protect system comments. When enabled, you can only delete user comments.
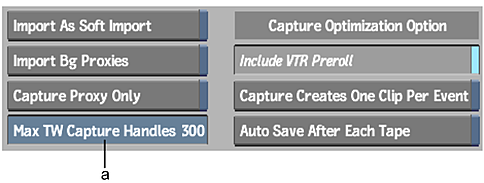
(a) Max TW Capture Handles field
- Import As Soft Import button
- Enable to soft-import files with a file-based EDL that are located on a standard filesystem. If you disable this option, the files are hard-imported.
- Import Background Proxies button
- Enable to allow proxies to be generated in the background.
- Include VTR Preroll button
- Enable to capture the events in one pass and store them as individual clips in the clip library. By default, if events in an EDL are separated by a shorter duration than the VTR preroll and more than 10 frames, they are captured in a single pass.
- Capture Proxy Only button
- Use this option in HD projects to auto-capture proxies only when conforming an EDL. This option does not appear in SD projects.
- Max TW Capture Handles field
- You can set the maximum number of handles to be captured for source clips that are part of timewarped events. On timewarped events, the capture handles value is equal to the capture handles value multiplied by the speed of the timewarp. For example, for an EDL event with an increased speed of 500% (in NTSC), if the capture handles are set to 30 frames, 150 frames are captured as handles (30 frames multiplied by 5).
Standard handles may not be enough in the case of high-speed timewarps.
- Capture Creates One Clip Per Event button
- Enable to create a clip in the clip library for every event in the EDL. When disabled, a single clip is created in the library for each group of events captured during the same pass. You can assemble the montage regardless of which option you chose to store EDL events in the clip library.
To reduce the size of clip libraries, you should disable this feature. However, if you need to reference back to individual shots, they may be easier to find if you enable the option and generate a clip for every event.
- Auto Save After Each Tape button
- When this option is enabled, the system performs an AutoSave between each tape when auto-capturing.
Search Events Menu
Use the Search Events menu to search entries for text or timecode in an EDL. When you search the EDL, you need to specify the item you want to search, the filter type you want to use, and the criteria for which you want to search.
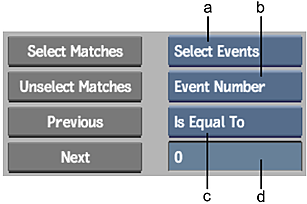
(a) Select Item box (b) Search Item box (c) Filter Type box (d) Search Criteria field
- Select Matches button
- Highlight all items that match the search criteria.
- Unselect Matches button
- Remove the highlight from all items that match the search criteria.
- Select Item box
- Select the option that you want to search for.
| Select: | To highlight: |
|---|---|
| Select Events | All events that match the search criteria. |
| Select Edits | All edits that match the search criteria. |
- Search Item box
- Specify the item that you want to search for in the EDL.
| Select: | To search for: |
|---|---|
| Event Number | Event numbers. |
| Tape | Tape names. |
| Transition Length | A specific transition duration. |
| Source In | A source in timecode. |
| Source Out | A source out timecode. |
| Speed | A specific timewarp speed. |
| Record In | A record in timecode. |
| Record Out | A record out timecode. |
| Comment | A comment or text within a comment. |
| Track | A track. |
- Previous button
- Move the cursor to the previous item that matches the search criteria.
- Next button
- Move the cursor to the next item that matches the search criteria.
- Filter Type box
- Specify the filter type. The filter type will differ depending on the item you are searching. For numerical searches, select one of the following options from the Filter Type box.
| Select: | To find: |
|---|---|
| Is Equal to | All event numbers that match your search criteria. |
| Is Not Equal to | All event numbers that do not match your search criteria. |
| Is Less Than | All event numbers that are less than your search criteria. |
| Is Greater Than | All event numbers that are greater than your search criteria. |
For alphabetical searches, select one of the following options from the Filter Type box.
| Select: | To search: |
|---|---|
| Matches | For all tapes that match your search criteria. |
| Does Not Match | For all tapes that do not match your search criteria. |
| Contains | For all tapes that contain your search criteria. |
| Does Not Contain | For all tapes that do not contain your search criteria. |
| Is Less Than | For all tapes lexicographically less than your search criteria. |
| Is Greater Than | For all tapes lexicographically greater than your search criteria. |
Alphabetical searches are performed on Tape and Comment items by default. To perform a numeric search on these items, enable Treat As Numeric. To match results by case, enable Case Sensitive.
- Search Criteria field
- Enter the search criteria.
Renumber Events Menu
Use the options in the Renumber Events menu to specify the value by which events are renumbered.
(a) Next Event field
- Renumber Events button
- Renumbers the selected events according to the value specified in the Next Event field.
- Next Event field
- Enter a value for the next event.
2:3 Pulldown Options Menu
Use the 2:3 Pulldown Options menu to set the parameters for 2:3 pulldown insertion upon import.
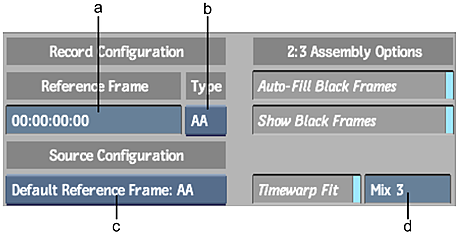
(a) Reference Frame field (b) Reference Frame Type box (c) Default Reference Frame box (d) Mix field
- Reference Frame field
- Enter the timecode for the reference frame. This is only required for clips stored as files, and not for material on tapes.
- Reference Frame Type box
- Set the reference frame type: AA or BB, corresponding to the timecode value entered in the Reference Frame field.
- Auto-Fill Black Frames button
- Enable to fill black frames with the last frame of the outgoing event. By default, gaps occuring between EDL events are filled with black frames.
- Default Reference Frame box
- Select AA or BB.
- Show Black Frames button
- Enable to highlight the places in the currently loaded EDLs where gaps of black frames occur.
- Timewarp Fit button
- Enable to automatically apply a timewarp to material on tapes referenced by EDLs where 2:3 pulldown removal was disabled (for example, when a tape contains native 30 fps interlaced video material), so that it can be easily integrated with 24 fps material.
- Mix field
- Enter the number of frames to ensure that match frames on timewarped elements are maintained. This field is active when Timewarp Fit is enabled.
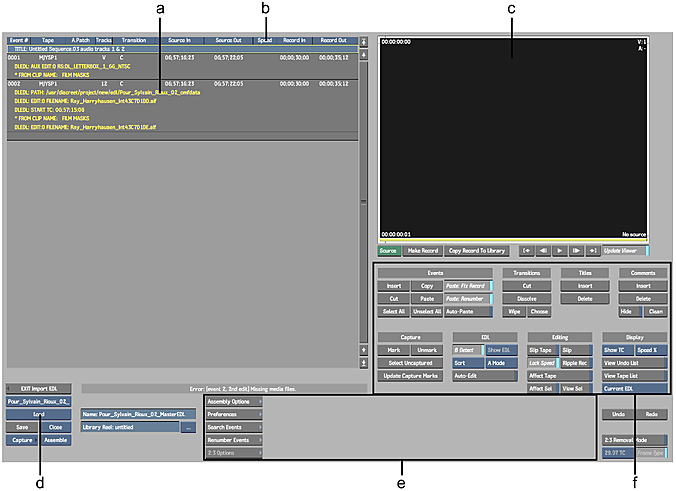
(a) EDL work area (b) Work area column headers (c) EDL Player (d) Load button (e) Import EDL menus (f) EDL editing tools