Choose your default: Configure Team Web to launch the default learning resource of your choice.
You can customize the Team Web link in the Applications Options dialog box to provide quick access to your company's learning resources.
Choose your default
Configure Team Web to launch the default start page or learning resource of your choice
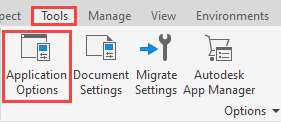
- Access the Application Options dialog box.
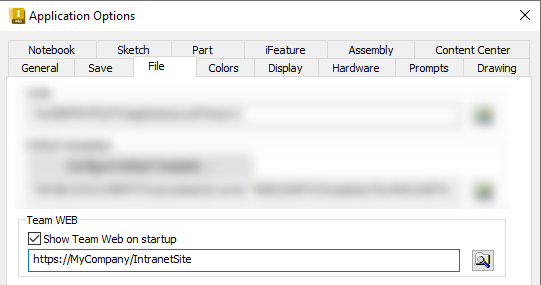
- On the Files Tab, specify a web site or a file in the Team Web field. This can be a link to tutorials or the file or URL of your choice.
Check the box to replace the Inventor Home start screen with the specified Team Web page.
Use Team Web
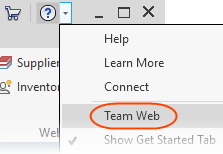
After you set the Application Option, you can start Team Web in two locations:
- From the Home Tools tab Team Web panel.

- From the Help menu drop-down.
CAD and IT Managers: Deploy Team Web setting
Step 1: Prepare for deployment.
- Install Inventor to as standalone.
- Launch Inventor: Access the Application Options dialog box, and import the XML file that contains the settings from the Inventor release your are importing from.
- In the Application Options dialog box, Files Tab, specify the Team Web site or file as previously described. Note: Enter any other changes in Application Options, as necessary.
- In the Application Options dialog box, export the new settings.
Step 2: Create deployment image and deploy to your user base
- Use the Inventor Deployment wizard to create a deployment image. To begin, click Create Deployment.
- On the Create Deployment > [Your deployment name] page , click the down-arrow to access the deployment configuration options.
- Select 'I would like to import custom settings.' and then browse and select the XML file that you exported.
- To continue the installation, click the arrow.
- To create the deployment image, click Create.
- Deploy the image to your user base.
Step 3: Instruct your user base to use Team Web command
- Communicate to your user base how to access and use Team Web.