Use to design fits and limits.
|
Access: |
Ribbon:
Design tab
 Power Transmission panel
 Limits/Fits Calculator
|
The Limits and Fits Mechanical calculator takes recommendations from ISO 286 or ANSI B4.1. The option to select a standard is available within the More Options area. (To display the More Options area, click ![]() More in the lower right corner of the Calculation tab.) Each standard has its own profile and the units of the nominal diameter and deviations are millimeters for ISO and inches for ANSI.
More in the lower right corner of the Calculation tab.) Each standard has its own profile and the units of the nominal diameter and deviations are millimeters for ISO and inches for ANSI.
Conditions
Determine the fit type for the Hole-basis system or the Shaft-basis system of fits. A similar fit is calculated automatically if the option is checked in the More Options area when the fit calculation system is changed.
|
Hole-basis system of fit, Shaft-basis system of fits |
Select the type of fits. This option provides an easy way to keep hole or shaft tolerance class on "H" ("h" symbol). You can define any custom fit, if needed. Basic-hole allows the use of standard tooling to bore the hole. |
|
Basic size |
Enter or measure the nominal size of the hole and the shaft. Set up the nominal diameter as a basic size. For ANSI active profiles, the diameter value is in inches. For ISO active profiles, the diameter value is in millimeters. |
|
Max. clearance, Min. clearance, Max. Interference, Min. Interference |
Set up key criteria for the fit you are looking for. Change the significance with respect to the selected fit. For example, a selected Interference fit of 100 mm H7/s6 displays the maximum and minimum Interference fit. As you activate the edit maximum interference area, the text of the corresponding dimension in Tolerance Zones area is highlighted. You can enter the value of the maximum interference. The tolerance grades are calculated and the fit symbols have a different color in the Tolerance Zones area. The maximum interference is smaller or equal to the selected fit. It depends on which system of fit you use. If you design in the Hole-basis fit system, the fit symbols have a different color in the shaft symbols line because the shaft tolerances are variables for the Hole-basis fit system. You can limit a selection of the tolerance zones using the minimum interference fit in the same way. The same behavior occurs for other fit types. The difference is that the edit field has another meaning (for example, maximum or minimum clearance). Select the color settings for the image in the More Options area. This value is used to highlight valid Limits on the Tolerance Zones image. |
|
Mid value of fit |
This edit field is only available for Transition fits. (Select Fit from the Fit Type pull-down list in the Tolerance Zones group box.) Enter the maximum value as a distance of centers of tolerance grades for the fit you are looking for. If you enter the positive value, the overbalanced clearance fit zones are highlighted. If you enter the negative value, the overbalanced interference fit zones are highlighted. See More Options for color settings for the image. |
Tolerances
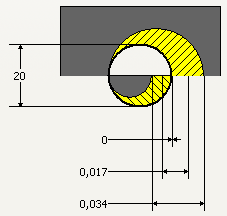
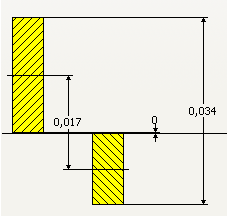
Displays the selected tolerance image. The displayed image depends on the specified option in More Options (Tolerance Image pull-down list). The image and dimensions dynamically update to reflect changes made in the Conditions and Tolerance Zones group boxes.
The upper half of the image represents the hole and the lower half of the image represents the shaft. Basic size value is indicated by a bold circle. The tolerance zone is indicated by a yellow, hatched area. The tolerance zone area is defined by two arcs where the arcs represent the upper and lower values of the limit. The arcs are tangent to the basic size circle on the left side.
The dimensions display basic size, maximum clearance or interference, minimum clearance or interference, and distance between midpoints of tolerances.

An example of a displayed tolerance image if you select Hole and shaft image in the Tolerance Image pull-down list in the More Options area.
 |
An example of a displayed tolerance image if you select ISO Tolerance range image in the Tolerance Image pull-down list in the More Options area. |
Tolerance Zones
Specify the limits and fits. Selected fit is displayed in a graphic form.
|
Fit Type |
Select Clearance, Transition, or Interference. |
|
Preferred Fits |
Select 1 of the predefined Fits. The list is dynamically updated when the Fit Type is changed. The Limits graph is dynamically updated to display the selected fit. |
|
Limits |
Select the limit letter and number. The Limits graph is dynamically updated to display the selected Limits. If you manually enter any letter or number, the Fit Type and Preferred Fits pull-down lists are disabled. When you click the Fit Type and Preferred Fits drop-down arrows, you enable these selections and Limits entries are reset to default values. Limits are defined by a letter and a number. Capitol letters are used for holes, and lower case letters are used for shafts. The letter is the Fundamental Deviation from the basic size. It is the maximum size or upper tolerance of the feature. The number is the Standard Tolerance Grade. It is the size of the tolerance zone. Subtract the Standard Tolerance Grade from the Fundamental deviation to determine the minimum size or lower tolerance of the limit. |
|
Limits graph |
Displays all available hole and shaft tolerance classes for the entered nominal diameter and tolerance grade. You can see currently selected tolerance class, displayed in a hidden line. Pause the cursor over each fit symbol to see the information about any fit deviations, which belong to the selected tolerance class. Click a tolerance class to change it. The Zero line is displayed. The fit parameters are dimensioned to show the tolerance zone dependencies clearly. The dimensions that join the center of the tolerance zones can have a value of less than zero. Using this technique, you can design the transition fit with respect to the maximum center value. It defines the Interference fit (negative) or Clearance fit (positive). |
 (More)
Displays additional options for spring design. To display the More Options area, click ![]() More in the right lower corner of the Calculation tab.
More in the right lower corner of the Calculation tab.
|
Find equivalent fit when changing between Hole-basis and Shaft-basis |
When you select a shaft fit symbol In the Tolerance Zones area (fit symbols are in a graphic form), the Hole-basis fit system and 'H' fit symbol is set automatically. The same behavior occurs for the Shaft-basis fit system. |
|
Change fit system according to selections in fit chart |
A corresponding fit is calculated automatically, if the box is checked, when the fit calculation system is changed. |
|
Standard |
Use the pull-down menu to select the standard for the calculation. |
|
Tolerance zones that are outside the specified range |
Change the color of the tolerance zones. |
|
Tolerance zones that are within the specified range |
Change the color of the tolerance zones. |
|
Tolerance Image |
Use the pull-down list to select the type of picture to display in the Tolerances group box of the Calculation tab. |
Results
To display the Results area on the right side of the Calculation tab, double-click the double line on the right or click the chevron.
The area displays numerical values for the tolerances. Click Calculate to calculate the values.
The following items are displayed in the Results pane:
- Hole
- Minimum diameter of the hole (Hole min )
- Maximum diameter of the hole (Hole max )
- Upper tolerance of the hole (Hole upper )
- Lower tolerance of the hole (Hole lower )
- Shaft
- Minimum diameter of the shaft (Shaft min )
- Maximum diameter of the shaft (Shaft max )
- Upper tolerance of the shaft (Shaft upper )
- Lower tolerance of the shaft (Shaft lower )
- For Clearance Fits
- Minimum clearance diametric value of the fit (Clearance min )
- Maximum clearance diametric value of the fit (Clearance max )
- For Transition Fits
- Maximum interference diametric value of the fit (Interference max )
- Midpoint
- Distance between midpoints of tolerance zones (Midpoint)