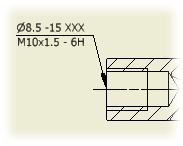
Annotate a drawing with dimensions or other instructions.

- On the ribbon, click
Annotate tab
 Feature Notes panel
 Hole and Thread .

- In the graphics window, click an edge or a circular edge to specify the hole.
In a side view (base, projected, detail, and section views), you can also click non-circular edges to place a hole or thread note.
- Move the cursor and click to place the note.
- When you are finished placing hole or thread notes, right-click and select Done.