Use the Tolerance Feature command to attach GD&T annotations, Feature Control Frames, and Datum Identifiers to part faces or features. Use the Tolerance Advisor to check the health and status of your tolerance scheme.
Create and edit tolerance features
Use a tolerance feature to geometrically constrain features and participate in GD&T analysis by the Tolerance Advisor.
- On the part ribbon, click
Annotate tab
 Geometric Annotation panel
Tolerance Feature
Geometric Annotation panel
Tolerance Feature
 .
.
- Select the required face or faces, adjust the options if necessary, and then click OK.
- Drag the leader to the required location and then click to place the endpoint of the leader.
Tip: To change the orientation of the leader, right-click and select Align to Geometry before you place the leader endpoint. You can click an edge or axis to change the orientation.
An interactive preview of the tolerance annotation is attached to the minitoolbar. The minitoolbar includes options to select type of geometry or feature, attach a datum identifier, or add a row to the feature control frame. Options suitable for the selected geometry or feature are displayed in the list boxes.
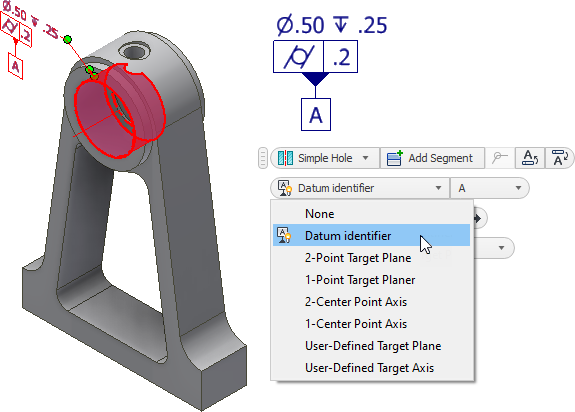
- Click the elements on the preview to edit properties and values displayed in the annotation. Click the Datum identifier drop-list to view the options.
- You can create Datum Targets by choosing one of the options in the drop-list. For example, the following image on the left creates datum targets using two 2D Sketch points and a work plane. The image at right uses three work points and a work plane.
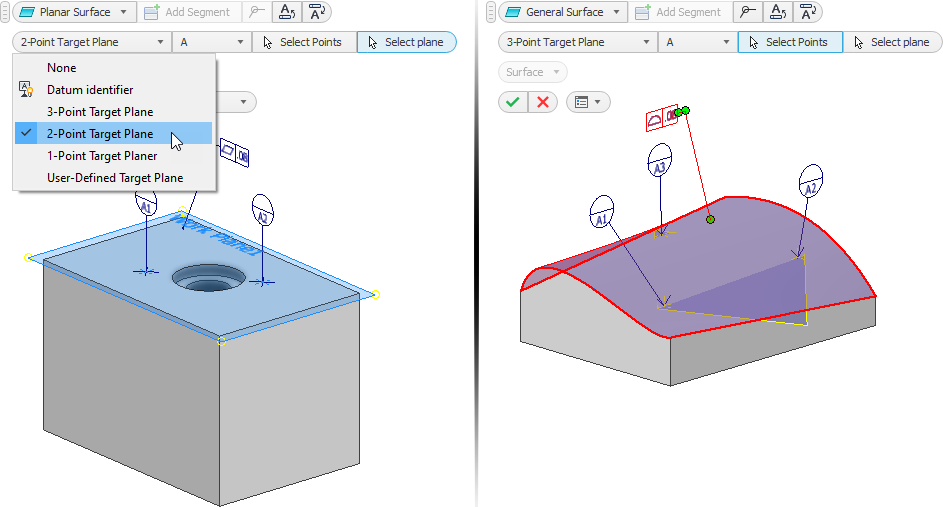 Note: 2D Sketch points are automatically selected. You must select work points manually.
- You can create Datum Targets by choosing one of the options in the drop-list. For example, the following image on the left creates datum targets using two 2D Sketch points and a work plane. The image at right uses three work points and a work plane.
- Click OK to create the Tolerance Feature.
The annotation is added to the Tolerance Features folder in the browser.
- To edit the feature alignment, select the feature in the display, right-click, and select Align to Geometry. Select an edge or axis to change the alignment.
- To edit a Tolerance Feature:
- Select the feature in the display or browser, right-click, and select Edit Tolerance Feature in the context menu.
- Double-click the feature in the display or browser.
Change the required options, and then click OK.
Tip: Clear the check box to remove the Datum Feature designation.
Add Continuous Feature, Statistical Tolerance, and Envelope Requirement symbols
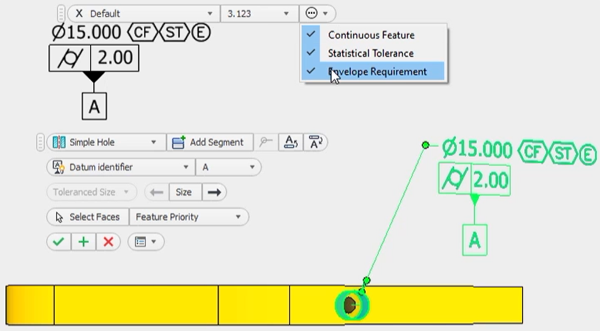
Use the annotation options to append feature modifiers directly to the dimension text. The feature modifiers display in the order in which you add them.
Create a new DRF
Use Create DRF to create a user defined Datum Reference Frame based on existing datums.
- On the ribbon, click
Annotate tab
Geometric Annotation panel
DRF
 .
.
- In the Datum Reference Frame dialog box, select the desired Primary, Secondary, and Tertiary datums from the list of available datums.
- Set the desired modifiers.
- Click OK to finish.
The annotation is added to the Tolerance Features folder in the browser.
- To edit a custom DRF, select the DRF in the browser, right-click, and select Edit DRF in the context menu.
Change the required options, and then click OK.
Use Tolerance Advisor to help with GD&T validation
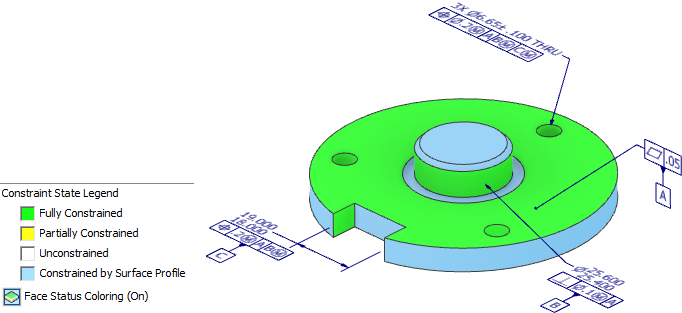
The Tolerance Advisor guides you through creating a fully constrained model. When you create tolerance features, the advisor displays informational messages or warnings about potential issues in the Tolerance Advisor browser pane. Enable Face Status Coloring to view the constraint state of the model faces.
- On the ribbon, click
Annotate tab
Manage panel
Tolerance Advisor
 .
.
The Tolerance Advisor browser pane is displayed.
- The following are examples of messages that can be displayed for a feature in the advisor pane:
- Right-click the message and select More Information to open contextual help which contains information about the message and the steps you can take to resolve.
- Click Tolerance Advisor in the ribbon to toggle the Tolerance Advisor browser pane on and off.
- Optionally, click Face Status Coloring at the bottom of the Tolerance Advisor browser to enable or disable face constraint state coloring.