What's New: 2021.1
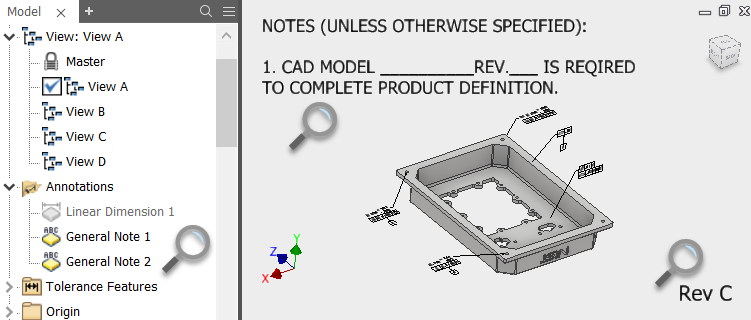
Tip: Within Inventor, the notes that you add to the 3D model do not rotate and are always normal to the active view. The note text in the exported PDF file rotates with the view. For best results refer to the following image as an example and do the following before you export:
- Activate views B, C, and D and turn off the visibility of General Note 1 and 2.
- Make View A active, verify the model orientation and note visibility is correct in the view, and then export the model.
- In an assembly or part file, click
File
 Export
3D PDF or click 3D PDF in the Annotate Export panel.
Export
3D PDF or click 3D PDF in the Annotate Export panel.
- In the Publish 3D PDF dialog box, select model properties to include in the 3D PDF.
Tip: To exclude all properties that are blank, click Select All Fields with Values.
- Select design view representations of the model to include in the 3D PDF.
- To indicate whether a design view is included in 3D PDF export by default, set the Publish property for each design view representation. In the browser, right-click a design view, and click Publish to change the setting.
- The design view representations list in the model browser determines the order of model views in the output 3D PDF. To change position of a design view, in the browser, drag the design view to the desired place in the list.
Note: To make sure that the exported views provide the expected results, you should do the following:- Activate each view you plan to publish and adjust the view orientation and zoom scale as desired.
- When you are satisfied, right-click the view in the browser and choose Save Current Camera.
- Set the Visualization Quality. Visualization Quality controls quality of mesh used to display model views in the output 3D PDF file.
- Select High to show all model details when zooming in.
- Select Low to reduce size of the exported file, and to avoid displaying details in zoomed views.
- Specify the Export Scope:
- Select All Entities to export all components and data available in the model file.
- Select Limit to Entities in the Selected Design View Representations to reduce size of the exported file. Only data related to the exported view representations are included in the output 3D PDF file.
- If appropriate, change the 3D PDF template file.
The 3D PDF template file specifies elements included in the exported file and their arrangement. You can customize a 3D PDF template delivered with Inventor installation, or create your own 3D PDF templates.
- Specify a folder to save the output 3D PDF file.
- Select View PDF When Finished to open the output file after the export finishes.
- Select Generate and Attach STEP File to export the model to a STEP file, and attach the STEP file to the output 3D PDF file.
Click Options, and specify the settings for the exported STEP file.
- Click Attachments, and select files to attach to the output 3D PDF file.
- Click Publish.
Work with an Exported 3D PDF File
Use Adobe Acrobat Reader to open a 3D PDF file.
In Adobe Acrobat Reader:
- Use commands on the 3D navigation toolbar to manipulate with model views.

- Display the Model Tree to list model components and other entities included in the 3D PDF file. Select items in the model tree to display related properties and values.
Create Custom 3D PDF Templates
Note: Check the tutorial gallery for the guided tutorial on basic PDF template file customization. The tutorial includes instructions for editing the JavaScript file. For advanced customization, download the detailed PDF template customization guide available
here.
The default location for the 3D PDF templates provided by Autodesk is C:\Users\Public\Documents\Autodesk\Inventor <release>\Templates\<language>. If you specify a different template location in your project file, copy the sample templates to that location.
A 3D PDF template includes two types of elements:
- Static elements, for example: Static text, images, property fields, and 3D model views. Static elements can be customized using the editing tools available in Adobe Acrobat Pro.
- Dynamic and interactive elements, for example: Interactive BOM lists, view carousels, and print options. A JavaScript file generates dynamic and interactive elements. The JavaScript file is embedded in the 3D PDF template and can be edited from within Adobe Acrobat Pro DC by specifying the external xml editor you want to use.
To customize the template, make a copy of the default template and then edit the copy in Adobe Acrobat Pro DC. Edit the template file to:
- Add or delete static text, images, or property fields.
- Customize size and position of graphical elements.
- Create more pages in the template file.