Learn how to assign, edit, and delete properties for individual component instances.
What's New: 2022
Instance Properties are assigned to individual component instance only and are available in annotations such as balloons, leader notes and parts lists.
Assign Instance Properties using the component context menu
- Select one or multiple component instances in the browser, right-click and then select Instance Properties to display the Instance Properties dialog box.
- In the Instance Properties dialog box, enter a name and a value of the desired instance property.
- Click Add to add the instance property.
- Optionally, add more instance properties.
Tip: In the Name list box, select name of an existing custom iProperty to assign the same name to an instance property. Then override the custom iProperty at instance level.
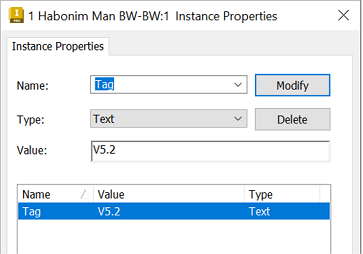
- Click OK.
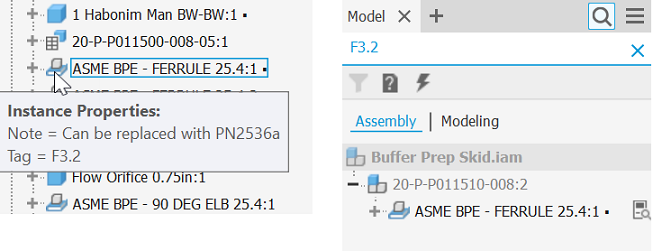
Note: In the browser, a little dot mark appears next to the instance name. It indicates that instance properties were assigned for that specific instance. Hover over the component icon to display a tooltip showing the assigned instance properties. Use browser search to search for instance properties.
Assign Instance Properties using the BOM dialog box
Model Data tab in the BOM always displays all rows that include instance properties. To display instance rows in the
Structured or
Parts Only tabs, uncheck the
Merge Instance Rows option in the Part Number Row Merge Settings dialog box. The icon field for an instance property row has a cyan background. Instance property values are blue. Hover over the component icon to display a tooltip showing the assigned instance properties.
- On the ribbon, select the Assemble tab
 Manage panel Bill of Materials
 .
.
- In the BOM dialog box, click Add Custom iProperty Columns.
- Fill in the Property Name and click OK.
- Select one or more blank value fields in one column, right-click and select Instance Property.
- Double-click the value field and fill in the value.
-

After you add a new column, select one or multiple value fields in that specific column. Then override the custom iProperty at instance level and fill in the instance property values.
Note: You can also right-click a specific column and select Create Instance Property (all instances). Every value in this column is automatically an instance property value now.
Edit Instance Properties
Edit instance properties in one of the following ways:
- Use the component context menu.
- Right-click a component instance in the browser, and then select Instance Properties to display the Instance Properties dialog box.
- Select the instance property you want to edit, make your changes, and click Modify.
- Click Close to close the Instance Properties dialog box.
- Use the BOM dialog box.
- On the ribbon, select the Assemble tab Manage panel Bill of Materials
.
- In the BOM dialog box, double-click the instance property value field, make your changes, and press Enter.
- Click Done to close the BOM dialog box.
- On the ribbon, select the Assemble tab
Delete Instance Properties
Delete instance properties in one of the following ways:
- Delete all instance properties using the component context menu.
- Right-click a component instance in the browser, and then select Delete Instance Properties.
- Click Yes to delete all instance property values.
- Delete selected instance properties using the component context menu.
- Right-click a component instance in the browser, and then select Instance Properties to display the Instance Properties dialog box.
- Select the instance property you want to delete and click Delete.
- Click Apply and then Close to close the Instance Properties dialog box.
- Delete all instance properties on the selected rows in the BOM dialog box.
- On the ribbon, select the Assemble tab Manage panel Bill of Materials
.
- Select one or multiple rows, right-click and select Delete Instance Row.
- Click Yes to delete all instance property values on the selected rows.
Note: You can also right-click a specific column and select Delete Instance Property (all instances). This deletes every instance property value in this column. - On the ribbon, select the Assemble tab
- Delete instance properties by changing them to custom iProperties in the BOM dialog box.
- On the ribbon, select the Assemble tab Manage panel Bill of Materials
.
- Select one or more instance property value fields in one column, right-click and select Custom iProperty.
- Click Yes to delete the instance property values.
Note: After you delete the last instance property value on a specific row, the row merges with the other instances without instance properties. The icon field for that row has no longer a cyan background and the values are no longer blue. - On the ribbon, select the Assemble tab
Display Instance Properties as Leader Notes
- On the ribbon, click
Annotate tab
Notes panel
Leader Text
 .
.
- Select the anchor point on the geometry.
- Click to place the leader endpoint.
- In the Format Text dialog box, in the Type list box, select Custom iProperties.
- In the Property list box, select the desired instance property.
- Click Add.
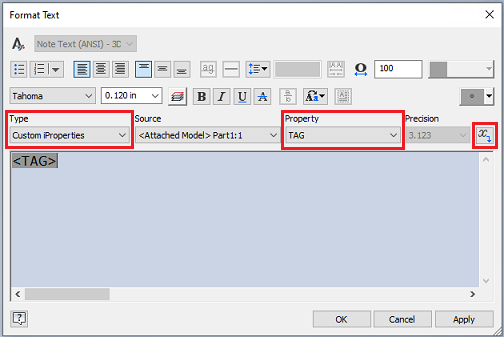
- Optionally, add more instance property values to the note.
- Click OK to close the Format Text dialog box.
Note: If the component instance has an instance property and an iProperty of the same name, the leader note shows the instance property value. Instance property values have a higher priority than the values of custom iProperties.
Display Instance Properties in Balloons
- On the ribbon, click
Annotate tab
Table panel
Balloon.
- In the graphic window, select component geometry to attach the balloon to.
- Move the cursor, and click to add a leader vertex.
- Right-click, and click Continue.
- Continue placing balloons. When you finish, right-click, and click Cancel.
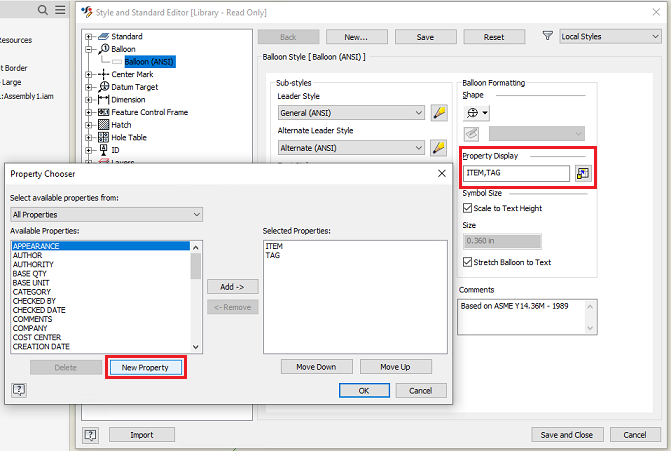
- Right-click a balloon and select Edit Balloon Style.
- In the Style and Standard Editor dialog box Property Display section, click Property Chooser.
- In the Property Chooser dialog box, click New Property.
- Fill in the instance property name and click OK.
- Click OK and then click Save and Close to close the Style and Standard Editor dialog box.
Display Instance Properties in Parts Lists
The parts list shows the data you have in the BOM.
- On the ribbon, click
Annotate tab
Table panel
Parts List.
- Set the parts list with the desired options and place the parts list on the drawing sheet.
- Double-click the parts list and click Column Chooser.
- In the Parts List Column Chooser dialog box, click New Property.
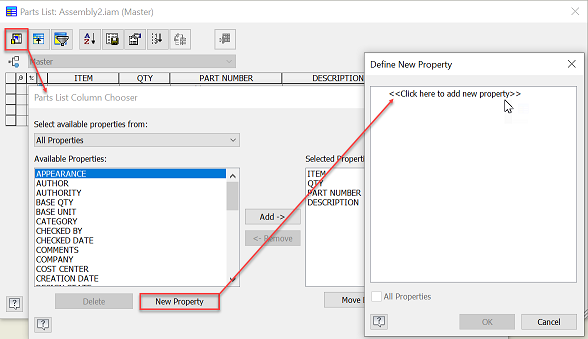
- Fill in the instance property name and click OK.