Click
Nailboard tab  Dimension panel
  Harness Dimension
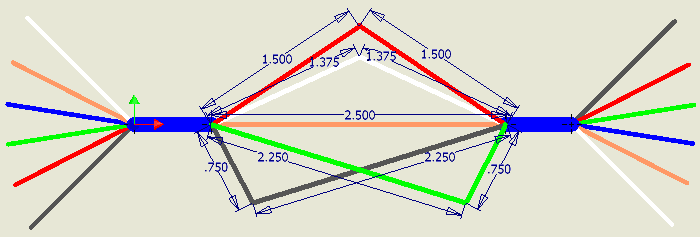
to add a dimension between 2 points. Harness dimensions are like driven dimensions that provide documentation in the drawing, but do not affect the size of the harness. Unlike dimensions in standard Autodesk Inventor, the harness dimension values represent a calculated wire, segment, and ribbon cable length. The calculated, or adjusted length, considers several factors that affect final length such as service loops, global slack, and embedded length.
Using the D shortcut in nailboard starts the standard Autodesk Inventor General dimension. Use Harness Dimension to dimension any wire, ribbon cable, or segment lengths in the nailboard, including loops. Although many dimensioning capabilities from standard Autodesk Inventor such as hiding dimension values in a view, appending to a dimension's value by adding a prefix or suffix are allowed, it is not recommended for harness dimensions.
How are nailboard dimensions changed?
Dimensions in the nailboard can be moved and deleted just like general dimensions. Dimension values, however, cannot be edited in the nailboard.
If the dimension is deleted in the view, the corresponding sketch dimension is not affected. If the sheet dimension is deleted, that dimension value is not automatically retrieved upon entering and exiting the nailboard sketch. Use Retrieve Dimensions on the nailboard sketch to manually retrieve dimensions that were deleted.
What controls the style and tolerances for dimension values?
The Dimension Styles control the text style, format, and display properties of the nailboard dimension value. The dimension style used should map to the dimension style that is set for the drawing, including any user-generated dimension styles. Tolerances are added or modified by editing the dimension style the harness dimension is associated with. When a dimension style changes, any displayed harness dimensions in the view (not the sketch) that use that style automatically update. Dimension styles also support primary and alternate units.
Use New Style on the context menu to change the Dimension style associated with a dimension value. Set the dimension tolerance on the dimension value using Tolerance on the context menu.
How are loops dimensioned?
You can dimension the length of each exposed wire piece displayed as a straight line just as you would dimension any other 2 points. When wire loops are displayed in a V-shape, you can dimension each side of the wire portion from the segment endpoint to the vertex.

How are ribbon cables dimensioned?
Ribbon cables with folds are shown in different portions like bends on a sheet metal flat pattern. When folds exist, you can dimension each side of the ribbon cable portion from the start endpoint to the fold lines, depending on the type of fold.
You can also dimension:
- Border lines
- The conductor one indication line
- The fold lines
- Work points
- Angle of a fold