
Before starting, create or import a thin-walled part and define the grill outlines on a 2D sketch on a plane external to the surface where the grill is to be.
- Click 3D Model tab
 Plastic Part panel Grill
  .
. - In the Boundary tab of the Grill dialog box, use the Profile selector to specify the closed extent of the grill. The boundary must be a closed sketch.
- If the part file has more than one solid body, use the Solid selector to choose the target body.
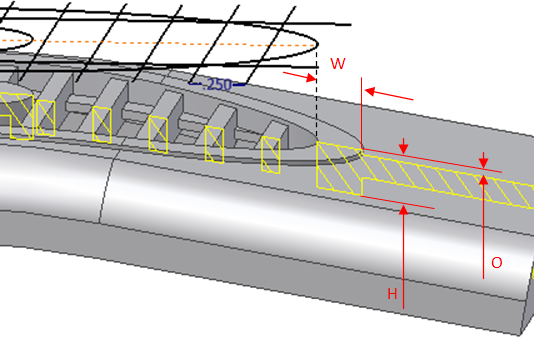
- Enter the Boundary parameters:
- W: Boundary Thickness
- H: Boundary Height
- O: Outside Height offset of the Boundary top face with respect to the part surface
- In the Island tab of the Grill dialog box, use the Profile selector to specify an area to fill with material, usually at the center of the grill. The island must be a planar, closed profile and the plane must be parallel to the boundary plane. Note: If no profile is selected, the Island is not present. It’s not necessary to trim the island profile at the boundary profile. This operation is automatically executed by the feature itself.
- Enter the Thickness of the island.
The top and bottom limits of the island correspond to the Boundary top and bottom faces. Ribs and Spars are trimmed at the profile of the island.
A zero thickness means that the island does not have a wall and is filled with material.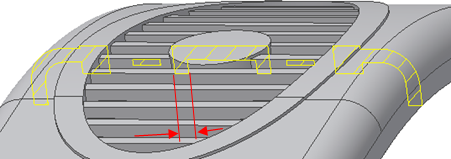
- In the Rib tab of the Grill dialog box, use the Profile selector to select a set of curves to fill the grill area. Ribs must be one or more open or closed profiles belonging to the same sketch on a plane that is parallel to the boundary profile (can belong to the same sketch as the boundary). The profiles are the centered outlines of the ribs. You don’t have to trim them at the boundary profile. This operation is automatically executed by the feature itself.
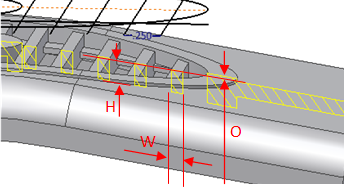
- Enter the Rib parameters:
- W: Rib Thickness
- H: Rib Height
- O: Rib Top Offset from the external face of the Boundary
- In the Spar tab of the Grill dialog box, use the Profile selector to specify a secondary pattern. Spars must be one or more open or closed profiles belonging to the same sketch on a plane that is parallel to the boundary profile (can belong to the same sketch as the boundary). The profiles are centered outlines of the Spars. You don’t have to trim them at the boundary profile; this operation is automatically executed by the feature itself.
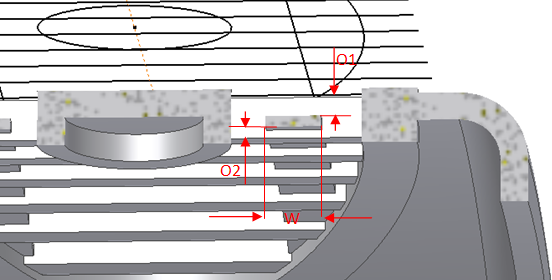
- Enter the Spar parameters:
- O1: Top Offset from the top face of the ribs
- O2: Bottom Offset from the bottom face of the ribs
- W: Thickness
- On the Draft tab of the Grill dialog box, enter a Draft Angle (no sign) and, optionally, select Parting Element to specify an offset from the boundary external face of the parting surface.
- Click OK.