Positional representations enable you to evaluate alternate kinematic states of an assembly. By creating overrides on such items as relationship values or component placements, multiple positional representations (PosReps) can be created, each capturing different solve states for an assembly.
Positional representations can be used by parent assemblies, drawing views, and derived assemblies. They are intended only for kinematics evaluation, and not for design intent changes. Any change in the assembly design intent, such as adding or deleting components, or editing assembly features, must be made when the Primary positional representation is active.
An assembly may call upon a Positional Representation of a subassembly in two primary ways. The first is to set the subassembly to a given Positional Representation, similar to associatively calling a design view representation. The second is through nesting: a Positional Representation in the parent assembly has an override on the subassembly, setting a Positional Representation for that assembly.
- The first method should be used when the Primary state of the parent assembly is best defined not by the Primary state of the subassembly, but by a PR of the subassembly, such as a hydraulic cylinder in a closed position.
- The second, more common method, should be used when various PRs of subassemblies help define a corresponding PR in the parent assembly.
Workflow 1: Controlling positional representations within the subassembly
- Open an assembly file containing a subassembly with positional representations:
- Download the samples files from Get Started tab
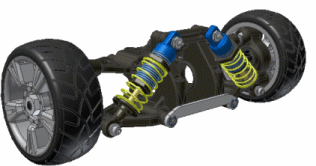
 Launch panel Open Samples\Models\Assemblies\Suspension\Suspension.iam
Note the two shock absorbers.
- Download the samples files from Get Started tab
- Expand the browser on the first shock subassembly, Front 1.3 Shock:1, and then expand the Representations folder.
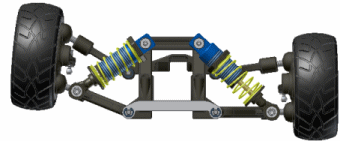
- Note the Position node, which indicates the subassembly is set to its Primary state. Expand this folder, and activate the existing Closed PR. Note the parent assembly reacts by lifting the suspension up in response to the change in solve state for the shock.
- Close the file. Do not save changes.
Workflow 2: Nesting a positional representation with an override.
- Open an assembly file containing a subassembly and create a positional representation in the main assembly:
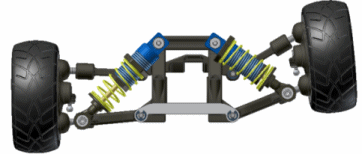
- Open Samples\Models\Representations\Suspension\Suspension.iam. Note the two shock absorbers.
- Open Samples\Models\Representations\Suspension\Suspension.iam. Note the two shock absorbers.
- Expand the Representations folder for the Suspension.iam assembly, and then expand the Position node.
- Using the right mouse button, click on the Position node, and select New. Rename the new PR to Left Bump.
We have now created a PR in the top assembly, which has no overrides, so it looks just like the Primary PR.
- Right-mouse click on the second shock subassembly, Front 1.3 Shock:2, and select Override.
- In the Override dialog, choose the Representation tab, and check the Override toggle for positional representations, and then set the PR to Closed. Close the dialog.
- The Left Bump PR of the top assembly is now nesting the shock absorber's Closed PR. By activating the Primary and Left Bump PRs of the top assembly, you can quickly see the effect of the left shock closing fully.
- Keep the file open and try creating further overrides to other objects, such as the right shock, or constraints.