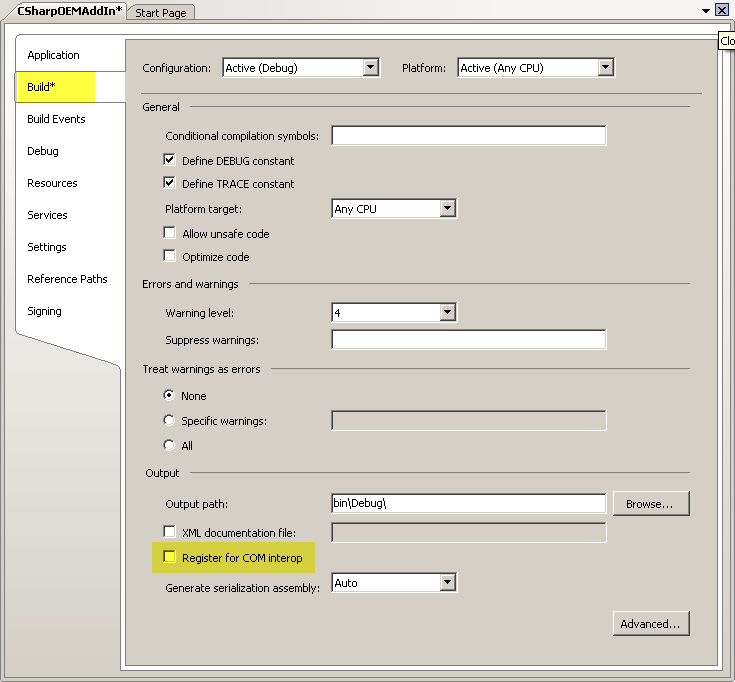
- In the Application Properties dialog box, Build tab, in Output, clear the check box for Register for COM interop.
- Create a file in the same folder as your project file and name it "CSharpOEMAddIn.X.manifest", where CSharpOEMAddIn is the name of your add-in. Add the following lines to the manifest file. Edit the text in italics to match your add-in.
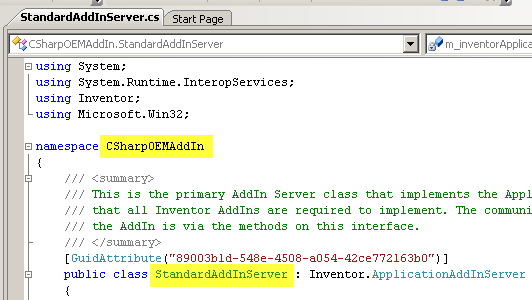
<?xml version="1.0" encoding="UTF-8" standalone="yes"?>
<assembly xmlns="urn:schemas-microsoft-com:asm.v1" manifestVersion="1.0">
  <assemblyIdentity name="InvAddIn" version="1.0.0.0" />
  <clrClass clsid="{2bf59d73-5170-4524-b0e1-391760aaffa5}"
            progid="CSharpOEMAddIn.StandardAddInServer"
            threadingModel="Both"
            name="CSharpOEMAddIn.StandardAddInServer"
            runtimeVersion="" />
  <file name="InvAddIn.dll" hashalg="SHA1" />
</assembly>
In Assembly name, the attribute of the assemblyIdentity element is the name of the assembly, as highlighted in the following image.

The "name" attribute of the clrClass element consists of two parts, separated by periods. The first is the name of the namespace that the COM class is defined within. For this example is it CSharpOEMAddIn, and the second part is the name of the class that implements the ApplicationAddInServer interface, which is "StandardAddInServer". Both are highlighted in the following image.
- Add a post-build process to incorporate this manifest into your .dll. The post-build process calls mt.exe, which is a Microsoft utility that embeds the manifest into the dll of your add-in. In the Application Properties dialog box, Build Events tab, click Edit Post-build…
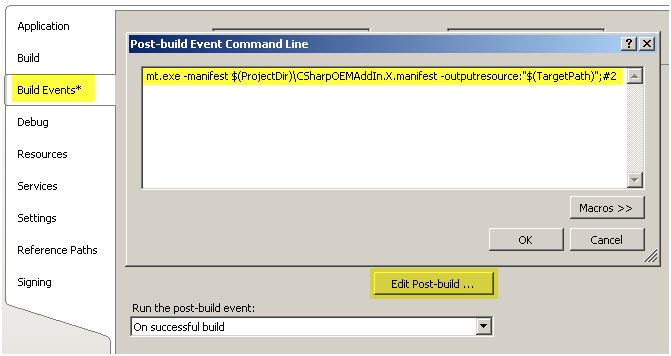
- . In the Post-build Event Command Line dialog box, enter the following
string
. Replace InvAddin with the name of your add-in.
call "%VS90COMNTOOLS%vsvars32"
mt.exe -manifest $(ProjectDir)\InvAddin.X.manifest -outputresource:"$(TargetPath)";#2
- Remove any code associated with registering the add-in in the registry by removing the Register and Unregister methods from your add-in class. The AddInGuid function is in the same region as the registration functions. If you plan use this property in other areas of your add-in, do not delete it.
- Compile your project. The manifest embeds within your .dll. If any errors occur during the compile, verify that the command
string
you entered matches the
string
in step 4.
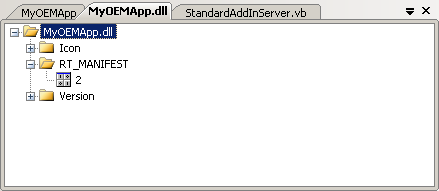
To verify that the manifest is correctly embedded, drag the add-in .dll into Visual Studio. The "RT_MANIFEST" folder displays, as shown in the following image. Double click the "2" icon to display a window with the actual manifest data.
- All registry-free add-ins require an .addin file. With a registry based add-in, Inventor relies on the registry to get information about the add-in. The .addin file takes the place of the registry for this same information. The addin filename is in the form of Autodesk.AddInName.Inventor.addin. The following image is an example of the .addin file for an example primary add-in, with the portions to change in italics.
<?xml version="1.0" encoding="utf-16"?> <Addin Type="Standard"> <ClassId>{2bf59d73-5170-4524-b0e1-391760aaffa5}</ClassId> <ClientId>{2bf59d73-5170-4524-b0e1-391760aaffa5}</ClientId> <DisplayName>MyOEMApp</DisplayName> <Description>Inventor OEM Sample App</Description> <Assembly>MyOEMApp\MyOEMApp.dll</Assembly> <Hidden>0</Hidden> </Addin>- ClassId and ClientId Both are the same value, which is the GUID at the top of the StandardAddInServer class.
- DisplayName The value can be anything, and is the name of the add-ins as shown in the Add-In Manager.
- Description The value can be anything, and is the description of the add-in as shown in the Add-In Manager.
- Assembly Defines the name and path of the add-in .dll, relative to the OEM bin folder. The subfolder requires the same name as the add-in .dll.
- Hidden Defines whether the add-in is visible in the Add-In Manager. A value of 1 indicates that it is hidden. However, if you right-click within the Add-In Manager and choose "Show hidden members," all add-ins display.
Descriptions of elements in the addin file example:
There can be other elements that are defined for other add-ins that either do not apply, or are ignored for an OEM primary add-in.
- Create a folder in the OEM\bin folder that is the same name as your add-in .dll, (minus the .dll portion of the name. Example full path to the new folder: "C:\Program Files\Autodesk\Inventor OEM 2014\Bin\MyOEMApp").
Copy the add-in .dll to the new folder.
- Copy the .addin file to one of the following folders, depending on the scope of your add-in, and the operating system.
-
Version Independent
If an .addin file is present in the following locations, the add-in loads in multiple versions of Inventor, based on the values of the "SupportedSoftwareVersionXXX" settings in the manifest file..
- Windows XP C:\Documents and Settings\All Users\Application Data\Autodesk\Inventor Addins\
- Windows7 C:\ProgramData\Autodesk\Inventor Addins\
-
Version Dependent
A manifest file present in the following locations indicates that the add-in loads in a specific version of Inventor. Any values of the "SupportedSoftwareVersionXXX" settings in the manifest file are ignored.
- Windows XP C:\Documents and Settings\All Users\Application Data\Autodesk\Inventor 2011\Addins\
- Windows7 C:\ProgramData\Autodesk\Inventor 2011\Addins\
-
Per User Override
When you saver per user overrides, the manifest file generates automatically in the following locations. The settings in these manifest files override the setting values in the manifest files in the 'all users' folder. The names of these override manifest files match the names of the "master" files.
- Windows XP C:\Documents and Settings\<user>\Application Data\Autodesk\Inventor 2011\Addins\
- Windows7/Vista C:\Users\<user>\AppData\Roaming\Autodesk\Inventor 2011\Addins\
-
Version Independent