Match Grade
The Match Grade feature allows you to apply current grade settings to a new assembled timeline without having to create a new cut file and use the Change Cut option. For information about the Change Cut option, see Changing a Cut.
When you enable Match Grade during a timeline assembly, the function applies the appropriate grade to any shots that are also included in the current cut. Match options are also available to allow you to specify the basis of the match.
To apply the current grade settings to a new assembled timeline:
Make sure a graded cut is already loaded into the timeline.
To specify the basis of the match, select one or more Match Options from the Browse menu.
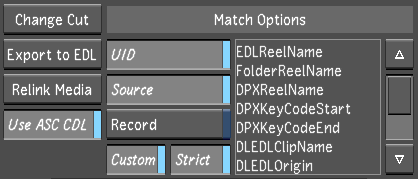
UID
Performs matching based on the shot's unique ID.
Note:UIDs are regenerated every time a new cut file is created in Lustre.Source
Performs matching based on source data, such as a shot's source timecode, ID, and tape/reel name.
Record
Performs matching based on record data, such as an EDL's record timecode.
Custom
Performs matching based on the keyword that is selected in the custom list.
If the Custom option is enabled, there is a list of keywords to which you can associate the custom option.
Select: To: EDLReelName Match the reel name of the EDL. FolderReelName Match the folder reel name. DPXReelName Match the DPX reel name. DLEDLClipName Match the clip name of the shot coming from the Wiretap server. DLEDLOrigin Match the image import path and file name of the timeline coming from the Wiretap server. DLEDLSourceId Match the media source’s unique ID of the timeline coming from the Wiretap server. DLEDLSegmentId Match the segment’s unique ID of the timeline coming from the Wiretap server. DLEDLStartTc Match the start source timecode of the timeline coming from the Wiretap server. DPXKeycodeStart Match the DPX header keycode start. DPXKeycodeEnd Match the DPX header keycode end. EDLComment Match the unique comment that is applied to the original cut from another application. In the Assemble menu, enable Match Grade.
Assemble the EDL, ALE, or CTL file.
Click Browse to display the Browse menu.
Save the new cut file.
Click Setup, and then click Grade to display the Grade menu.
Click New Version to save the grade with the newly associated cut.
When working with a multi-layer timeline and Solo mode is disabled, the layers are flattened and only the grade settings from the shots that are visible in the Storyboard are applied to the newly assembled timeline. When working with a multi-layer timeline and Solo mode is enabled, only the grade settings from the active layer are applied to the newly assembled timeline. If the new timeline has multiple layers, then the grade setting is applied to each layer.