In this exercise, you set DWF publishing options that specify the object data to publish with your map. Then you publish your map to a DWF file.
To set publishing options
- Navigate to and open the Street_Centerlines.dwg map you used in Lesson 2: Clean Up Your Drawings.
- Click
 .
.

- In the Map Information dialog box, select Publish Map Information.
- In the Map Information dialog box, expand the items in the list and select Street_Centerlines.
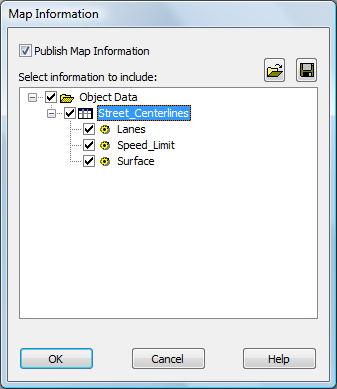
When you select Street_Centerlines, everything under Street_Centerlines is automatically selected.
- To publish the information to an XML file, click the save icon and specify a location for the published file. Click Save.
The DWF Publish operation uses the XML file.
- Click OK.
To publish to DWF
- Save your map.
You cannot plot or publish without saving first.
- Just below your map, click the Layout 1 tab.

If you do not see the tabs, right-click
 (the Model Space icon). Click Display Layout and Model Tabs.
 - Click Output tabPlot panelPlot.

- In the Plot dialog box, under Printer/Plotter, select DWF6eplot.pc3.
- Click Apply To Layout, and then click Cancel.
Printer/plotter settings are applied to your publishing job without sending the job to a plotter or printer.
- Click
 Publish.
Note: Do not choose an option from the Publish submenu. Click the word Publish in the application menu.
Publish.
Note: Do not choose an option from the Publish submenu. Click the word Publish in the application menu. - In the Publish dialog box, do the following:
- In the Sheets List, make sure that only the sheets you want are selected.
For example, if another map is open, its model and layout views appear in the list. The default Layout2 view of the current map also appears. Select any undesired entries (such as Layout2) and click
 .
.
- Under Publish To, select DWF .
- Click Publish Options.
- In the Sheets List, make sure that only the sheets you want are selected.
- In the Publish Options dialog box, do the following:
- Click Layer Information (under General DWF/PDF Options).
- On the pull-down menu in this field, click Include.
Each layer in your map becomes a separate layer in the DWF output. In Design Review, you can turn the display of these layers on and off independently.
- Click OK.
- In the Publish dialog box, do the following:
- Click Publish (at the bottom of the window).
- Specify a location and a name for the published file and click Select.
- If you are prompted to save the sheet list, click No.
- If you see a message about the job processing in the background, click Close to dismiss the message.
The files needed by Autodesk Design Review are published to the file you specified.
- Monitor the progress of the publishing operation by holding your cursor over the animated icon in the lower-right corner.
- When the job is complete, a bubble appears in the bottom, right-hand corner of the window. Click the link in the bubble to view any warnings or errors. Close the window when you are finished.
Where you are now
You exported your map to an Autodesk SDF file. You also published your map to a DWF file. People without a copy of AutoCAD Map 3D toolset can view your published map using a free, downloadable viewer available from http://www.autodesk.com/designreview.