
Use componentTags to create membership tags to replace the groupID nodes that are normally generated when deforming geometry. Component Tags create a procedural, topology-independent workflow that lets you edit as you work, and declutters in the Node Editor by eliminating unnecessary nodes.
You can edit the membership of
Component Tags in the
Component Tags section of each shape node in the
Attribute Editor.
Note: Be sure to activate the
Component Tags option in the
Animation (Settings) preferences, so that a componentTag attribute is automatically assigned to every geometry node.
Because
Component Tags let you name and separate out selections of components within geometry, use can use them to:
- Apply deformers only to specific areas of geometry
- Create editable deformation falloff effects to specific areas of geometry. See Create deformer falloffs using Component Tags
- Automatically make lookup tables that feed into your component list. See Create vert lookup tables with the componentMatch node
- Add Component Tags
-
- Select the geometry on a polygon on which you want to add a Component Tag: faces, vertices, or edges. (To select components on geometry, press F8 to enter Component mode, and Shift or Ctrl-select components.)
- In the Attribute Editor, click the shape node tab of the geometry and expand the Component Tags section. (The settings in this section are described in Component Tags table.)
- Click the
Add icon
 on the right side of the table to create an
unnamedTag entry.
on the right side of the table to create an
unnamedTag entry.
- Right-click the new unnamedTag and select
Components >Replace to fill the tag with your selected components.
Note: You cannot combine different component types, for example faces and edges, in the same Component Tag selection.
- Right-click the unnamedTag Component Tag in the table and select Components > Rename. A window appears to enter a name for the Component Tag.
- Click Ok.
- Delete or Rename Component Tags
- In the Attribute Editor, click the geometry shape node and expand the Component Tags section to view the Component Tag table.
- Right-click the corresponding row in the table and select Delete or Rename. To edit the membership of a Component Tag, see the steps for Add/Remove, below.
-
Note: Component Tags are included with some primitives by default. If you don't want them applied, go into the primitive Tab (for example, Cube1) in the Attribute Editor and turn off the Component Tag Create option.
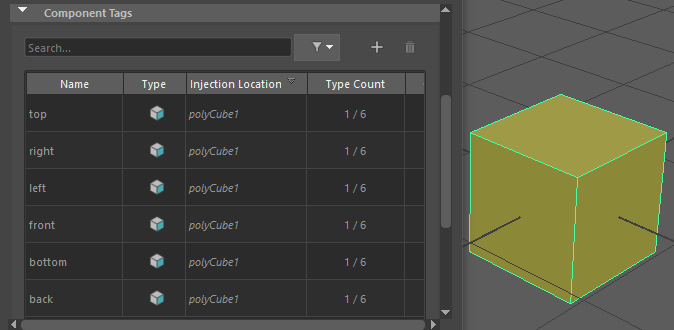
The default Component Tags of polyCube1.
- Add/remove elements from a Component Tag membership
- In the
Component Tags section in the
Attribute Editor, right-click the
Component Tag entry in the table and choose the following functions:
Option Function Replace Fills the Component Tag membership with the selected components. Note: You can only add/remove the same component type from a Component Tag. For example, you cannot add edges to Component Tag selection of faces.Add/Remove Increases or decreases the Component Tag membership by the selected components.  Merge
Merge
Creates a new Component Tag from multiple selected tags. Note: You cannot combine different component types, for example faces and edges, in the same Component Tag selection. Duplicate
Copies the selected Component Tag. Clear Empties the Component Tag membership. This lets you wipe out all the existing assignments of a Component Tag, but keep the name so you can reuse it.
Convert Tag Components
Changes the select component type to Edges, Faces, or Vertices.