+
The simplest way to test LODs is to move the camera in your scene. By default when you create an LOD group it gets associated with the current camera, and one level of the LOD group displays at a time depending on the percentage of screen height taken up by the overall LOD group in the current camera frame.
Because the LOD system starts to switch geometry based on a specified threshold after you create the group, you may still want a way to zoom in and out on the mesh for a particular level, or to preview the different meshes at the same time in order to compare them.
To zoom in and out on a particular level
- Using the camera associated with your LOD group, zoom in or out until the level you want to examine displays in the viewport.
- Switch to a different camera, then zoom in to examine the mesh.
Since you're not using the camera associated with the LOD group, the LODs stop swapping in and out, letting you get a closer look at the level you want.
To view more than one object in the group at a time
- In the
Hypergraph or
Outliner, select the level of detail group node.
The LOD node attributes display in the Attribute Editor and Channel Box.
In the Attribute Editor, you can see the Lod attributes section lists an LODn Display option for each level, with a drop-down list containing three possible settings: uselod, show, and hide.
By default, all levels are set to uselod, which means geometry is switched out according to the group threshold values. - For each level that you want to preview, set the drop-down to
show.
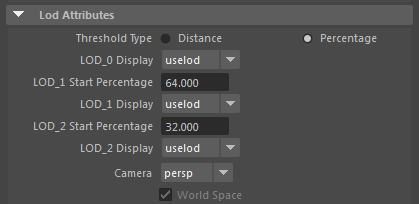
- When you're ready to return to the regular level of detail behaviour (letting levels switch based on the threshold), reset all LODn Display attributes to uselod.