To open the Node Editor
To create a node, do as follows:
Create a node (Method 1):
- Press Tab and enter the type of your node.
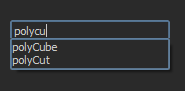
You can enter the keyword for the node that you want to create. As you enter a keyword, the Node Editor updates in real time and only nodes with names that match what you entered are displayed. If the keyword appears in the middle of a node name, the node also appears in the search results.
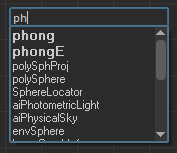
Tip: Press Enter to create the first node in the list of available nodes. In the example below, pressing Enter creates the polyCube node.
Tip: If there is only one node that matches what you have entered, then pressing Enter automatically creates the node. In this example, a polySphere node is created automatically when you press Tab.

Note: If you attempt to create a node type that does not exist in Maya, an error message appears informing you that the node cannot be created. The Tab creation UI then remains open for you to correct the error.
Create a node (Method 2):
- Right-click any empty area in the Node Editor to access the work area marking menu and select Create Node.
- Middle-drag a node into the Node Editor, and drop it in the desired location. Alternatively, you can click the node that you want and it appears in the Node Editor.
Create a node (Method 3):
- Click
 on the
Node Editor toolbar to open the create node pane.
on the
Node Editor toolbar to open the create node pane.
-
Middle-drag a node from the create node pane into the Node Editor work area. Alternatively, you can left-click the node that you want and it appears in the work area.