You can customize the list of attributes displayed for each node type.
This topic is applicable to both the Node Editor and the Hypershade.
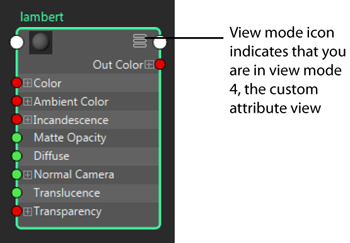
To create a custom list of attributes, right-click the node and select Edit Custom Attribute List. You can then use view mode 4 to display your node in this custom attribute view.
Create a custom list of attributes
- Right-click the node and select Edit Custom Attribute List.
The node switches to Edit mode and is highlighted with a yellow border. All visible attributes are highlighted in white. All hidden attributes are greyed out.
If you have never previously edited the attribute list for this node, then all the attributes for the node are listed, and all primary attributes are set as visible. In other words, the visible attributes list is the same as that of view mode 3.
If a custom list currently exists for this node, then the attributes are listed as they are saved in the list.
The node is drawn without any connection ports and all connections are drawn in grey. The node is also locked in place and you cannot make any connections to the node being edited. (If you try to make connections to another node in the Node Editor, you will exit out of Edit mode.)
- Toggle your attributes to set them as invisible or hidden:
- To make an attribute visible, toggle it so that it is highlighted in white.
- To hide a visible attribute, toggle it so that it is greyed out and italicized.
Note: Use the filter field to quickly find the attributes that you want to set as visible or hidden.
- Change the order of attributes in the list by middle-dragging the attributes.
- Commit your changes by doing one of:
- Click the view mode icon
 on the node
 - Select another node
- Right-click the node for its marking menu and disable Edit Custom Attribute List.
After you have committed your changes, your custom attribute list is saved as a template to $MAYA_APP_DIR/<app_ver>/[localized]/prefs/viewTemplates/, with the filename NE<NodeType>Template.xml.
Note: This is the default location to which the Node Editor template files are saved. You can override this location by setting the MAYA_CUSTOM_TEMPLATE_WRITE_PATH environment variable.After you have committed your changes, all other nodes that are of the same type, and that are already displaying in custom mode, refresh automatically to show the updated custom attribute list.
Note: To exit out of Edit mode without committing your changes, press .
. - Click the view mode icon
Edit mode menus
-
Preview: Preview how your node will appear if you commit your current changes. The node lists all the attributes that are visible and in the order that they would appear. A heads up display appears on the upper right corner of the Node Editor, informing you to click the mouse to exit Custom Attribute Preview.
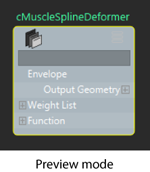
You can press Esc or click your mouse to exit Preview mode.
- Hide All: Set all the attributes to hidden.
- Show All: Set all the attributes to visible.
- Revert: Revert back to the settings you had before you entered Edit mode.
- Reset View: Reset the settings to that of view mode 3; that is, all primary attributes are visible.
Display the custom attribute view
To display the custom attribute view, you can do one of the following:
- Use the 4 hotkey
- Click on the Node Editor toolbar
- Cycle through the view mode icon on the top right corner of the individual node to
- Select Edit > Custom Mode
As with the other view modes, you can display the custom attribute view for an individual node, for selected nodes, or for all the nodes.
If you select multiple nodes (or no nodes at all) and switch to custom mode , then each node that has a custom attribute template displays its custom attribute view, while each node that does not displays in full mode.
A custom attribute template is applied to all instances of the same type of node. For example, if you create a custom attribute list for pSphereShape1, then pSphereShape2/3/4 and so forth all use the same template. However, you can also create a Node Editor template for a specific node. To do this, manually rename the saved .xml file to include the node name: NE<NodeType>.<NodeName>Template.xml.
Save a custom attribute list as a template and share on the network
After you have created a custom attribute list, the list is saved as a template to your $MAYA_APP_DIR/<app_ver>/[localized]/prefs/viewTemplates/ folder by default. You can also override this location by setting the MAYA_CUSTOM_TEMPLATE_WRITE_PATH environment variable.
You can share your templates with other users by placing them on a network location, then setting the MAYA_CUSTOM_TEMPLATE_PATH environment variable to the network location at which you saved your template. You can set this environment variable to multiple paths. MAYA_CUSTOM_TEMPLATE_PATH supports multiple paths that can be separated by a ; on Windows and : on Mac OS X/Linux.
When you create a node, Maya searches for Node Editor templates in the following order. The first template found is used:
By default (that is, MAYA_CUSTOM_TEMPLATE_PATH is not set):
- ..\prefs\viewTemplates
- ..\scripts\NETemplates (of your installation directory)
Otherwise, if you have set MAYA_CUSTOM_TEMPLATE_PATH:
- MAYA_CUSTOM_TEMPLATE_PATH
- ..\scripts\NETemplates (of your installation directory)
See Save preferences for more information on where preferences are saved.
Identifying between nodes with a custom attribute list and nodes without
When you click hotkey 4, or in the toolbar, or select Edit > Custom Mode, nodes that have a corresponding custom attribute list display with a on the top right corner, while nodes that do not have a corresponding custom attribute list display with a  on the top right corner.