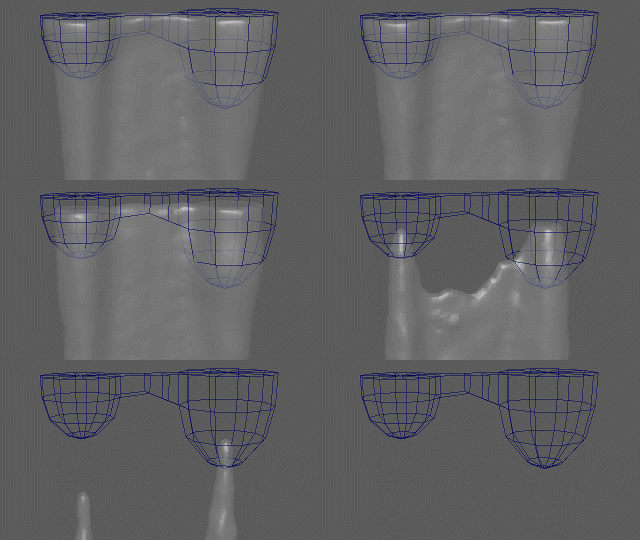
You can animate fluid emitters turning off and on in a Bifröst simulation, for example, to show a faucet being shut off. There are several techniques that may be applicable, depending on the situation.
Turn an emitter off or on immediately
- Select the bifrostEmitterProps node and display its emitterProps tab in the Attribute Editor.
- In the Properties group, make sure that Enable is on.
- Set keys on Continuous Emission to turn the emission off and on at specific frames. Depending on your version of Maya, you may be able to do this directly by right-clicking on Continuous Emission in the Attribute Editor, or you may need to use the Channel Box.
Turn an emitter off gradually by scaling it
If you are using a simple, non-rendered mesh as an emitter, then the easiest way to turn it off or on gradually is to animate its scaling to or from 0 in one or more axes.
Turn an emitter off or on gradually using its boundary
You can activate and animate an emitter's boundary to turn it off or on gradually. This method can be useful in particular cases, such as when the emitter mesh needs to be rendered or if you do not get the desired results by scaling the emitter mesh.

- Select the bifrostEmitterProps node and display its emitterProps tab in the Attribute Editor.
- In the
Boundary Controls group, turn on
Enable.
The default shape is a box with sides of length 2, displayed as a wireframe in the viewport.
- Select a different
Boundary Shape if desired, and then scale, rotate, and translate the bifrostEmitterProps node to enclose all or part of the emitter's geometry.
The fluid gets emitted in the intersection of the boundary and the emitter's geometry.
- Animate the bifrostEmitterProps node's transformations to increase or decrease the volume of the intersection.
Turn an emitter off or on gradually using thickness
You can animate the thickness used to voxelize an emitter mesh to turn the emission on or off gradually. This method may be slower than other techniques, but it can be useful when the emitter has an irregular shape and other methods do not give the desired result.

- Select the bifrostEmitterProps node and display its emitterProps tab in the Attribute Editor.
- In the
Conversion group, select a value for
Thickness Units:
- Voxels uses Voxel Scale × Master Voxel Size (set in the main fluid properties).
- World Space uses the scene grid units, when the Linear working unit is left at the default value of centimeter in the Settings preferences.
- Animate the Thickness attribute to control the volume where particles get emitted. Use lower values to shrink the volume and emit fewer particles, and use higher values to expand the volume and emit more particles. To turn the emission off completely, use a negative value with a magnitude that is at least half of the smallest dimension of the emitter's bounding box.