You can use a deforming plane or other flat mesh to guide the surface of a Bifröst liquid simulation, while restricting the simulation to one or more specific regions. This is useful for shots like a boat on an ocean, where a large expanse of water must be rendered even if splashes and other simulated effects are needed only for a portion of it.
Elements of a guided simulation
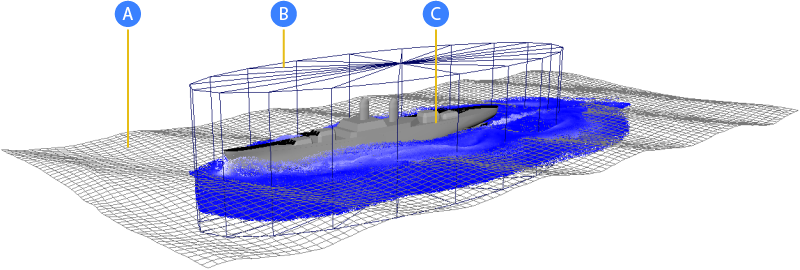
- A. Guide mesh
-
The guide mesh defines the liquid surface, and the animation of its vertex positions provides the velocity input that guides the simulation. By controlling the deformation of the mesh, you can direct the surface waves artistically.
If the guide mesh has a color set named bifrostVelocity, the color set will be used as the guiding velocity input instead of the animated vertex positions. In particular, the mesh must have a bifrostVelocity color set if its topology changes (as might be the case with a cached geometry), because the velocity cannot be computed from the vertex positions when there is no correspondence between the vertices from one frame to the next. The RGB color channels correspond to the world-space XYZ velocity components in m/s, assuming that the scene has been modeled to a scale of 1 cm in Maya being 1 m in Bifröst.
For best results, the velocity should have both horizontal and vertical components. In addition, the waves in the guide mesh should move in a manner that's not too different from real waves. If the waves are extremely fast, slow, or big, then the simulation may have artifacts or produce other unexpected results.
In a typical workflow, you might also use the mesh for rendering the non-simulated regions of the liquid surface, and then blend between the simulated and non-simulated renderings during compositing.
As an alternative to using a mesh as a guide, you can use a low-resolution simulation to guide a high-resolution one — see Guide a Bifröst liquid with a low-resolution simulation.
- B. Emission region
-
Emission regions define the volume in which liquid is emitted. Limiting the emission in this way saves memory and computation time.
As an alternative to using a separate mesh to define an emission region as illustrated, you can use the same meshes that are being used as colliders, and specify the thickness of an emission region around them.
The emission regions can be both animated and deforming. As the regions move, new particles are seeded in formerly empty areas, and particles outside the regions die after a time interval that you can set.
The emission regions should not extend horizontally beyond the guide meshes.
- C. Collider
-
The liquid interacts with colliders such as boats and rocks, creating effects such as splashes, wakes, and bow waves.
To guide a simulation with a mesh
- With nothing selected, select . This adds a liquid simulation to the scene, but there are no particles because no emitters have been defined.
- Select the guide mesh, as well as the main simulation container (e.g.,
bifrostLiquid) or shape (e.g.,
liquid), and then select
.
The selected mesh is connected to the simulation as a guide with a mesh property (e.g., guideMeshProps). In addition, the following attributes are automatically enabled in the main guide properties (e.g., bifrostGuideProperties):
- Enable in the Guided Simulation group.
- Mesh in the Input subgroup.
- Select one or more meshes to act as colliders, as well as the main simulation container or shape, and then select
. For more information, see
Work with Bifröst colliders.
Repeat to add more colliders, if desired.
- Do one of the following:
- Create one or more meshes to define the volume of an emission region. Make sure that they extend below the guide to at least the depth that you want to simulate, and that they also contain sufficient space for splashes above the guide. Select the meshes as well as the main simulation container or shape, and then select . Hide the meshes, or make them otherwise unrenderable.
- Select one or more of the collider meshes as well as the main simulation container or shape, and then select . In the Conversion attributes of the emissionregionProps node, set Thickness to a positive value to define a band of emission around the meshes (because particles won't be emitted inside a collider).
Repeat to add more emission regions, if desired. Each set of meshes is connected to the simulation with a separate emission region property. To connect one or more meshes using an existing property, select the meshes and the property node (instead of the simulation container or shape) and then select .
-
Once there is at least one emission region, you should see a band of liquid below the guide surface inside the emission regions on the first frame of the simulation, and you can adjust the settings as desired. In particular:
- Min Simulation Depth in the main guide properties controls the depth of the liquid in world space, and may need to be adjusted depending on the situation and the scale to which the scene was modeled. For example, to create a boat wake, the liquid should extend below the bottom of the hull with at least some room to spare, and longer or faster boats may need more depth.
- If you want surface splashes with no depth, you can set Min Simulation Depth to 0.0 and use Surface Layer to control the height of a thin band of liquid on top of the surface. You can also use non-zero values for both attributes to have liquid above as well as below the guide mesh.
- Use Blend with Guide on the guide mesh properties to control the blend from the simulated velocities at the center of the emission region to the input guide velocities at the boundary of the region. This helps to provide a smooth transition from the simulation to the guide mesh.
- To control how long particles survive in seconds after they have left an emission region, set Death Age in the Emission attributes of the emission region properties.
- For best results in general, make sure that all particle density settings are equal. This includes Particle Density in the Particle Reseed group of the global guide properties, as well as Interior Particle Density and Surface Particle Density in the Emission group of the liquid properties.
For more information, see Bifröst guideProperties attributes and EmissionRegionProps attributes.
- Play back, and adjust the settings further as necessary (see Adjust a Bifrost guided simulation). Use a low resolution at first (high Master Voxel Size), and then increase the resolution once it's working satisfactorily.