- In the Animation, Modeling, and Rigging menu sets:
Deform > (Create) Tension >

- Basic Tab
-
- Smoothing iterations
-
Lets you set the number of times the smoothing algorithm is run. If you set a large number of Smoothing Iterations, the amount of smoothing the vertices receive is increased, which provides better results. However, the more times the smoothing algorithm is run, the longer the effect takes to process. The default iteration value is 10.
- Smoothing step
- Specifies the smoothing step size used per smoothing iteration. Higher values may lead to instabilities but converges faster versus lower ones.
- Pin Border vertices
- The pinBorderVertices attribute specifies that vertices on the outside of the mesh are excluded from tension deformer effects and therefore act as anchors on the tension deformation.
Note: Vertices that are not part of the selection when the tension deformer is created are also pinned. This means that the vertices adjacent to the vertices being affected by the tension deformer are used as anchors.
- Relative
- By default, the tension deformer will work to preserve original edge lengths (The default is 0.0). When Relative is turned on, it maintains the relative lengths of all edges that join a specific vertex. This means that if the mesh is scaled up or down uniformly and Relative is set to 1.0 (the full value), the tension deformer has no effect.
- Inward/Outward constraints
-
Note: This setting appears only in the Tension pane of the Attribute Editor and not in the Options window.
- The inwardConstraint and outwardConstraint attributes limit the vert motion over the deformed surface. The inward constraint stops the vertex moving under the surface, while the outwardConstraint stops the vertex moving outside the surface to preserve the current geometry contour.
- Squash/Stretch constraints
-
Note: This setting appears only in the Tension pane of the Attribute Editor and not in the Options window.
- The Squash and Stretch constraints control how much the Tension deformer tries to prevent squashing and stretching of the geometry. You can turn down the Squash Constraint to avoid surface buckling, but turning the Stretch Constraint down to 0.0 is not recommended because setting both stretch and squash to 0.0 effectively disables the deformer. (In most cases Stretch should remain at 1.0.)
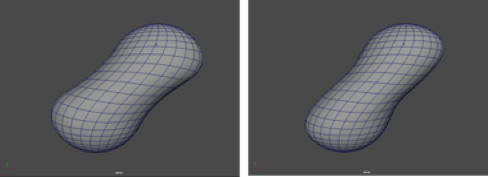
- The Squash constraint automatically creates wrinkles.
Squash set to 0
Squash set to 1
- Shear/Bend constraint
-
Note: This setting appears only in the Tension pane of the Attribute Editor and not in the Options window.
- The shearStrength and bendStrength attributes control the strength of the forces that use the shear and bend connections, relative to the main edge connections. The shear connections are formed by connecting each vertex to the other vertices in a face to maintain the face surface area. Bend connections are formed by connecting one extra level of the original edge connections to give the surface some extra stiffness.
- A higher Bend value makes the skin stiffer.
- Advanced Tab
-
- Deformation order
- Specifies the deformer’s placement in the deformable object’s deformation order. The placement can affect the deformer’s effect and performance.
Default Maya typically places the deformer immediately before (as an Input) the deformed shape.
This is the same as Before unless the deformer is going to act on a shape node with no history. In this case, the order will be the same as After.
When you create a number of deformers for an object with Default, the result is a deformation chain whose order is the same as the order in which you created the deformers.
Before Maya places the deformer immediately before the deformable object’s deformed shape. In the object’s history, the deformer will be placed right before the deformed shape. Default typically provides this type of placement.
After Maya places the deformer immediately after the deformable object. You can use After to create an intermediate deformed shape somewhere in the middle of the object’s history. With After, the original shape of the object is not hidden.
Split Maya splits the deformation into two deformation chains. You can use Split to deform an object in two ways at the same time, creating two final shapes that originate from the same original shape.
Parallel Maya places the deformer in parallel with the existing input nodes in the object’s history, and then blends the effects provided by the existing input nodes and the deformer. A parallel blender node (default name: parallelBlendern) that blends the effects of the existing input nodes and the new deformer is placed before the final shape.
The parallelBlender node provides a weight channel for each deformer, which you can edit.
- Exclusive
-
Specifies whether the deformer set is in a partition. Sets in a partition can have no overlapping members. If on, the Partition To Use and Partition Name options become available. Default is off.
- Partition to use
-
Lists any existing partitions, and a default selection New Partition. If you select New Partition, you can edit the Partition Name field to specify the name of a new partition. (Available if Exclusive is on.)
- Partition name
-
Specifies the name of a new partition that will include the deformer set. The suggested partition name is deformPartition, which will be created if it does not already exist. Typically, you might put all your exclusive deformer sets in the partition named deformPartition. However, you can create as many partitions as you like, and name them whatever you want. Only available if Exclusive is on.