
Use a Component Tag expression to define deformer memberships dynamically. You can edit Component Tag membership in the Component Tags area of each shape node in the Attribute Editor.
You can use colons (:) and periods (.) in Component Tags names. See the Naming Syntax section of the Component Tag Expressions topic.
Note: Make sure that you have activated the
Component Tags in the
Animation (Settings) preferences, a
componentTag node is assigned to every geometry node.
See Assign Component Tags to Geometry for information on how to use Component Tags to define deformer memberships.
- Select a Component Tag
-
-
- Select the geometry in the Outliner or Viewport.
- In the Attribute Editor, click the shape node of the geometry and expand the Component Tags section.
- Right-click a Component Tag in the table, and choose Select Components from the menu. If nothing is listed in the table, make sure the geometry is selected.
- Add/remove elements from a Component Tag membership
-
- Increases or decreases the Component Tag membership by the selected components.
Note: You can only add/remove the same component type from a Component Tag. For example, you cannot add edges to a Component Tag selection of faces.
-
To add elements to an existing Component Tag
- In the Component Tag section in the Attribute Editor, select the Tag that you want to add more components to.
- Go to the geometry, press Shift, and select the components you want to add.
- In the Component Tag table, right-click the tag to which you are adding components and select Add Selected.
To remove elements from an existing Component Tag
- In the Component Tag section in the Attribute Editor, select the Tag that you want to subtract components from.
- Go to the geometry, press Ctrl, and select the components you want to subtract from the grouping.
- In the Component Tag table, right-click the tag to which you are adding components and select Remove Selected.
 To change component type of an existing
Component Tag
To change component type of an existing
Component Tag
-

-
- In the Component Tag section in the Attribute Editor, select the tag that you want to change components.
- Right-click the corresponding row in the table and select Convert to Faces, Edges, or Verts.
- Click Select Components to view the change.
-
To combine
Component Tags into a new tag
-
-
- In the Component Tag section in the Attribute Editor, Shift or Ctrl-select the Component tags that you want to compine.
- Right-click a corresponding row in the table and select Merge. A new MergeTag is created from the selected tags.
- Click Select Components to view the change.
- To use Component tags for Material assignments
- You can create Material Templates that let you apply Materials to tagged areas.
Note: The geometry that you want to assign a material to must have Component tags. If it does not, the material is applied to the whole geometry. See Assign Component Tags to geometry.
-
- With the geometry selected, click Create New Template. A new row is added to the Material Template table.
- Double-click in the Component Tag Expression field and begin typing to see the list of Component tags assigned to the geometry. Choose the tag you want to assign the material to. If no geometry is selected, the options are grayed out. If nothing is selected in the Component Tag Expression field, an asterisk (*) is shown and the material is applied to the whole geometry.
- The default material is the scene's default material (often Lambert 1). Right-click anywhere in the Material Assignment table row to select a material, assign a new or existing material, as well as select expression components, add, or delete rows.
- Other Component Tag membership editing options
- For other options, right-click the corresponding
Component Tag row in the
Component Tag table and select:
- Delete removes the tag.
- Rename... opens a window where you can name the tag.
- Duplicate copies the tag.
- Replace with Selected fills the Component Tag membership with the selected components.
- Use Clear to empty the Component Tag membership so you can wipe out all the assignments of a Component Tag, but keep the name so you can reuse it.
-
Note: Component Tags are included with some primitives by default. If you don't want them applied, go into the primitive Tab (for example, Cube1) in the Attribute Editor and turn off the Component Tag Create option.
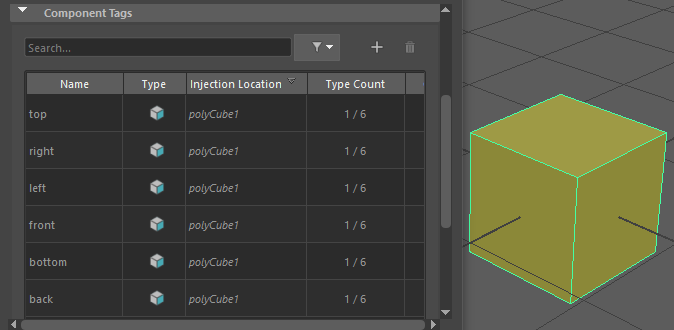
The default Component Tags of polyCube1.