When you create a blend shape deformer (see Create blend shape deformers), a blendShape node and Tweak node are created for it. These nodes appear in the scene’s dependency graph as an input of the base object’s Shape node, as you can see in the Channel Box.
See the table below this image for information on the nodes and attributes associated with blend shape deformers.
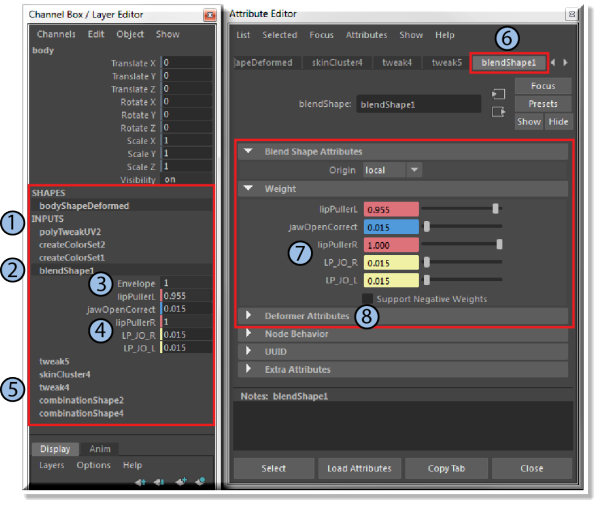
| 1 - Deformation order |
The order in which all deformers are stacked (called the deformation order) determines the order in which Maya evaluates them. The deformers are evaluated starting from the bottom of the stack. In general, you can apply as many deformers to an object as you like.
Because the deformation order matters, you can create a great variety of effects. For example, if you create a Bend deformer and then create a Sine deformer, the result is different than if you first created the Sine deformer and then created the Bend deformer. The order of the blendShape node in the object's history is determined by other deformers on the base object when you create it, which you can set in the Blend Shape Options when you create the blend shape deformer. You can also change the deformation order (see Change the deformation order) after creation, such as by moving the Tweak node above the blendShape node so that it's evaluated after the blend shape deformation. |
| 2 - blendShape node |
The blendShape node is the actual blend shape deformer algorithm itself, and acts as a kind of "container" for all target shapes that are created in it. This node calculates the influence of each target shape, and then interpolates those values to come up with the blend shape that deforms the base object. You can have more than one blendShape node on an object or group of objects. Each node calculates only its target shapes in relation to the others in the node in an additive fashion (that is, the results of each shape are added together, not averaged or normalized). |
| 3 and 8 - Envelope attribute |
A blendShape node includes the Envelope attribute, which controls the overall influence of the blend shape on the base object - see Scale the influence of the blend shape. You can also edit this attribute in the Shape Editor. |
| 4 and 7 - Target shapes with Weight sliders |
A blendShape node includes Weight attributes that control the influence of each target shape on the blend shape - see Set weights for target shapes. You can also edit these attributes in the Shape Editor. |
| 5 - tweak node |
The tweak node is created for an object as soon as you create a deformer for it - in this case, the blend shape deformer. It keeps track of the transformation of the vertices (the deformation) on the object by storing its vertex position information. This ensures the proper transformation of vertices when you deform the object. When you delete the tweak node, all the transformation information for the vertices that are affected by the deformation is erased, which is an easy way of removing deformations from an object. See Point tweaking on objects for more information. |
| 6 - blendShape attribute tab |
A blendShape node includes these attributes that you can edit in the Attribute Editor - see Blend Shape Attributes. Most of these are also available in the Channel Box and the Shape Editor. |