Move object components

Move curve and NURBS surface CVs
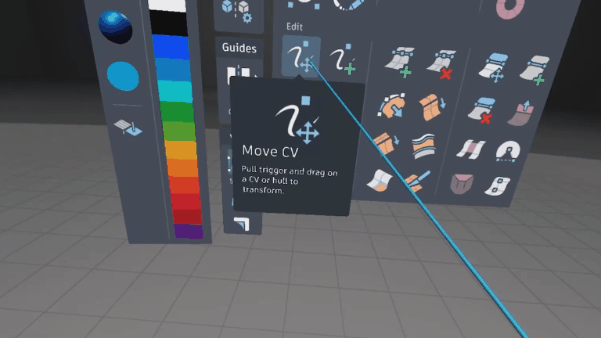
Select the Move CV tool
 .
.Hover the stylus over the CVs you want to move.
The selected CVs highlight.
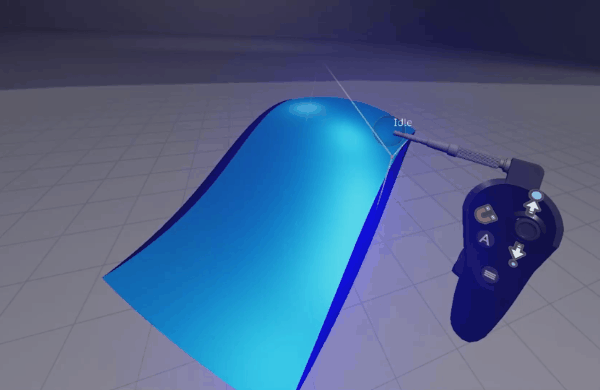
Do either of the following:
- To move the CVs freely in space, pull the trigger and drag them into position.
- To move the CVs along the X, Y, or Z axis, drag them until they snap to a vector, red for the X axis, blue for the Y axis, or green for the Z axis.
Release the trigger to complete.
Move curve and NURBS surface CVs using the Transform Manipulator

You can move and rotate CVs with greater precision along a specific axis or plane by using the Transform Manipulator.
![]()
While using the CV Move tool, activate the Transform Manipulator
 by pressing A (Oculus) or left on the D-pad (VIVE).
The Transform Manipulator appears in the scene.
Pull and hold the Tool hand trigger on the individual handles and rings of the tool, and drag to transform.
- Use the arrows to move the CVs along the X, Y, or Z axis, or the XY, YZ, or XZ plane.
- Use the cubes to scale along the X, Y, or Z axis. Use the gray handle to scale it proportionally.
- Use the rings to rotate the CVs. The inner ring allows free rotation, while the outer ring snaps rotation to 5 degree increments.
Press the check-mark
 icon on the Tool Hand to complete.
Move NURBS surface hulls
Hover the stylus over the Hull you want to move.
The selected Hull will be highlighted
Hold the trigger and drag the Hull.
An animated dashed-line will highlight the location of the Hull for guidance. This is helpful when unsnapping CVs from two different surfaces.
Move sub-d CVs, edges and faces
Video contents
- 0:04 - About the the contextual CV Move tool
- 0:50 - Move CVs freely
- 0:55 - Move CVs along the X, Y, or Z axis
- 1:14 - Move edges using the individual Move tool
- 1:53 - Move faces using the individual Move tool
- 2:32 - Transform sub-d components using the Transform Manipulator
Use the Move Sub-d Components tool to move sub-d CVs, edges and faces.
Select the Sub-d Move tool
 .
.Do one of the following:
Hover the tool sphere over a CV.
Hover the tool sphere over an edge, and tap right or left on the analog stick (Oculus) or D-pad (VIVE) to choose a selection mode
- Move Edge (One) - Selects a single edge.
- Move Edge (Multi-select) - Selects specific edges. Hold the trigger and drag over multiple edges to manually select them, then release the trigger to complete your selection.
- Move Edge (Edge Loop) - Selects an edge loop for modification.
Hover the tool sphere over a face, and tap right or left on the analog stick (Oculus) or D-pad (VIVE) to choose a selection mode:
- Move Face (One) – Selects a single face.
- Move Face (Smart) – Selects all faces on a flat surface.
- Move Face (Face Loop) – Selects all faces along a face loop.
- Move Face (Corners) – Selects all faces on a flat surface, including faces attached to creased edges.
Faces and edges to be moved are highlighted.
Do either of the following:
- To move the components freely in space, pull the trigger and drag them into position.
- To move the components along the X, Y, or Z axis, drag them until they snap to a vector: red for the X axis, blue for the Y axis, or green for the Z axis.
Press up or down on the analog stick (Oculus) or D-pad (VIVE) to enlarge or shrink the selection.
Release the trigger to complete the transformation.
Move sub-d components using the Transform Manipulator
You can move and rotate sub-d components with greater precision along a specific axis or plane by using the Transform Manipulator.
While using the Move Sub-d Components tool, activate the Transform Manipulator
by pressing A (Oculus) or left on the D-pad (VIVE).The Transform Manipulator appears in the scene.
Pull and hold the Tool hand trigger on the individual handles and rings of the tool, and drag to transform.
- Use the arrows to move the components along the X, Y, or Z axis, or the XY, YZ, or XZ plane.
- Use the cubes to scale along the X, Y, or Z axis. Use the gray handle to scale it proportionally.
- Use the rings to rotate the components. The inner ring allows free rotation, while the outer ring snaps rotation to 5 degree increments.
Press the check-mark
icon on the Tool Hand to complete.