These are the toolbar buttons on the Hypershade Browser. For more information about Hypershade, see Hypershade window.
- Pause materials and textures swatch generation
-

To toggle on and off swatch generation for all nodes, click the
and
 buttons in the
Hypershade tab toolbar.
buttons in the
Hypershade tab toolbar.
When swatch generation is toggled off, you can enable swatch rendering for a specific node in your shader graph by right-clicking and selecting Refresh Swatch from the marking menu.
- View As Icons
-

Displays the swatches as icons with text.
When viewing swatches as icons, you can select the size: Small, Medium, Large or Extra Large.
- View As List
-

Displays the swatches as text only (a much more compact display). In large scenes with many shading elements (materials, textures, lights, for example), this option improves the performance of Hypershade.
When viewing swatches as a list, you can select the size: Small, Medium, Large or Extra Large.
- View As Small Swatches / As Medium Swatches / As Large Swatches / As Extra Large Swatches
-

small

medium

large

extra large
Customize the Hypershade by selecting the ideal size for your swatches.
Tip:You can dolly in the Hypershade tabs (using the Alt + Right mouse, or Alt + Left + Middle mouse) to flip through the swatch sizes.
- Sort By Name
-

Sorts the swatches alphabetically (A-Z).
- Sort By Type
-

Groups swatches together by type (Blinn, or Phong, for example), and sorts the groups alphabetically (A-Z).
- Sort By Time
-

Sorts swatches by their creation date and time (oldest to newest).
- Sort in Reverse Order
-

Use this option to reverse the sorting when you've specified Name, Type, or Time.
Tip:You can access the features on this toolbar via the View menu of the Hypershade menu bar.
Hypershade tab filter
Every scene tab (also called an Asset tab) in Hypershade has controls for filtering the nodes displayed in the tab (similar to the ones in HyperGraph).
By default, each scene tab has an implicit filter that is determined by the tab type specified when the tab was created (or by the default tabs when the scene was first created). The tab only displays nodes that pass this filter, and you cannot disable this filter. For example, a Materials tab shows only material nodes.
However, you can filter the nodes in a tab by name (in the text box) or by type (with the Show button). Use * as a wildcard.
At any given time, one or more of these filters can apply to each scene tab. Only nodes that pass all of the applied filters are displayed. You can clear filters at any time by clicking
 . The icon also reflects that filters have been applied. When no filters are applied, the icon appears as grey
 . .
. .
- Clear button
-
Click to clear any applied filters (beyond the implicit one) and return the tab to its default contents.
- The text box
-
Lets you type in a character string, which can be a regular expression, to specify by name the nodes to be shown. Only nodes whose name matches the character string are displayed in the tab.
Show button
Shows a menu from which you can select the types of nodes to be shown.
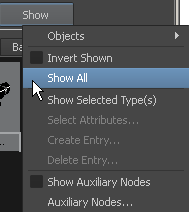
- Objects
-
Choose which object types to show. Select Clear Below to turn off all filters.
- Invert Shown
-
Reverse the filters so visible objects are invisible and invisible objects are visible.
- Show All
-
Turns off all filters in the Show menu.
- Show Selected Type(s)
-
Shows only object types of the same type as the current selection.
- Create Entry
-
Lets you save the current filter with a name.
- Delete Entry
-
Lets you delete a saved filter.
- Show Auxiliary nodes
-
Shows node types that are normally not shown because they are rarely needed (such as underworld nodes).
- Auxiliary nodes
-
Lets you set what nodes are considered "auxiliary".