You can clone an area of the texture (duplicate it) and then paint that sample elsewhere on the texture or on other textures. There are two cloning approaches: dynamic and static.
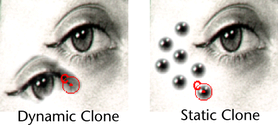
With dynamic cloning, the clone source moves as you paint. In the following DynamicClone example, a small area of the top eye was set as the clone source. Painting below the eye gradually reproduced the top eye. In the StaticClone example, the pupil was cloned and stamped.
To clone an area of the texture and paint with it
- In the Paint Operations section, click Reset Brushes to reset the brush settings. Resetting the tool is good practice to ensure you get expected results when you paint.
- In the
Paint Operations section, select the
ArtisanClone option.
The brush outline displays an X across it
 when you move the brush over the surface to indicate that you are unable to paint on the selected attribute texture until you set a clone source.
Maya automatically selects the brush profile selected when you last used the Clone operation. However if the last profile was a custom brush, the operation remembers only that it was a custom brush, not which custom brush. Changing the custom brush for one operation changes it for any other operation with the custom brush profile selected.
- Select a
Clone Brush Mode:
Dynamic or
Static.
By default, the Clone Brush Mode is set to Dynamic. With dynamic cloning, the cloned area changes as you paint, moving alongside your stroke and maintaining a constant distance from the stroke path. This is an effective way to copy areas from existing textures.
Select Static to keep the clone source stationary.
- Click Set Clone Source and click an area where you want to clone the texture. A brush outline stays on the area where you clicked.
- If the Clone Brush Mode is set to Dynamic, click another area on the texture to define the offset between the clone source and your paint stroke.
- Paint on the model where you want the cloned texture to appear. As you paint, the clone source moves alongside the stroke, maintaining the offset defined by your second click.
If you paint over the clone source during a stroke, the original paint sample is used for the rest of the stroke, but the next stroke uses the updated clone source paint sample.