
Depending on the editor from which you set these options, you may see a subset or all of the following attributes:
- Type
-
Click the arrow to choose a light type from the drop-down list. When you change a light’s type, only those attributes common to both types retain their previous values or settings. Values and settings for non-common attributes are lost. When you change a light’s light type, the light’s position is also preserved.
- Color
-
Set the color of the light. Click the swatch either to change the light’s color in the Color Chooser or to map a texture to the light. If you map a texture, the light projects it (depending on the light Type). The default setting is white. The following shows the rendered result when you map a Ramp texture to an Ambient light’s Color attribute.

- Intensity
-
Represents the brightness of the light. A light with an Intensity value of 0 produces no light. A light with a negative Intensity value removes light from a scene in the area of the light’s influence. The slider range is 0 to 10, but you can type in a larger value for a brighter light (for example, 20). The default value is 1.
Tip: Use a negative Intensity value to reduce or remove hot-spots or glare. - Illuminates by Default
-
If on, the light illuminates all objects and is included in the defaultLightSet. If off, the light only illuminates objects to which it is linked. Illuminates by Default is on by default.
- Emit Diffuse and Emit Specular
-
Emit Diffuse and Emit Specular are on by default. Turning them off turns off the diffuse or specular shading results for the light.
Note:The results do not show in the scene view. To see the results, test render in Render View.
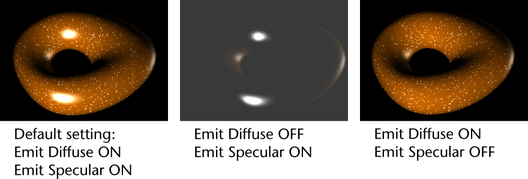
To enable or disable the diffuse and specular shading for multiple lights at the same time, use the Rendering Flags window (Windows > Rendering Editors > Rendering Flags).
- Light shape
-
This determines the volumetric shape of the light. Select a light shape from the drop-down list: Box, Sphere, Cylinder, or Cone. Sphere is the default.
- Cast Shadows
-
If on, the light produces depth map shadows (for directional, point, or spot lights) or raytraced shadows (for ambient lights). Cast Shadows is off by default. See also Shadow attributes.
Tip:- Depth map shadows are typically used for quick render tests when the quality is not important.
- Raytraced shadows produce more accurate results and can handle transparency, but can be slower.
- Shadow Color
-
The color of shadows produced by the light. Use a colored shadow to simulate shadows produced by transparent, colored surfaces (for example, colored glass). The default setting is black.
You can also map textures to shadows to create interesting effects. The following example shows a Checker texture mapped to the Shadow Color of a Spot Light.
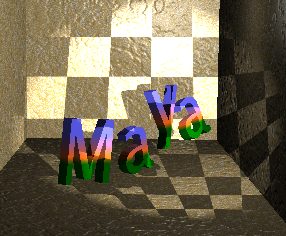
If you decide to map a texture that has color (such as the Stucco texture in the following example), change the texture’s color to black and white if desired.

Color Range
- colorRange
-
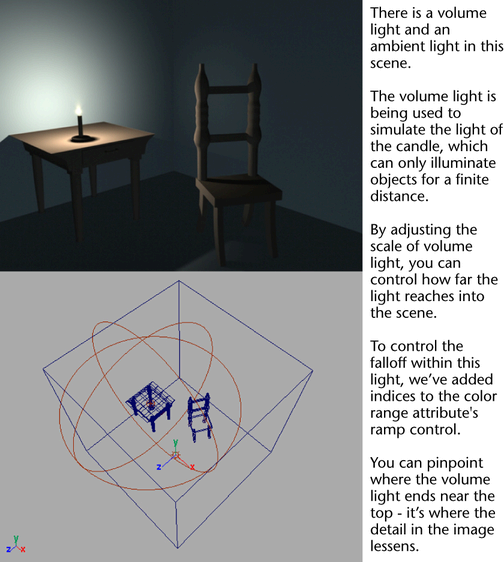
The colorRange is the color of the light from the center to the edge of the volume. By changing the values on the ramp (gradient) you can decay or change color along the defined light direction. The right side of the ramp represents the light color at the center of the volume. The left side is the color at the outer boundary. The effect of decay is accomplished by the interpolation (blend) from the inner color to the outer color. The outermost color should be black to avoid a hard boundary at the volume edge.
See Set attributes using ramps for more information on how to customize your ramp by adding additional color entries.
Tip:Advanced ramp features exist. For more information, see Ramp Shader.
- Selected Position
-
Position of the active color entry in the ramp.
- Selected Color
-
The color of the active color entry.
- Interpolation
-
Controls the way colors blend in the ramp. Select an option from the drop-down list: None, Linear, Smooth, Spline. The default is Linear.
- None: There is no interpolation; the different colors show up as different bands in the final texture.
- Linear: The values are interpolated linearly in RGB color space.
- Smooth: The values are interpolated along a bell curve, so that each color on the ramp dominates the region around it, then blends quickly to the next color.
- Spline: This takes into account neighboring indices for a smoother effect.
- Volume Light Dir
-
The direction of the light within the volume. Select an option from the drop-down list: Outward, Inward, Down Axis. The default is Outward.
- Outward: Light moves away from the center of a box or sphere and away from the central axis of a cylinder or cone. It behaves like a point light.
- Inward: The light direction moves towards the center of the light. This is a special effect that does not simulate an area light, but is instead a simple change in direction used for the light computation.
- Down Axis: The light direction is down the central axis of the light. It behaves like a directional light.
Note: Shadowing does not work properly for directions other than Outward. It always shadows as if from a point light.
Emit Specular has no effect on Inward lights.
- Arc
-
Use this option to create a partial sphere, cone, or cylinder light shape by specifying a degree of rotation. Values can range from 0 to 360 degrees. The most common settings are 180 and 360, the default. 180 is similar to slicing the light volume in half and 360 is the full light. This option does not apply to the box light shape.
- Cone End Radius
-
This option applies to the cone light shape only. This is the relative size of one end of the cone. At a value of 1.0 it is a cylinder, while at 0 it is a cone.
- Emit Ambient
-
If turned on, light affects surfaces in a multi-directional manner. The default is off.
Note: Emit Ambient may wash out shadows and look flat.When combined with Emit Diffuse, the lighting of a surface is 50% of the surface/light angle, and 50% in a non-directional fashion. If Emit Diffuse is off then the light is totally omnidirectional.
If Emit Diffuse and Emit Specular are off and Emit Ambient is on, the light behaves like an ambient light with decay and a bounded range. This is quite useful for adjusting lighting. It can be used with negative light intensity to pull light out of defined regions.
Penumbra
This section applies to cone and cylinder light shapes only. This contains attributes for managing the penumbra, the area of partial illumination around the shadow border and the light. Using the graph you can adjust the spread and the dropoff of the light. The left side of the graph represents the intensity at the outer edge of the cone or cylinder and the right side represents the intensity from the center of the beam to the edge.

- Selected Position
-
This value affects the active entry in the graph and is represented on the x-axis of the graph.
- Selected Value
-
This value affects the active entry in the graph and is represented on the y-axis of the graph.

- Interpolation
-
This controls the way the values are calculated. Select an option from the drop-down list: None, Linear, Smooth, Spline. The default is Linear.
- None: There is no interpolation; the different values show up as different bands in the final result.
- Linear: The values are interpolated linearly.
- Smooth: The values are interpolated along a bell curve, so that each value on the ramp dominates the region around it, then blends quickly to the next value.
- Spline: This takes into account neighboring indices for a smoother effect.
