The Color node is used customize the display of a MASH network's CPV data in the workspace for meshes created when the Geometry Type is set to Mesh. Because it uses CPV data, you must first turn on the Repro node's Color per vertex output, then display the MASH_ReproMesh's color attribute data () in order to see the colors in the workspace.
Color
- Color
- Determines the base diffuse color for the objects in the MASH network.
- UV Mesh
- Connect to add it.
- Color Set Name
- Random Hue
- Adds a random value to the Color attribute's hue.
- Saturation Random
- Adds a random value to the Color attribute's saturation.
- Value Random
- Adds a random value to the Color attribute's value.
- Random Seed
- Adjusts the randomization used by the Hue Random, Saturation Random, and Value Random attributes.
- Use Velocity
- Uses the Velocity multiplier provided by the Waiter. When this is enabled, objects moving more quickly will appear brighter.
- Blend Mode
- Specifies how
Color is applied to the objects in the MASH network. Options include:
- Normal: Current CPV data is overwritten with the Color values.
- Add: Color values are added to current CPV data.
- Subtract: Color values are subtracted from current CPV data.
- Multiply: Color values are multiplied by the current CPV data.
- Screen: Color and current CPV values are inverted, multiplied, then inverted again.
- Overlay: Combines Screen and Multiply mode. The net result is that existing CPV lights/darks are exaggerated.
- Enable Backgroud Color
- Sets the default color for any objects the Color attribute doesn't affect. This is most useful in combination with a Falloff Object to color objects outside the affected area.
UV Tile Settings
- UV Mode
- Determines the UV space for each mesh in the MASH network. For example, given the following MASH network
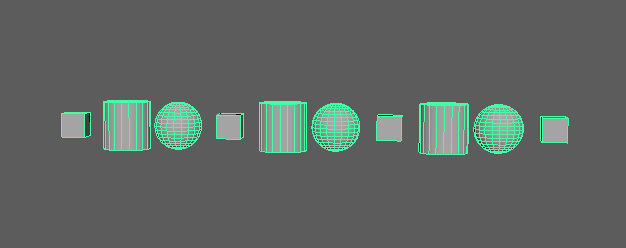
The available options would appear as follows:
- Pass Through
- UVs are placed in the same space as their source object, even if this means they overlap in 1,1 UV space.

- By ID
- The UVs corresponding to each object with a unique ID are placed side by side. UVs corresponding to objects with the same ID will overlap.

- Unique
- The UVs corresponding to every individual object are placed side by side.

- Limit Tiles
- Enables a hard limit on the number of UV tiles this node can use, denoted by the Tile Count.
- Randomize UVs
- Chooses a random UV tile for each point. Only works when UV Mode is set to Unique.
- Tile Count
- Determines the maximum number of UV tiles when Limit Tiles is enabled.
Strength
- Strength
- Fades the node's effect for all the points at the same time.
- Random Strength
- Smoothly fades the node's effect on all the points in a random order.
- Step Strength
- Turns the node's effect off one point at a time.
- Strength Map
- Determines the input file (2D texture, animated texture, etc) that controls the shape of this node's effect.
- Map Projection Axis
- Determines the axis along which the Strength Map is projected.
- Map Helper
- Displays the object being used to interactively place the
Strength Map in the scene. You can right-click the field to create a new helper object (a plane) if none exists. You can also middle-drag a mesh into this field or right-click to connect a selected mesh. If a mesh is already connected, you can also right-click to break its connection or show it in the Outliner.
Note: For the best results, assign the same texture to both the Strength Map and the Map Helper (this automatically happens when creating a new helper object).