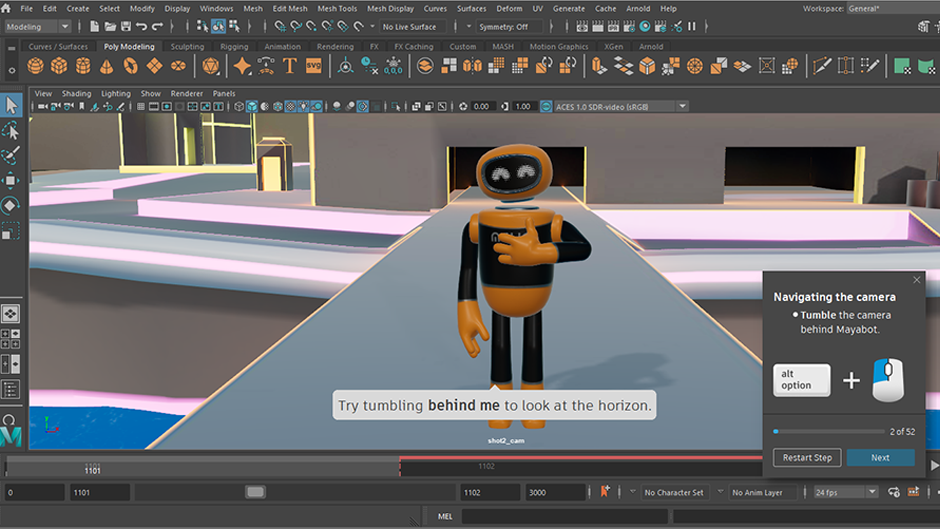
You can use the moverlay python module to display 2D overlays over top of Maya's UI. Situations where this might be useful include (but are not limited to):
- Displaying instructions for an interactive tutorial
- Pointing at UI elements
- Displaying hotkeys for a custom tool
Overlays in Maya are built using Qt and support most HTML tags, including images, animated gifs, styles, and tables. To see a more in-depth, interactive example of what's available, run the following code in a Python
Script Editor:
import moverlay
moverlay.mayaDemo.demoOverlays()
You can find moverlay in Python/Lib/site-packages in your install folder. You can also view the scripts included in the Interactive Tutorial Demo or Interactive Basics Tutorial to see more examples of 2D overlay code and usage.
Overlay examples
There are three pre-made types of 2D overlays:
| Overlay Type | Hello World example | Result |
|---|---|---|
|
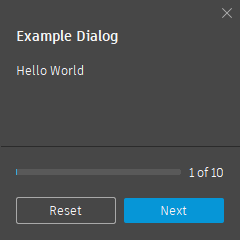
Progress Dialog: A two button dialog window designed as a tutorial controller. |
import moverlay as mo
from PySide2.QtCore import QPoint

def pressNext():
    print("Next was pressed")

def pressReset():
    print("Reset was pressed")

def pressClosed(dialog):
    manager.controller.deleteLater()

#create manager object and assign its controller
manager = mo.maya.overlayManager()
manager.controller = mo.progressDialog.ProgressDialog(manager.getMainWindow())

#Assign title and body text
manager.controller.setTitle("Example Dialog")
manager.controller.setBodyText("Hello World")

#Create buttons and attach them to appropriate procedures when clicked
manager.controller.setupButton(0, "Reset", pressReset)
manager.controller.setupButton(1, "Next", pressNext)
manager.controller.setCloseCallback(pressClosed)

#Create a progress bar with 10 steps
manager.controller.progressBar().resetSteps(1, 10)

#Re-size and position the controller
manager.controller.theDialog().resize(mo.utils.DPIScale(180), mo.utils.DPIScale(250))
manager.controller.theDialog().moveToScreenPos(QPoint(0, 0))

#Display the controller
manager.controller.showAndRaise()
|
 |
|
HIG Dialog: A no button dialog window designed for displaying hints or diagrams |
import moverlay as mo
from PySide2.QtCore import QPoint

def pressClosed(dialog):
    dialog.deleteLater()

#Create manager and dialog object
manager = mo.maya.overlayManager()
dialog = mo.higDialog.HIGDialog(manager.getMainWindow())

#Assign body text
label = dialog.setAsLabel('<h1>Example Dialog</h1><p>Hello World</p>')

#Assign close procedure
dialog.setCloseCallback(pressClosed)

#Re-size and position the dialog
dialog.theDialog().resize(mo.utils.DPIScale(180), mo.utils.DPIScale(250))
dialog.theDialog().moveToScreenPos(QPoint(0, 0))
dialog.theDialog().setFixedWidth(250)

dialog.showAndRaise()
|
 |
|
Bubble: A non-interactable word bubble that appears in a designated position. Note: To remove overlays, you can call overlayManager's deleteAll() procedure.
|
import moverlay as mo
from PySide2.QtCore import QPoint
from PySide2.QtCore import QSize
from PySide2.QtGui import QColor

#Create manager and overlay definition
manager = mo.maya.overlayManager()
od = mo.overlayDef.OverlayDef(QSize(300, 100))

#Position relative to screen center and apply the style and color
od.style = mo.enums.OverlayStyle.SpeechBubble
od.attachment = mo.enums.RelTo.Center
od.bgColor = QColor(217, 217, 217, 255)

#Create this overlay
overlay = manage.createOverlay(od)

#Assign body text
label=overlay.setAsLabel("""<h2>Hello World</h2><p style="color: #3C3C3C; font-size: 16pt; font-weight: normal;
font-style: normal; font-family: Artifakt Element">Lorem ipsum dolor sit amet, consectetur adipiscing elit,
sed do eiusmod tempor incididunt ut labore et dolore magna aliqua.</p>""")

#Add a word bubble tail
overlay.addSpeechBubbleTail(mo.enums.Direction.Top, 0.25)

#Display the overlay bubble
manager.showAll()
|
 |