To retime key movements in an animation, you can create retime markers in the FCurves pane, then drag them to adjust the timing of key movements.
To create retime markers:
- Select the object with animation.
- In the FCurves editor, select the channels (T, R, or S).
- In the FCurves toolbar, click
 .
This activates the Retime mode in the FCurves editor.
FCurves editor A. Retime Tool C. T and R channels selected
- Double-click on the FCurves pane to add retime markers around segments of the animation curves you want to retime.
Note: Add a single marker to reposition the marker or to ripple all animation out from a single point.

Single retime marker added A. Time bar (thin upper and lower part) to reposition the marker B. Handle (thicker middle part) to retime animation
- Add two or more markers to retime the time span between them.
For example, in the following figure, two markers are added at frames 5 and 20 to retime animation between them.

Retime markers A. Solid line between markers B. Delete icon
- To exit the retime mode, click
 .
.
When there are multiple retime markers, a solid line displays between each pair of markers. It indicates that dragging either marker affects any keys between the first marker and the next. Dragging two retime markers further apart slows the motion between them, and dragging them closer together speeds it up.
To delete a retime marker, click the Delete icon or double-click anywhere on the marker.
When you drag the marker, the timing of the animated object in the Timeline of Transport Controls window and in the scene loaded in the Viewer window is changed.
Locking time span between two markers
You can lock the time span between two markers to move the segment in time, without scaling or adjusting the shape of the curves within.
To lock the time span between two markers:
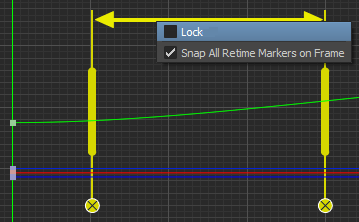
- Right-click the solid line that appears between two markers.
- From the context menu, select
Lock.


Locking a segment of animation is useful when you want to retime multiple keys together, without adjusting the shape of the curves. Once the segment is locked, drag the markers to shift the entire segment to a new location in time.
Snapping markers on the nearest frame
When you drag a marker, you can choose to snap it on the nearest frame or to maintain the last position of your movement. By default, all markers are snapped on the nearest frame to each marker.
To disable snapping of markers to the nearest frame:
- Right-click the solid line that appears between two markers.
- From the context menu, deselect
Snap All Retime Markers on Frame.
If you disable snapping, then the marker appears on the same frame where you created.
Inserting a key on a Retime marker
You can insert a key on all selected channels currently displaying under the retime marker.
To insert a key on a marker:
- Right-click anywhere on the marker.
- Select
Insert Key.
Note: In the retime mode, you cannot edit any keys or FCurves.Tip: In the retime mode, press Ctrl+Z to undo your last 10 actions.