Define a 2D shape as a stencil and project it through the part
There are three types of polygonal shapes you can use as a stencil:
- A free shape where you draw the contours as polylines yourself
- A circle (circular polyline contour)
- A rectangular polyline contour
Polygon cuts are projected through the depth of the part based on the current view perspective. Rotate the model after the stencil is created to see its projection.
To begin cutting
- From the main menu, choose
Modify >
 Cut > Free Cut.
- In the context view, switch to the
Polygon tab.
Tip: If you just click Modify > Cut, this is selected immediately.
- Click
 Create Polygon,
 Create Circle, or
 Create Rectangle.
Now use buttons


 in the context view to choose a function:
| Button | Function | Note |
|---|---|---|
| Create polyline
|
Create the cutting stencil as arbitrary polygonal line by successively adding more points. | |
| Create circle
|
Create the stencil as a circle with a centerpoint and a radius. | |
| Create rectangle
|
Create the stencil as a rectangle with a centerpoint, a width, a height, and a rotational angle. | |
| Edit edge
|
Opens the dialog to define matching features on all polygon edges for joining parts | Only available for arbitrary polygons |
| Select and position parts
|
Temporarily fixes the stencil and lets you move the part against the stencil | |
| Reset perspective to cutting direction
|
Changes perspective to look perpendicularly onto the cutting stencil | |
| Reset polygon
|
Clears all stencils |
To create a cut with a free shape
- Click points on the display to set the corner points for the cutting stencil. As soon as you have set the third point, the stencil is created. (If you need a flat cut, use
plane cut with limited width instead.),
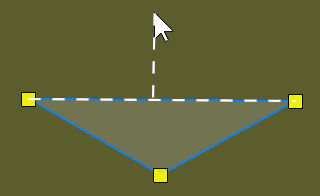
New points are always added above the perpendicularly nearest edge regardless of the order in which corner points were placed.
 Optional: To snap an edge to a multiple of 90°, hold Alt, then click on the edge near the point that should be moved.
- Optional: Adjust the depth of the cut. In the context view, activate
Cutting depth, then specify a depth by number or by dragging the yellow arrow. The depth is only avaliable for the free polygon cut.
- Click Cut to complete the cut.
You can save and load existing cutting stencils on the Load/Save tab to reuse the same geometry.
To configure a polygon cut edge
The edges of polygon cuts can be configured to create dovetail, jagged, or puzzle-shaped edges.
- Create the free-cut stencil first.
- To configure
all edges at once, click
Edit Edge in the context view.
To configure only specific edges, right-click the edge and choose
Edit Edge
- In the opening dialog, configure variant and shape.
- Click Apply to preview and produce the edited edge, and click OK to accept the settings and close the dialog.
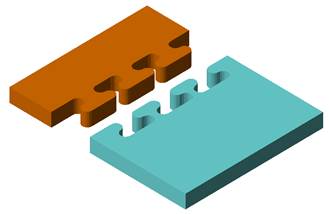
A cut with puzzle pins
To create a cylindrical cut
- Click a location in the display to create a circle.
- Drag the control points to adjust the position and radius of the circle. You can also use the controls in the context view.
- Click Cut to complete the cut.
To create a cuboid or rectangular cut
- Click a point in the display to create a rectangle. The center of the rectangle is positioned at this location.
- Drag the control points to adjust size and rotation of the rectangle. You can also use the controls in the context view to adjust the size.
- Click Cut to complete the cut.