Add Custom TimeLiner Rules
Open the TimeLiner window > Tasks tab, click Auto-Attach Using Rules
 .
.In the TimeLiner Rules dialog box, click New.
The Rules Editor dialog is displayed:
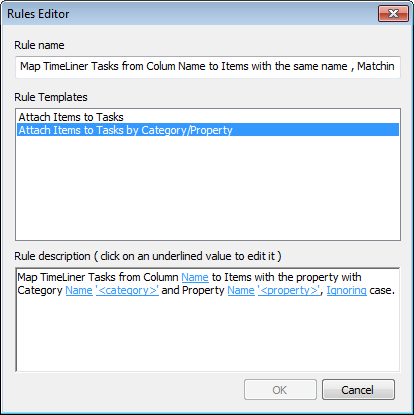
Enter a new name for your rule in the Rule Name box.
Note: If you choose not to enter a name, upon selecting a rule template the name of that template will be used.From the Rule Templates list, choose a template from which your rule will be based upon.
Note: The Attach Items to Tasks template is the one used for the first three pre-defined TimeLiner rules, that is, Items, Selection Sets, and Layers By Task Name.The Attach Items to Tasks by Category/Property template enables you to specify a property within the model scene. If a task has the same name as the specified property value in the model, then all items having that property will be attached to that task when you check the rule Attach Items to Tasks by Category/Property, and click Apply Rules.
In the Rule Description box, click on each of the underlined values to define your custom rule. The customizable values available with the built in templates are:
- Column Name. Choose which column in the Tasks Tab you want to compare Item names to. The default is the Name column, though you may also choose other available columns, for example one of the ten User columns, identified in the Field Selector Dialog Box.
- Items. Choose what you would like the value in the column to be compared to in the model scene. The default is Item name, though you may also choose either Selection Sets or Layers.
- Matching. Use case sensitivity and therefore only match names that are exactly the same. You may also choose Ignoring to ignore case sensitivity.
- Category/Property Name. Use the name of the category or property as it is displayed in the interface (recommended). You can also choose Internal Name which is that accessed via the API (for advanced use only).
- “
”. Choose from the available list, which category the property you wish to define is in. Only the categories that are contained in the scene are available in the drop down. - “
”. Choose from the available list, which property you wish to define. Again, only the properties in the scene within the chosen category will be available.
Click OK to add the new TimeLiner rule, or Cancel to return to the TimeLiner Rules dialog box.