Field Selector Dialog Box
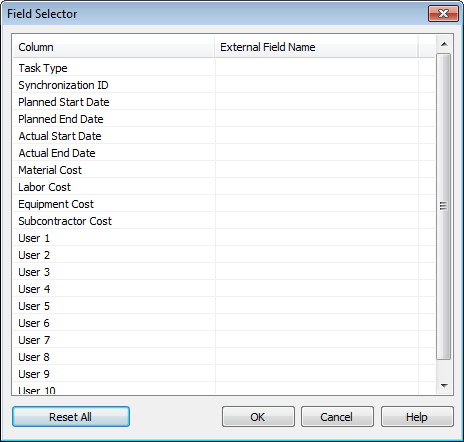
The Field Selector dialog box determines various options used when importing data from an external project schedule.
The options available may be different for each type of data source.

The Field Selector Dialog Box for importing data from an external scheduling software.

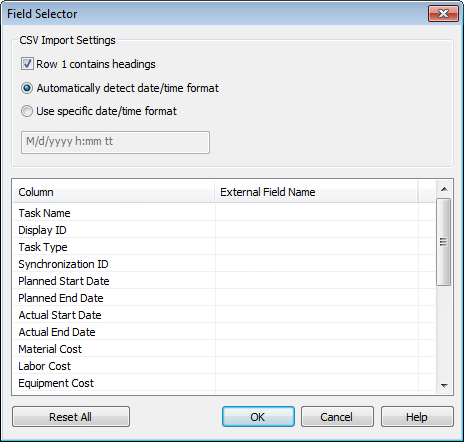
The Field Selector Dialog Box for importing CSV data
Options
CSV Import Settings
Row 1 Contains Headings
Select the Row 1 Contains Headings check box if you want the first row of data in your CSV file to be treated as column headings. TimeLiner will use it to populate the External Field Name options in the grid.
If the first row of data in your CSV file does not contain column headings, clear this check box.
Automatically Detect Date/Time Format
Select the Automatically Detect Date/Time Format option if you want TimeLiner to attempt to determine the date/time format used in your CSV file. First, TimeLiner applies a set of rules to try to establish the date/time format used in the document; if it is not possible, it uses the local settings on your system.
Use Specific Date/Time Format
Select the Use Specific Date/Time Format option if you want to manually specify the date/time format that should be used. When this radio button is selected, you can enter the required format into the box provided. See the list of valid date/time codes below.
The Field-Mapping Grid
The field-mapping grid is a grid containing, in the left column, all the columns from the current TimeLiner schedule and, in the right column, a number of drop-down menus enabling you to map the incoming fields to the TimeLiner columns.
Task Name
This field is shown and required when you import CSV data. If you do not map this field, you will receive an error message.
Synchronization ID
The field is used to uniquely identify each imported task. This allows synchronization to work even if major changes are made to the external schedule in the scheduling software. The default behavior is to use the most appropriate field for each source. Some sources do not have a well-defined unique id, in which case you may need to choose a field manually.
Task Type
The field is used to automatically assign Task Types to each imported task.
Display ID
This field is shown when you import CSV data. Data sources plugins may automatically map a Display ID if such an ID is present within the external scheduling software, but when importing a CSV this field must be mapped manually - it is not a required field. Fields mapped to Display ID either automatically or manually will appear in the Display ID column on the Tasks tab.
Planned Start Date
The field is used to identify a planned start date. This allows planned against actual comparisons to be made and simulated.
Planned End Date
The field is used to identify a planned end date. This allows planned against actual comparisons to be made and simulated.
Actual Start Date
Some project sources support multiple start dates for different purposes. The default behavior is to use the most appropriate available date for each source. This field may be used to define an Actual Start date, should it be different to that selected by default.
Actual End Date
Some project sources support multiple end dates for different purposes. The default behavior is to use the most appropriate available date for each source. This field may be used to specifically define an Actual End date, should it be different to that selected by default.
Material Cost
This field is used to automatically assign a material cost to each imported task.
Labor Cost
This field is used to automatically assign a labor cost to each imported task.
Equipment Cost
This field is used to automatically assign an equipment cost to each imported task.
Subcontractor Cost
This field is used to automatically assign a sub contractor cost to each imported task.
User 1 to 10
Ten user fields are available to link any custom data fields from the project source.
Reset All button
Use this button to clear all column mapping and also reset CSV import settings to their defaults, if appropriate.
Valid Date/Time Codes
d, %d
The day of the month. Single-digit days will NOT have a leading zero.
dd
The day of the month. Single-digit days will have a leading zero.
ddd
The abbreviated day name.
dddd
The full day name.
M, %M
The numeric month. Single-digit months will NOT have a leading zero.
MM
The numeric month. Single-digit month names will have a leading zero.
MMM
The abbreviated month name.
MMMM
The full month name.
y, %y
The year without the century. If less than 10, it will NOT have a leading zero.
yy
The year without the century. If less than 10, it will have a leading zero.
yyyy
The year in four digits, including the century.
h, %h
The hour in 12-hour clock format. Single digit hours will NOT have a leading zero.
hh
The hour in 12-hour clock format. Single digit hours will have a leading zero.
H
The hour in 24-hour clock format. Single digit hours will NOT have a leading zero.
HH
The hour in 24-hour clock format. Single digit hour will have a leading zero.
m, %m
The minute. Single-digit minutes will NOT have a leading zero.
mm
The minute. Single-digit minutes will have a leading zero.
s, %s
The second. Single-digit seconds will NOT have a leading zero.
ss
The second. Single-digit seconds will have a leading zero.
t, %t
The first character of the AM/PM designator, if any.
tt
The AM/PM designator, if any.
z
The GMT time zone offset (“+” or “-” followed by the hour only). Single-digit hours will NOT have a leading zero.
zz
The time zone offset. Single digit hours will have a leading zero.
zzz
The full time zone offset in hours and minutes. Single digit hours and minutes will have leading zeros. For example, “-8:00”.