Measure Distances Using the Measure Tools
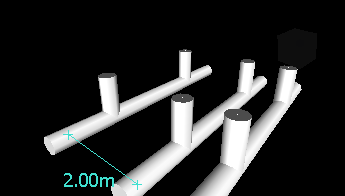
Measure a Distance Between Two Points
Click Review tab > Measure panel > Measure drop-down > Point to Point
 .
.Click the start and end point of the distance to be measured in the Scene View.
The optional dimension label displays the measured distance.
Keep the Same Start Point as you Measure a Distance Between Two Points
Click Review tab > Measure panel > Measure drop-down > Point to Multiple Points
 .
.Click the start point, and the first end point to be measured. A measuring line is displayed between two points.
Click to register the next end point to be measured.
Repeat this to measure additional end points if required. The optional dimension label always displays the last measured distance. Your start point stays the same throughout.
Tip: If you want to change the start point, right-click in the Scene View, and select a new start point.
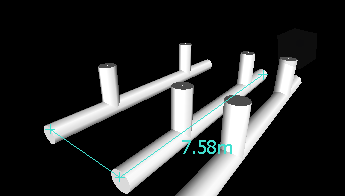
Measure a Total Distance Along a Route
Click Review tab > Measure panel > Measure drop-down > Point Line
 .
.Click the start and the second point to be measured.
Click the next point along the route.
Repeat this to measure the entire route. The optional dimension label displays the total distance along the selected route.
 Tip: If you want to change the start point, right-click in the Scene View, and select a new start point.
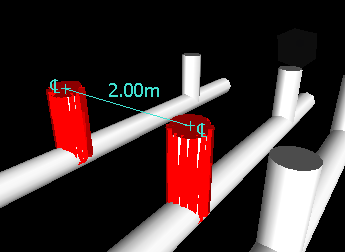
Measure the Shortest Distance Between Two Objects
Press and hold the CTRL key, and select two objects in the Scene View with the Select tool
 .
.Click Review tab > Measure panel > Measure Shortest Distance
 .
.The scene view automatically zooms to the measured area. The optional dimension label displays the shortest distance between the selected objects.
Measure the Shortest Distance Between Two Parametric Objects
Press and hold the CTRL key and select two parametric objects in the Scene View with the Select tool
.Open the Measure Tools window, and click Options.
In the Options Editor > Interface node > Measure page, select the Use Center Lines check box, and click OK.
Click Review tab > Measure panel > Measure Shortest Distance
.The Distance box, and the optional dimension label display the shortest distance between the center lines of the selected parametric objects.
Convert Measurements into Markups
Click Review tab > Measure panel, and take the desired measurements, for example, distance between two points.
Click Review tab > Measure panel > Convert to Markup
 .
.The end markers, lines, and dimension label (if any) of your current measurement are now converted to a markup, and stored in the current viewpoint.

Change the Thickness and Color of Measuring Lines
- Open the Measure Tools window, and click Options.
- In the Options Editor > Interface node > Measure page, enter the desired number into the Line Thickness box.
- Select the required color from the Color palette. By default, measuring lines are white.
- Click OK.
Clear measuring lines
- Click Review tab > Measure panel > Measure drop-down > Clear
 .
.