Use the options on the Lead ins tab of the Toolpath connections dialog to control the tool's movement before beginning a cutting move.
You can select a 2nd choice for the Lead in which is used if your 1st choice gouges. The settings in this page are not available for Vortex toolpaths.
This tab contains the following settings:
Choice — Select the type of move to use before each cutting move.
Linear move — Enter the length to extend the Lead in move before the cutting move starts. The distance is the length of the linear tangential move between the arc and the cutting portion of the toolpath. This option is available only for a Choice of: Surface normal arc, Vertical arc, Horizontal arc, Horizontal arc left, and Horizontal arc right.
Angle — Enter the angle of the Lead in move relative to the toolpath segment. For arcs, this is the angle spanned by the arc. For lines, it is the orientation relative to the cutting move. This option is available only for a Choice of: Surface normal arc, Vertical arc, Horizontal arc, Horizontal arc left, Horizontal arc right, and Straight.
Radius — Enter the radius of the Lead in arc move. This option is available only for a Choice of: Surface normal arc, Vertical arc, Horizontal arc, Horizontal arc left, and Horizontal arc right.
Length — Enter the length to extend the Lead in move before the cutting move starts. This option is available only for a Choice of: Extended move, Boxed, and Straight.
 Ramp options — Click to display the
Lead in Ramp Options dialog. This determines how the tool ramps into the stock. This option is available only for a
Choice of
Ramp.
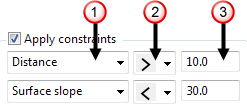
Apply constraints — Select this option to apply constraints to your leads and then select a constraint from the list. Selecting a constraint from the list creates an additional field to apply further constraints. 1st choice and 2nd choice links have a maximum of 2 constraints. If more than one constraint is selected they must all be satisfied for a link to be applied.
To apply constraints:

 Select a constraint type from the list:
- Distance — Constrain the link by its distance spanned.
- Surface slope — Constrain the link by the slope angle of the surface at either end of the link.
 Select an option from the list to define the constraint limit:
 — The constraint is satisfied if the parameter is less than the specified value.
 — The constraint is satisfied if the parameter is greater than the specified value.
 Enter the constraint value.
 — Click to copy the
Lead in values to the
Lead out page.
 — Click to copy the
Lead out values to the
Lead in page.
Separate first lead in — Select this option to specify a first lead in move that is different from the subsequent lead in moves.
Lead in extension — Select this option to add another lead in to existing lead ins. All choices are available except for Pocket centre.
Trim segments — When selected, segments are automatically trimmed where necessary to make space for lead in and lead out moves. If the lead moves cannot be added, the entire segment is trimmed away to improve the safety of the toolpath.
Overlap distance — Enter the distance by which a Lead in can overlap a closed toolpath segment.

Add leads at tool axis discontinuities — When selected, inserts leads and links between continuous segments where there is an angular change in tool axis between neighbouring segments. This ensures that any reorientation of the tool axis at a specific point takes place away from the part.
Angular threshold — Enter the minimum angle required before leads and links are inserted. The angle is the change in the tool axis between neighbouring segments.
Allow start points to be moved — When selected, this option moves the start points on closed toolpath segments to try and find a non-gouging position. When deselected, PowerMill will not move the start points - this means that if you carefully position a start point, you can prevent PowerMill from moving it.
Stagger start points — When selected, this option moves the start points on successive closed toolpath segments so that the start points are spread out on each segment. This allows the tool to maintain forward motion as it moves from one segment to the next.
Gouge check — Select this option for PowerMill to gouge-check all leads and links.
Apply lead ins — Click to update the lead in values to the active toolpath.
Apply — Click to apply the values to the currently active toolpath.
Accept — Click to accept the values on this dialog and closes the dialog.
Cancel — Click to close the dialog without updating the leads and links.