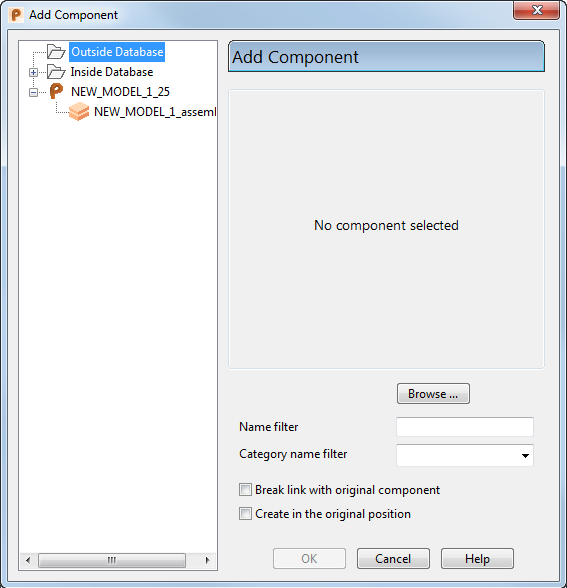
Use this dialog to add the selected component to the assembly. The tree in the left pane of the dialog reflects the assembly models you have open and the current working model.

- Use the tree in the left-hand panel to select a component or assembly from the current model.
- Browse — Use this button to locate components to add to the model. These components must be in inactive unopened models.
- Name filter — Enter a string to filter the list of models that appears in the
Inside Database and
Outside database folders.
For example, to display models that have a name starting with SHOE:
- Ensure that Inside Database and Outside Database are expanded.
- Enter SHOE* in Model name filter.
- Press Enter.
- Category name filter
— Use this drop-down list to filter component definitions by category name. The drop-down list contains all the category names found in the active model.
When you have selected a category name, the tree browser shows only those definitions where the category name matches the selected filter.
- Break link with original component — Use this option to retain or break the link with the original component definition when you add a component from the Component Library or another model.
Deselect this option to add the component definition to the assembly tree, with storing a copy of the component definition with the assembly. The 'linked' component definition is indicated by the
 in the assembly tree.
Select this option to create a copy of the component definition and store it with the assembly. The local component definition is indicated by the standard component definition
 icon in the assembly tree and it can then be used in the same way as any other component definition. If the component definition is modified in the originating assembly or in the Component Library, use the Refresh imported component definitions
 button to update the component definition in the current assembly.
Note: When the dialog is displayed, the initial status of this option is controlled by the Create local copy of component definition on the General page of Assembly options. If you change the status of the option within the Add Component dialog, the new status only applies for the component you are currently adding
 - Create in the original position — Select this option to locate the component in the position where the geometry was registered. This option is only active when you add a component using Assembly tab > Component panel > Add component.
Tip: This option is useful for component positioning in a multi-model assembly. Select this option to insert the new component in the same position as in its original model.
- Apply — Adds the component to the assembly. The component is added outside the bounding box of the existing components in the assembly. If the component is the first one added to the assembly, it is in the same position as its original solid.
If you are adding a parameterised component to the assembly, the Parameter List Editor dialog is displayed. You can use this to edit the values of the parameters. The dialog remains on the screen, so that you can add more components.
- OK — Closes the dialog.
Note: If you click Undo
 after adding components using the
Add component dialog, all the components you added using the dialog are deleted.