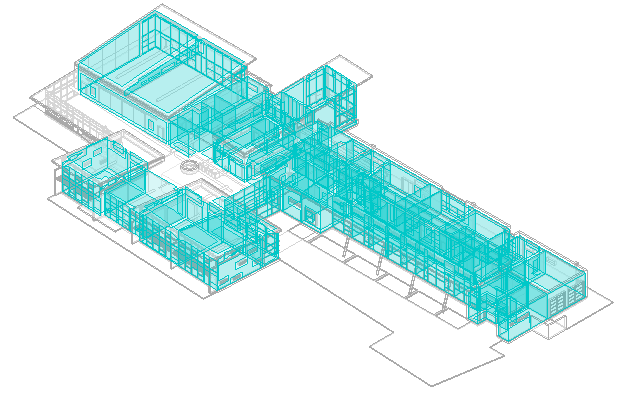
When you use the Create Energy Model tool, Revit creates 4 views to help you understand the geometry of the energy analytical model.
- Analytical Spaces view
- System-Zones view
- Analytical Spaces schedule
- Analytical Surfaces schedule
Use these views as follows:
- Before submitting the energy analytical model for analysis, examine the views to make sure the model is well defined and accurately reflects the design intent.
- When an energy simulation returns unexpected results, use the views to troubleshoot issues with the model. Consider modifying the model and adjusting the parameters for Analytical Space Resolution and Analytical Surface Resolution.
Analytical Spaces View
When you click Create Energy Model, Revit creates the energy analytical model and displays it in a 3D view named Analytical Spaces. The view is listed in the Project Browser under 3D Views.

The Analytical Spaces view uses settings in the Visibility/Graphics dialog to hide some categories of building elements and to apply 50% transparency to other model categories, such as floors and roofs. The view also displays analytical spaces laid over the building elements.
Use the view to understand how Revit interpreted the building elements to create the energy analytical model. You can pan, zoom, and rotate the energy analytical model to examine it closely.
To enhance your understanding of the energy analytical model, create duplicate views of the Analytical Spaces view and adjust the Visibility/Graphics settings. In one duplicate view, for example, you may want to hide all model elements (clear the Visibility check boxes for all items listed on the Model Categories tab) and display only analytical surfaces. (See Specify Element Category Visibility.) Examine these views to identify ways in which you can improve the building model to better support energy analysis or to troubleshoot the source of issues with the analysis results.
System-Zones View
A System-Zones view is also created and listed in the Project Browser under 3D Views. The System-Zones view displays the building elements the same way as the Analytical Space view, but displays the System-Zones instead of the Analytical Spaces.
Analytical Spaces Schedule
The Analytical Spaces schedule lists the individual analytical spaces in the energy analytical model. These spaces were created for the energy analytical model based on defined rooms in the building model and Revit elements that are room-bounding.
The schedule lists the area and volume of each space, as well as the total area and volume of the entire model. If an analytical space is based on a room, the room name is also listed.
Review the schedule, looking for the following:
- unexpectedly large or small spaces
- rooms whose area or volume is larger or smaller than expected
- total analytical space area and volume that are larger or smaller than expected (these numbers include ceiling voids)
To examine a particular analytical space, select it in the schedule and use the Highlight in Model tool to see it in the 3D Energy Model view.
Analytical Surfaces Schedule
The Analytical Surfaces schedule lists the individual analytical surfaces in the energy analytical model. These surfaces were created for the energy analytical model based on analytical spaces.
The schedule lists the area of each surface, the number of surfaces of that size, and the opening type (such as door or window) or the surface type (such as interior wall, exterior wall, roof, shade, ceiling, or slab).
Review the schedule, looking for the following:
- unexpectedly large or small surfaces
- surface types or opening types that do not match your expectations
- a total analytical surface area that is larger or smaller than expected
To examine a particular analytical surface, select it in the schedule and use the Highlight in Model tool to see it in the 3D Energy Model view.