Fix the height of a revision schedule to a user defined value.
By default, revision schedules use a variable height, so that the schedules can expand to accommodate all of the revisions for a sheet.
If needed, you can specify that a revision schedule has a fixed (user defined) height. On a sheet in a project, the schedule displays only the revisions that can fit in the allotted space. If the sheet refers to more revisions than can fit in the schedule, Revit shows the most recent revisions and omits the rest.
To specify a fixed height, modify the revision schedule in the title block family, and use the Height option of the Revision Properties dialog, as follows.
To define a fixed height for a revision schedule
- Open the title block for editing.
- Modify the revision schedule properties, as follows:
- In the Project Browser, under Views (all)
 Schedules, click Revision Schedule.
 - On the Properties palette, for Appearance, click Edit.
- On the Appearance tab of the Revision Properties dialog, for Height, select User defined.
- Click OK.
- In the Project Browser, under Views (all)
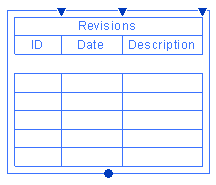
- In the drawing area, select the revision schedule of the title block.
The status bar displays Schedule Graphics : Schedule Graphics : Revision Schedule.
The bottom of the revision schedule displays a blue dot. Grid lines display to indicate the amount of space required for each row of revision information (assuming one line per revision row; in a sheet, long values wrap to the next line). In this mode, these grid lines display regardless of whether the revision schedule is set to display grid lines.
- Drag the blue dot up or down until the revision schedule is the desired height.
The blue dot indicates the bottom boundary of the revision schedule. If a sheet in a project has more revisions than can fit in this space, Revit omits the oldest revisions from the schedule.
- To save the title block, on the Quick Access toolbar, click
 (Save).
 - Load the title block into a project.