Learn about route analysis tools in Revit and the People Flow Toolkit add-on. These tools help you understand paths of travel in a building for exiting analysis and physical distancing requirements.
What is Route Analysis?
The route analysis tools were first introduced in Revit 2020. The tools allow you to select 2 points in a floorplan and calculate the shortest route between the 2 points. Route analysis settings control what categories in the model are considered obstacles during the analysis. The calculated path of travel uses a 300mm clearance avoiding the obstacles along the path. The path does not calculate along vertical distances, the path of travel must be all on one level.
For additional information on how a path of travel is calculated during route analysis, see: Path of Travel Calculations

Why should you use it?
- Travel Distance Limit - Travel distance to the nearest exit.
- Dead-End Limit - Length of a corridor with no exit.
- Common Path Limit - The portion of the exit access that must be traversed before two separate and distinct paths are available for exiting.
The examples shown in the videos refer to terms in the NFPA 101 Life Safety Code, but the same principles apply to other fire codes.
Maximum Travel Distance to Nearest Exit
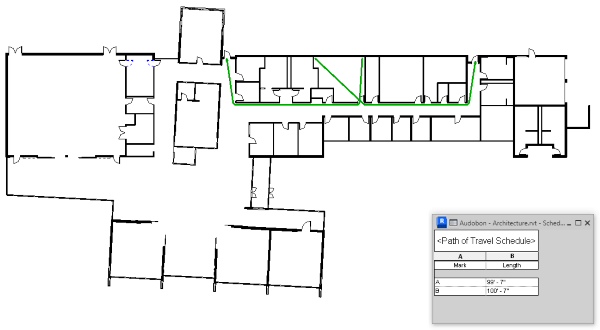
In most designs you are going to be able to identify which spaces will need to be evaluated for maximum travel distances. Use the route analysis tools to find the actual travel distance. In the video example, two path of travel lines are added to the most distant corners of the room farthest for the exits. A schedule is used to list the lengths of the travel lines. The schedule identifies path 'A' as the maximum distance to the nearest exit.
Path 'A' created by the route analysis tools goes diagonally through the room. In many cases this may not be a realistic path of travel based on the use of the room. In that case, you can add waypoints to a path of travel line making the calculated path more realistic to the use of the space. The video demonstrates adding a waypoints to path 'A'. This more accurately represents the exit path from the room once the classroom layout is considered.
Dead-End Limit
Examine plans for dead end corridor conditions that may exceed the length allowed by the fire code. Using the same plan from the previous videos, a design change has created a dead end condition. The video demonstrates using a path of travel to verify the length of the dead end condition. A view filter is added to the view to color the path of travel line red once its length exceeds the allowed value.
Common Path Limit
Multiple rooms or spaces can share a portion of an exit path, this is known as the "common path". Under fire codes common paths, as a portion of the overall exit distance, have limits to their length. Use the route analysis tools to reveal common paths in your design and revel if they are within the acceptable range for a common path.
Other Uses
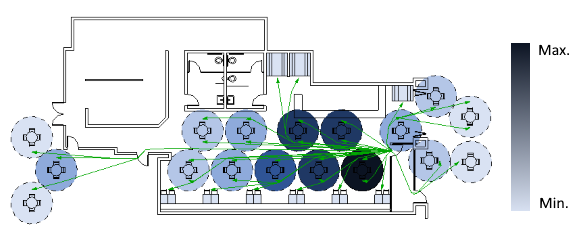
Exiting studies is the most obvious use of route analysis tools, but of course there are other uses. Traffic patterns, space uses and optimal routes between building uses are other places you can apply the route analysis tools. For example, as part of a physical distancing redesign of a restaurant you might analyze routes through the dining room to understand how frequently a table will be passed as other customers are seated.
To help you use route analysis for purposes beyond exiting, install and use the People Flow Toolkit. The add-on adds four tools that are used with route analysis to help you analyze how people move through building spaces. for additional information see: People Flow Toolkit
- Multiple Paths - Multiple routes between points for a path of travel are created simultaneously with a minimum separation distance.
- One Way Indicator - Places a family in the model to indicate the direction of travel. The family is respected by the path of travel calculations.
- People Content - Places a family in the model to represent occupancy of a space and block path of travel lines.
- Spacial Grid - Places a room based grid overlay to visualize spacial distancing in the room.

Where do you find the tools?
Route analysis tools were first introduced in Revit2020. The ability to add and remove waypoints was added in 2020.2. Route analysis tools are located on the Analyze tab of the ribbon. Waypoints are added to individual path of travel lines. Select an existing path of travel line and add/remove waypoints on the contextual tab of the ribbon. For more detailed learning content on route analysis tools see: Route Analysis.
The People Flow Toolkit is a Revit add-on and must be installed separately. The add-on can be installed to Revit2020.2 and later releases. Once the add-on is installed, the additional tools appear on the Analyze tab next to the route analysis panel.Download the People Flow Toolkit from your Autodesk account.