Use embedded schedules to show information about elements contained in room, spaces, or an MEP system.
What is an Embedded Schedule?
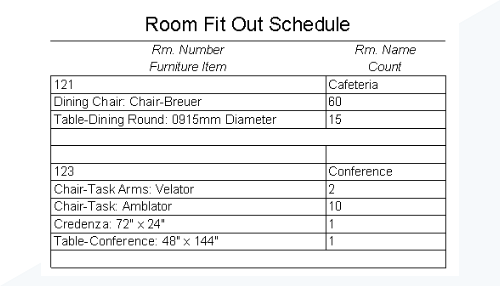
An embedded schedule allows you to create a schedule category inside of a schedule of another category. In order to create an embedded schedule the top level category needs to be room, space, duct systems, piping systems, or electrical circuits. In the example above, a furniture schedule is embedded into a room schedule.
Why should you use one?
When you need to schedule individual parts of a greater system or components that fall into a room or space use an embedded schedule. For example if you were working on a hospital and wanted to track all of the equipment in each patient room, you might create an embedded schedule for these items appearing in each room. You might create a schedule for all the air terminals in a duct system.
How do you create one?
- Create a schedule for spaces, duct systems, piping systems, or electrical circuits.
- On the Properties palette for the schedule, for Fields, click Edit.
- In the Schedule Properties dialog:
- Click the Embedded Schedule tab.
- Click Embedded Schedule.
- Select a category.
- Click the Embedded Schedule Properties button.
- In the Schedule Properties dialog (for the embedded schedule), select fields from the Available Fields list, and click Add to move them to the Scheduled Fields list.
You can use the Select available fields drop-down list to select fields from the category selected for the parent schedule and for the embedded schedule.
Use the Move Up and Move Down buttons to arrange the order of fields in the Scheduled Fields list and click OK in the dialogs.The fields selected for the embedded schedule appear below each line in the parent schedule.
Note: When inserting rows into an embedded schedule, each category will be available as a tab on the Select Fields dialog.