Learn how to adjust wall parameters and create slanted and tapered wall profiles.

Can I create slanted and tapered walls?
If you are working in Revit 2022, the answer is yes, slanted and tapered walls are possible.
Prior to the Revit 2021 release, walls could only be 90 degrees from the floor. It was possible to create a slanted wall, but you needed to either use the "Wall by Face" method or create an in-place family. In Revit 2021 the slanted wall feature was introduced so you could slant a wall towards the outside face or inside face based on the angle from vertical parameter. The entire wall would slant based on that value. This was a great addition expanding your options when creating walls, but there still was not a way to create a tapered wall. In a slanted wall. The interior and exterior faces of the walls remained parallel to one another, slanting the entire wall.
Revit 2022 expanded on the slanted wall functionality and allows you to create a tapered wall. In a tapered wall, the cross section allows you to independently set the interior and exterior angles for the wall faces, giving you the ability to taper the wall cross section.
Why should you use it?
Of course, the need for slanted and tapered walls will depend on the kinds of projects you design. Not every project calls for slanted or tapered walls, but the ability to create one when you need it is a good thing to have. Now you don't need to compromise designs because of the tool you are using. Just knowing you can create these elements if you need them is important.
How do you create a slanted or tapered wall?
- Select the wall, in the Properties Palette set the Cross-Section parameter.
Note: The wall structure must contain a variable layer to select a Tapered cross section. For additional information on setting a variable wall layer see: About Component Walls.
- Set the angle or angles for the wall slant/taper.
- Slanted - Set the Angle From Vertical parameter. Positive values angle the wall away from the exterior side of the wall, negative values angles the wall towards the exterior side of the wall. In the example image, the vertical face of the wall is shown as a dashed line
 left of the line is the exterior side of the wall. A positive value slants the wall away from the exterior
 and a negative value slants the wall towards the exterior
 .
.
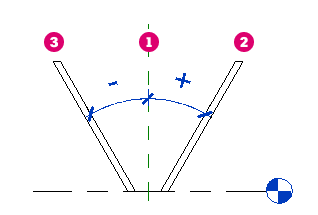
The video shows how to create a slanted wall.
- Tapered - Select Enable Angle Overrides (default type parameters can be set for tapered cross sections) and set the angle for the interior and exterior faces of the wall. If the type values for the angle are correct, just setting the cross section to tapered will apply the angles to the wall.
Positive angles will tilt the face's top edge toward the center of the wall. Negative angles will tilt the face's top edge away from the center of the wall. If the angles defined in a tapered wall cause the width of the variable layer to go below zero, the wall will not be able to be created and you will receive a warning. The angles will need to be changed, and/or the height of the wall will need to be altered.
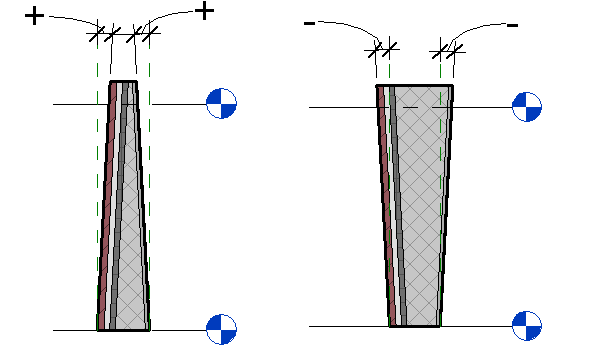
The video shows how to create tapered walls.
- Slanted - Set the Angle From Vertical parameter. Positive values angle the wall away from the exterior side of the wall, negative values angles the wall towards the exterior side of the wall. In the example image, the vertical face of the wall is shown as a dashed line
Additional Considerations
The wall structure must contain a Variable layer to make the "Tapered" cross section available. Once a variable layer is defined, additional type parameters are made available. The Default Exterior Angle, Default Interior Angle, and Width Measured At type parameters are used to set the default cross section of the wall if the Cross Section instance parameter is set to tapered.
The Width Measured At parameter determines how the angle of a tapered wall will be established. The Width of the variable layer will be measured at the chosen position. The angles set and the height of the wall will define the width of the wall at other points. It is possible to use an angle and height combination where the width of the variable layer becomes zero. If this happens you will receive a warning informing you the angles of the wall or the height of the wall need to change in order to prevent the wall width from dropping below zero.
For more information on using slanted and tapered walls see: Best Practices: Slanted Walls and Best Practices: Tapered Walls.