When adding walls, follow these best practices for successful modeling and to improve productivity.
- When creating the exterior walls of a multi-level building, use walls that extend from the lowest level to the highest level. Use multiple walls or stacked walls for material changes or changes in wall construction (wall type).
- To flip the orientation of the wall between exterior and interior, select the wall and click the blue flip controls that are displayed near it. The flip controls always are displayed on the side that Revit LT interprets as the exterior side.
- Walls do not automatically attach to other modelling components, such as roofs and ceilings. You must explicitly attach them using the Attach and Detach tools. See Attach Walls to Other Elements.
- As you draw a wall, you can offset it from the cursor by specifying a value for Offset on the Options Bar. You can specify to which location line the offset is measured.
- You can access wall type properties from the Project Browser. In the Project Browser, expand Families, expand Walls, expand a wall family, and right-click wall type. Click Properties to access the Type Properties dialog, where you can modify wall properties.
- If you rename or create a wall type, indicate the function in the name and specify the Function Type property (interior, exterior, foundation, retaining, soffit, or core-shaft) in the Type Properties dialog.
- The top constraint for interior partition walls is set, by default, to the level above.
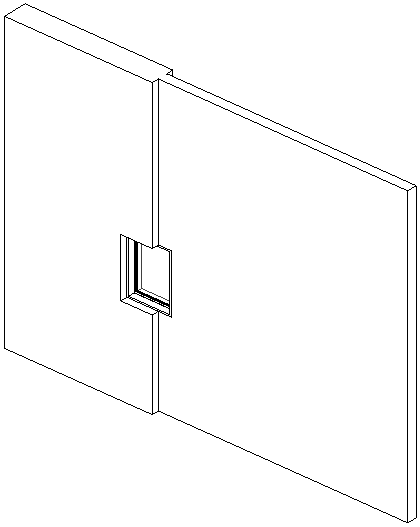
- You can drag inserts, such as windows and doors, between 2 walls.

Window placed at a join between 2 walls
- When an insert is placed between hosts of unequal thickness (as shown above), you can resize the thickness of the insert relative to its hosts. Select the insert and click Pick Primary Host. Select the host you want the insert to resize to match. The insert resizes to the selected host's thickness. If you later delete the host, you delete the insert as well.
- If you select Radius on the Options Bar, and then join the end of a straight wall to the end of another straight wall, a fillet is created between the walls at the specified radius.
- To improve performance:
- Avoid over-modeling or over-constraining the building model (and its walls) to keep the size of the project smaller and less complicated.
- Be judicious in showing wall layer information in views. Minimize the level of detail whenever possible.
Note: The Offset option is not supported when creating walls using the ellipse or partial ellipse Draw tools.