Use these procedures control lighting settings, such as dimming the lights or turning them on or off.
When you set the light levels in a 3D view for rendering, the settings are saved as part of the view properties for that view only. The light settings do not affect rendered images for any other 3D views. Use this method, for example, if you want to represent a ceiling light that is dimmed to create mood lighting in a rendered image.
If a lighting fixture is a nested family that is not shared, you cannot control individual light sources in the fixture. Instead, you turn the entire lighting fixture on or off.
To turn lights on or off
- Open a 3D view.
- On the View Control Bar, for Visual Style, select Online Rendering Options.
- In the Online Rendering Options dialog, under Lighting, for Scheme, select a setting that includes artificial lights.
- Click Artificial Lights.
- In the Artificial Lights dialog, under On/Off, select individual lighting fixtures or light groups to include them in the rendered image. Clear the check boxes to omit the lights in the rendered image.
You can also enter values in the Dimming column to dim individual lighting fixtures or entire light groups. Learn more about this in the "To dim lights" section, below.
- Click OK.
- To see the results, render the image.
To dim lights
- Open a 3D view.
- On the View Control Bar, for Visual Style, select Online Rendering Options.
- In the Online Rendering Options dialog, under Lighting, for Scheme, select a setting that includes artificial lights.
- Click Artificial Lights.
- In the Artificial Lights dialog, in the Dimming column, enter dimming values for light groups or individual lighting fixtures.
Enter a value between 0 and 1 to indicate the relative amount of dimming. A value of 1 means that the light is completely on (not dimmed). A value of 0 means that the light is completely dimmed (off).
Note: If a lighting fixture is a nested family that contains multiple light sources but is not shared, you cannot dim individual light sources in the fixture. - Click OK.
- To see the effects of dimming the lights, render the image.

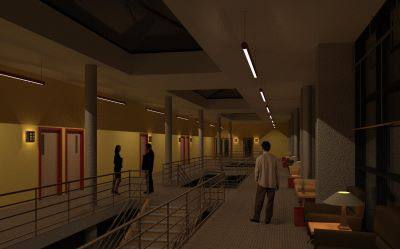
Dimming values set at 1 (100% light)
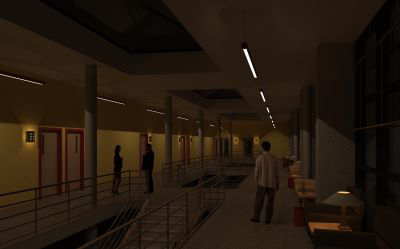
Dimming values set at 0.5 (50% light)
Dimming values set at 0.25 (25% light)