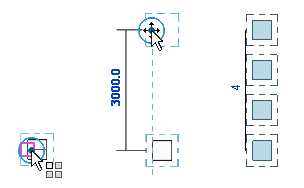
You can specify the distance between the elements in the array.
- Do one of the following:
- Select the elements to be copied in an array, and then click Modify | <Element> tab
 Modify panel
 Copy drop-down
 (Array).
 - Click Modify tab
 Modify panel
 Copy drop-down
 (Array), select the elements to be copied in an array, and then press Enter.
- Select the elements to be copied in an array, and then click Modify | <Element> tab
- On the Options Bar, click
 (Linear).
 - Select the desired options:
- Group And Associate: Includes each member of the array in a group. If not selected, Revit LT creates the specified number of copies and does not group them. Once placed, each copy acts independently of the others. Note: Group and Associate displays only when you are working in the Family Editor. It is not available when you are working in the project environment.
- Number: Specifies the total number of copies (of the selected elements) in the array.
- Move To:
- 2nd: Specifies the spacing between each member of the array. Additional array members appear after the second member.
- Last: Specifies the entire span of the array. Array members are evenly spaced between the first member and the last member.
- Constrain: Restricts movement of array members along vectors that run perpendicular or collinear to the selected elements.
- Group And Associate: Includes each member of the array in a group. If not selected, Revit LT creates the specified number of copies and does not group them. Once placed, each copy acts independently of the others.
- If you selected Move To 2nd, place array members as follows:
- Click in the drawing area to indicate a starting point for measuring.
- Move the cursor the desired distance between members. As you move the cursor, a box displays to indicate the size of the selected elements. The box moves along snap points. A dimension displays between the first click location and the current cursor position.
- Click again to place the second member, or type a dimension and press Enter.
- If you selected Move To Last, place array members as follows:
- Click in the drawing area to indicate a starting point for measuring.
- Move the cursor to the desired location for the last array member. As you move the cursor, a box displays to indicate the size of the selected elements. The box moves along snap points. A dimension displays between the first click location and the current cursor position.
- Click again to place the last member, or specify a dimension and press Enter.
- If you selected Group and Associate on the Options Bar, a number box displays, indicating the number of copies to create in the array. If desired, change the number and press Enter.
Revit LT creates the specified number of copies of the selected elements, and places them using the appropriate spacing.
Example
