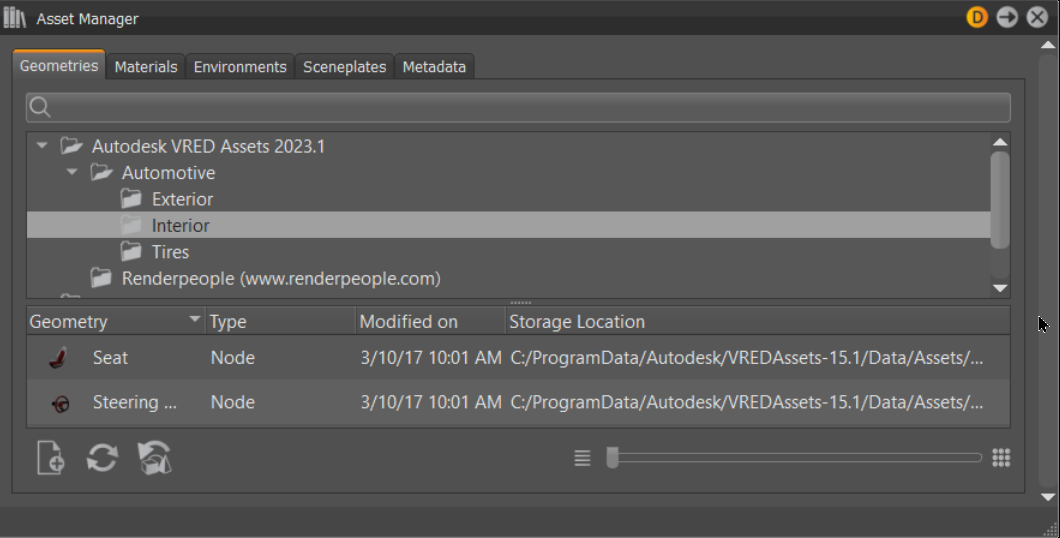
Asset Manager
Use the Asset Manager to manage items like scenes, environments, and materials across multiple projects. Several global assets stored anywhere on the network can be accessed, like from a local folder. It supports standardization throughout several projects or even across multiple departments within the company.

An individual asset can be locally stored, as well. When the module is activated the first time, a path to the user's local folder is already specified. As a result, you can start establishing a library immediately.
Content for the Asset Manager is a separate install from the VRED installer and must be installed. See Working with the Assets and the Asset Manager for instructions on where and how to install them.
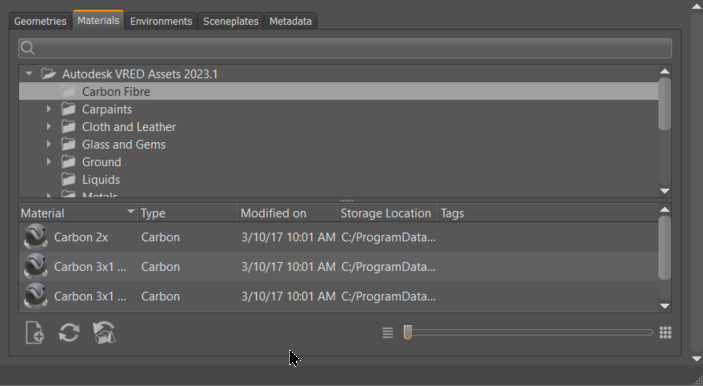
Each tab contains the assets and location of those assets for that category.
Use the Asset Manager section in Preferences to set up asset paths either for complete assets or for scenes, materials, and environments, individually.
How it Works
All items within the Asset Manager are externally-referenced files from preset libraries. These items are called assets. A geometry asset contains geometry; material and environment assets contain their type of content.
Use the Web Shops to download free 3D environments, 360° HDR and HDRI environments, and Substance materials, models, and lights.
After importing from the Asset Manager, the geometry asset appears in the Scenegraph, as a node or a substructure. When an object is referenced to the Asset Manager, its icon switches to an inverted green shape icon  . The material and environment representation from referenced assets gets an additional green indication in the lower left corner
  .
.
Preferences from such indicated assets are locked after creation. A Modify button located below the module's Icons Bar unlocks the asset and makes it editable. Click Save to apply the new settings to the references within the Asset Manager.
Material and Environment Assets
A Material asset saves the information of its applied environment. If this Material asset is added to a scene and if the applied environment is available in the scene, the environment will be applied to this material. If not, the Default Environment Switch will be used, instead.
This also works for old (prior 2015) assets because the information has always been saved, but not yet loaded.
Geometry Assets
When a geometry asset is applied to the Scenegraph, the node and all its children are initially locked. The “Asset Root”, the node marked with the green icon, is editable after the geometry asset has been dragged into the scene (for example, renamable, transformable). This root node is a node that has a reference to the Asset Manager and draws its children from the Asset Manager. The asset root’s children are locked and it is not possible to add, delete, or move them, as long as the asset is not unlocked for modifications (icon switches).
If the user adds an old asset (prior 2015) to the scene, which consists only of a single leaf node, an appropriate root node will be added automatically above the loaded node. These “old” geometry asset nodes are marked as modified because versions prior to VRED 2016 did not have node locking in the Scenegraph.
If one geometry asset is added multiple times, it will be treated as a clone. The child nodes of the asset root will be shared. The asset roots will be synchronized with each other. Nevertheless, it can be renamed or transformed individually.
Any external change on a referenced asset will be adapted to the scene, after reloading the affected asset. The context menu within the Scenegraph provides features to reload such references.
If one geometry asset is added multiple times and one is reloaded, only this one will be reloaded. The asset root node will not be changed. It will remain in position and name. Only its children will be updated/replaced by the ones loaded from the Asset Manager.
Tabs
Along the top of the Asset Manager, there are tabs for easily switching between managing assets for geometry, materials, environments, sceneplates, and metadata. All tabs have the same structure - tab name, file search, library folder tree, list of components, and a zoom slider.

Metadata sets from the Metadata Editor can be dragged onto any entry in a tab. This changes the tag into an asset metadata tag ![]() . To change an asset's metadata, see Editing Metadata.
. To change an asset's metadata, see Editing Metadata.
Search
A live search considers only the current tab. Once a folder is selected within the library folder tree, it is searched. An entered search string hides all assets not containing the string. The results appear in the table below. As of 2023.3, you can search by tag, which works well for materials.
Library Directory Tree
All asset paths, as configured in the Preferences, appear here. Select a folder to either import or store an asset from there.
Context Menu
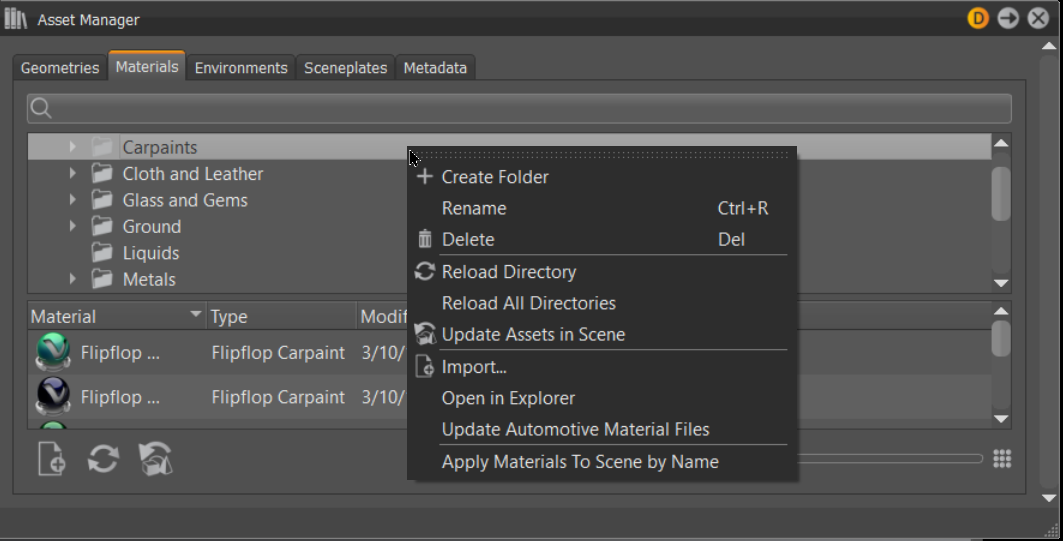
Right-click the folder structure in the upper part of the module to open a context menu that is the same in every tab.

 Create Folder - Adds a new folder or subfolder into the selected library. This is a tab-specific functionality. The new folder is created automatically in the Materials, Scenes, or Environments subfolder of the selected library. If the subfolder does not exist, it is created.
Rename - Changes the name of the selected subfolder.
 Delete - Removes the selected folder and all contained files.
 Reload Directory - Reloads the content or structure of the selected subfolder.
Reload All Directories - Reloads content from all Asset Manager paths.
 Update Assets in Scene - Updates all assets (geometry, materials, and environments) contained within the scene.
 Import - Imports external files into the selected folder. One of the shortcut icons at the bottom of the module makes the same feature quickly accessible.
Open in Explorer - Opens the selected folder within Windows Explorer.
Update Automotive Material Files - Reloads the automotive materials, to ensure you are working with the latest versions.
Apply Material To Scene by Name (folder context menu) - Replaces materials in the scene with material assets of the same name from the selected folder in the Asset Manager.
If there are no matching material names, nothing happens.
For example, there is a material named Red Plastic in the scene, and a Red Plastic also inside the selected material assets folder. The material Red Plastic in the scene will be replaced by the Red Plastic material from the Asset Manager.
List of Components
Contains thumbnails and detail information about the modify date, name, tags, and so on.
Click to select an asset and right-click to open the context menu.
List Context Menu
Right-clicking one of the listed items at the lower part of the Asset Manager module opens a context menu, which is slightly different per tab.

Add to Scene - Only available when the Environments or Geometries tab is selected. Adds the selected asset as a node, directly below the current scene root. Drag to add it to a custom location within the Scenegraph.
Add to Sceneplate Editor - Only available when the Sceneplates tab is selected. Adds the selected asset as an asset backplate or frontplate node in the Sceneplate Editor.
Add to Metadata Editor - Only available when the Metadata tab is selected. Adds the selected asset as an asset set node in the Metadata Editor. Find it in the Sets list or enter its name the basic search to find it in other lists.
Rename (Ctrl + R) - Enables you to change the name of a subfolder.
Add to Scene and Rename can only be found in the context menu for Scenes or Environments.
Apply to Selected Node - Only available when the Materials tab is selected. Uses the selected material on the previously marked node in the Scenegraph.
Apply to Scene by Name - Only available when the Materials tab is selected. Replaces materials in the scene with the same name with the selected material assets.
Only the materials tab provides the features Apply to Selected Node and Apply to Scene by Name.
Delete (Del) - Removes the selected item directly from library.
Note:Undo is not available for this action.
Select Directory - Selects the corresponding folder of the asset's location in the upper folder tree.
Open in Explorer - Opens the selected folder within Windows Explorer.
Icon Bar
At the bottom of the module window are three buttons and a slider for scaling the size of the asset thumbnails.
![]() Import - Opens the file browse dialog to import a new asset.
Import - Opens the file browse dialog to import a new asset.
![]() Reload Directory - Adapts any changes to the external asset library, once you have clicked.
Reload Directory - Adapts any changes to the external asset library, once you have clicked.
The following Python functions were added for Reload Directory in the Asset Manager:
reloadAllAssetDirectories()reloadAssetDirectory(path)
![]() Update Assets in Scene - Updates all assets contained within the scene.
Update Assets in Scene - Updates all assets contained within the scene.